【Linux】Rsync基于SSH认证的使用(rsync 命令属于1 v 4 的命令、rsync常用参数基本用法)
一、Rsync基于SSH认证的使用
rsync 默认使用 rsync 协议进行远程登录和数据传输,想使用ssh协议进行传输需要使用-e参数指定,并且远程主机需要开启 sshd 服务,rsync 在传输数据之前会先与远程主机进行一次 ssh 登录认证,然后通过 ssh 隧道进行数据传输。只需数据同步双方安装 rsync,但不必启动 rsyncd 服务。
可用 -e 选项指定协议:
rsync -r -e ssh /var/sysnc-src/ username@10.110.101.100:/var/rsync-dest
#指定通过ssh协议将/var/sysnc-src的数据递归同步到ip为10.110.101.100主机的/var/rsync-dest目录
也可省略 -e:
省略-e表示使用的是默认的rsync协议;
rsync -r /var/rsync-src/ username@10.101.11.11:/var/rsync-dest/
使用 ssh 认证与传输的缺点是不安全:
-
登录认证使用的账号是远程主机可登录的系统账号,且需要手动输入密码;
-
同步数据不受目录限制。
rsync 命令属于1 v 4 的命令
-
类似于 cp 命令 -- 实现本地备份传输数据
-
类似于scp 命令 -- 远程备份传输数据
-
类似于 rm 命令 -- 实现无差异同步备份
-
类似于 ls 命令 -- 本地文件信息查看
① rsync==cp
[root@backup ~]# cp -a /etc/hosts /tmp/
[root@backup ~]# ls /tmp/hosts
[root@backup ~]# rm /tmp/hosts
[root@backup ~]# rsync /etc/hosts /tmp/
[root@backup ~]# ls /tmp/hosts
/tmp/hosts
② rsync == scp
远程数据同步方式(类似scp)---又称为隧道传输

说明:需要进行交互传输数据。如果想实现免交互传输数据,需要借助ssh+key方式实现
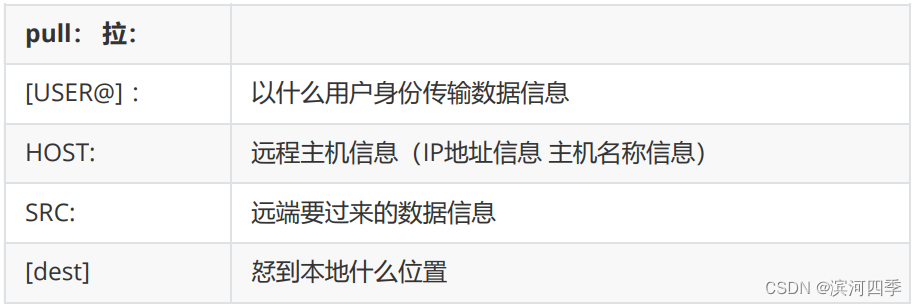

【实践操作】pull 拉
从远端拉文件到当前目录
[root@A~]# touch /tmp/1.txt
[root@B~]# rsync A:/tmp/1.txt .
root@A's password:
[root@B~]# ll
total 44
-rw-r--r-- 1 root root 0 Oct 11 16:16 1.txt
【实践操作】push推 (目录)
将本地的hosts文件推到远端服务器上
①使用push的格式 推整个目录(包括目录)
[root@NAT1 ~]# rsync -a ./sh 192.168.198.140:/root/111
[root@NAT1 ~]#


②推整个目录下的文件(不包括目录本身)
[root@NAT1 ~]# rsync -a ./sh/ 192.168.198.140:/root/222
[root@NAT1 ~]#

/sh --表示将sh目录本身及目录下的内容进行传输
 (等于将整个目录传输过去)
/sh/ --表示只传输sh目录下面的内容信息
③ rsync== rm
创建出来一次命令 进行操作
[root@NAT1 ~]# mkdir null_list
[root@NAT1 ~]# ll
total 4
drwxr-xr-x. 6 root root 4096 Feb 10 16:21 all2
drwxr-xr-x. 2 root root    6 Feb 10 16:21 null_list
drwxr-xr-x. 2 root root    6 Feb 10 16:23 txt
[root@NAT1 ~]# ls txt
cron.txt  employee.txt      files.txt  mytest.txt  output1.txt  sed3.txt  userinfo.txt
cut.txt   empnametitle.txt  grep.txt   num.txt     output.txt   test.txt
[root@NAT1 ~]# ls null_list/
[root@NAT1 ~]# rsync -a --delete null_list/ txt
[root@NAT1 ~]# ls txt
[root@NAT1 ~]#

创建一个空目录,使用空目录进行无差异同步,将null_list/的所有文件同步到txt/内,并删除txt目录下内多余的文件;因为null_list目录下没有任何文件,无差别同步后,txt目录下也就没有任何文件了。
④ rsync == ls -l
使用rsync 可以实现与 ls -l类似的功能;
注意:如果后面接目录,想要列出目录下的文件,要添加-r 参数;
接文件:
[root@NAT1 ~]# touch 1.txt
[root@NAT1 ~]# ls -l 1.txt
-rw-r--r--. 1 root root 0 Feb 10 16:32 1.txt
[root@NAT1 ~]# rsync 1.txt
-rw-r--r--              0 2023/02/10 16:32:15 1.txt
接目录:
[root@NAT1 ~]# ls -l full2/
total 0
-rw-r--r--. 1 root root 0 Feb 12 21:05 1.txt
-rw-r--r--. 1 root root 0 Feb 12 21:05 aa
-rw-r--r--. 1 root root 0 Feb 12 21:05 a.file
-rw-r--r--. 1 root root 0 Feb 12 21:05 bb
-rw-r--r--. 1 root root 0 Feb 12 21:05 b.file
-rw-r--r--. 1 root root 0 Feb 12 21:05 cc
-rw-r--r--. 1 root root 0 Feb 12 21:05 c.file
-rw-r--r--. 1 root root 0 Feb 12 21:05 dd
[root@NAT1 ~]# rsync -r full2/
drwxr-xr-x            101 2023/02/12 21:05:12 .
-rw-r--r--              0 2023/02/12 21:05:12 1.txt
-rw-r--r--              0 2023/02/12 21:05:12 a.file
-rw-r--r--              0 2023/02/12 21:05:12 aa
-rw-r--r--              0 2023/02/12 21:05:12 b.file
-rw-r--r--              0 2023/02/12 21:05:12 bb
-rw-r--r--              0 2023/02/12 21:05:12 c.file
-rw-r--r--              0 2023/02/12 21:05:12 cc
-rw-r--r--              0 2023/02/12 21:05:12 dd
[root@NAT1 ~]#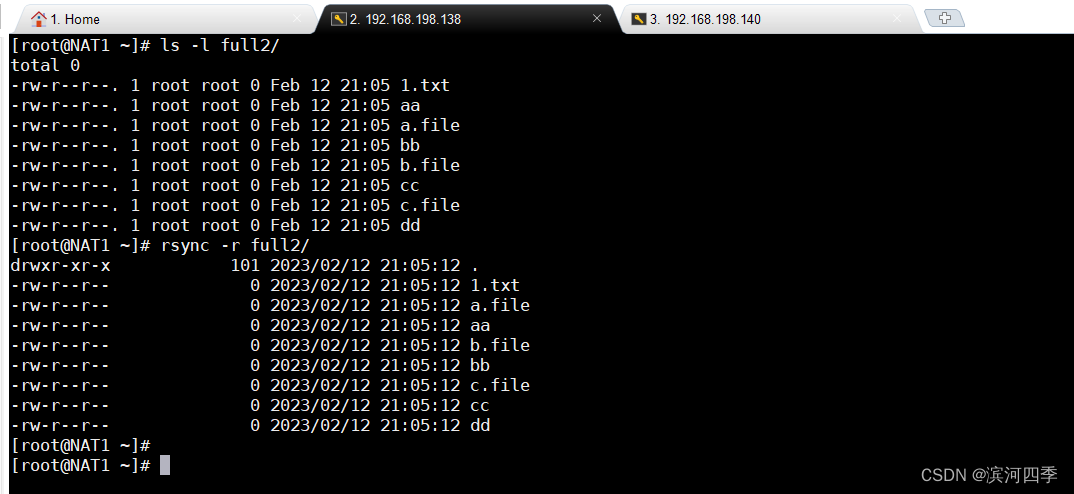
2、rsync常用参数基本用法
rsync 命令的基本格式有多种,分别是:
[root@localhost ~]# rsync [OPTION] SRC DEST
[root@localhost ~]# rsync [OPTION] SRC [USER@]HOST:DEST
[root@localhost ~]# rsync [OPTION] [USER@]HOST:SRC DEST
[root@localhost ~]# rsync [OPTION] [USER@]HOST::SRC DEST
[root@localhost ~]# rsync [OPTION] SRC [USER@]HOST::DEST
另外,以上几种格式中各个参数的含义如下:
-
SRC:用来表示要备份的目标数据所在的位置(路径);
-
DEST:用于表示将数据备份到什么位置;
-
USER@:当做远程同步操作时,需指明系统登录的用户名,如果不显示指定,默认为以 root 身份登录系统并完成同步操作。
针对以上 5 种命令格式,rsync 有 5 种不同的工作模式:
-
第一种用于仅在本地备份数据;
-
第二种用于将本地数据备份到远程机器上;
-
第三种用于将远程机器上的数据备份到本地机器上;
-
第四种和第三种是相对的,同样第五种和第二种是相对的,它们各自之间的区别在于登陆认证时使用的验证方式不同。
要知道,使用 rsync 在远程传输数据(备份数据)前,是需要进行登陆认证的,这个过程需要借助 ssh 协议或者 rsync 协议才能完成。在 rsync 命令中,如果使用单个冒号(:),则默认使用 ssh 协议;反之,如果使用两个冒号(::),则使用 rsync 协议。
ssh 协议和 rsync 协议的区别在于,rsync 协议在使用时需要额外配置,增加了
工作量,但优势是更加安全;反之,ssh 协议使用方便,无需进行配置,但有泄
漏服务器密码的风险。
-r 参数
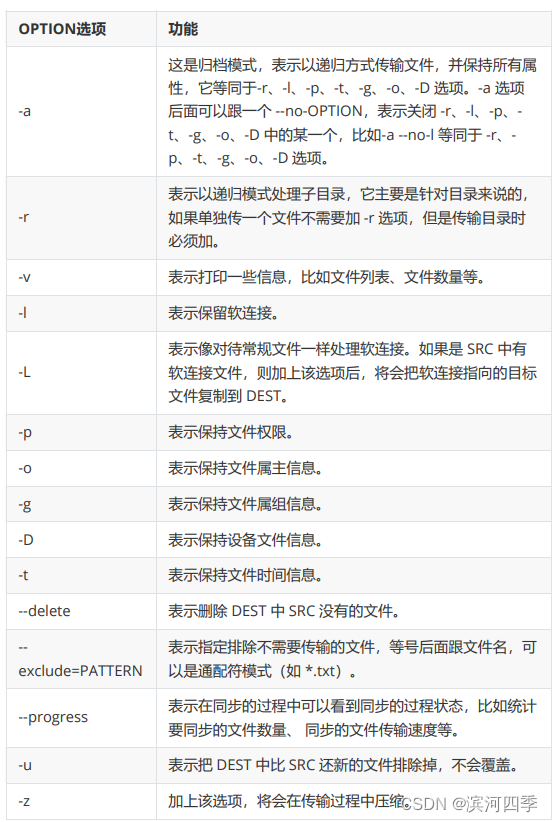
使用 rsync 命令时,可以作为 cp 和 mv 命令的替代方法,将源目录同步到目标目录;
语法:
rsync -r source destination
上面命令中, -r 表示递归,即包含子目录。注意, -r 是必须的,否则 rsync 运行不会成功。 source 目录表示源目录, destination 表示目标目录。
如果有多个文件或目录需要同步,可以写成下面这样。
rsync -r source1 source2 destination

上面命令中, txt 、 all2 都会被同步到 destination 目录。
-a 参数
-a 参数可以替代 -r ,除了可以递归同步以外,还可以同步元信息(比如修改时间、权限等)。由于 rsync 默认使用文件大小和修改时间决定文件是否需要更新,所以 -a 比 -r 更有用。下面的用法才是常见的写法。
rsync -a source destination目标目录 destination 如果不存在,rsync 会自动创建。执行上面的命令后,源目 录 source 被完整地复制到了目标目录 destination 下面,即形成了 destination/source 的目录结构。
如果只想同步源目录 source 里面的内容到目标目录 destination ,则需要在源目录后面加上斜杠。
rsync -a source/ destination上面命令执行后, source 目录里面的内容,就都被复制到了 destination 目录里面,并不会在 destination 下面创建一个 source 子目录。
举例:

-n 参数
如果不确定 rsync 执行后会产生什么结果,可以先用 -n 或 --dry-run 参数模拟执行的结果。
rsync -anv source/ destination上面命令中, -n 参数模拟命令执行的结果,并不真的执行命令。 -v 参数则是将结果输出到终端,这样就可以看到哪些内容会被同步。
举例:

只是预设了一下过程,并没有真的实现;
--delete 参数
默认情况下,rsync 只确保源目录的所有内容(明确排除的文件除外)都复制到目标目录。它不会使两个目录保持相同,并且不会删除文件。如果要使得目标目录成为源目录的镜像副本,则必须使用 --delete 参数,这将删除只存在于目标目录、不存在于源目录的文件。
(也就是让源目录的内容与目标目录相同,如果此时源目录为空,目标目录存在文件,使用--delete参数后,目标目录的文件就会全部删除,保持和源目录的内容一样,都为空)。
rsync -av --delete source/ destination如果在 DEST 中增加文件,而 SRC 中不包含这些文件,那么在使用 --delete 选项做同步备份操作时,DEST 新增的这些文件会被删除。例如:
[root@localhost rsync]# touch test2/4
[root@localhost rsync]# ls test1/
1 2 3
[root@localhost rsync]# ls test2/
1 2 3 4
[root@localhost rsync]# rsync -a --delete test1/ test2/
[root@localhost rsync]# ls test2/
1 2 3
-v 参数
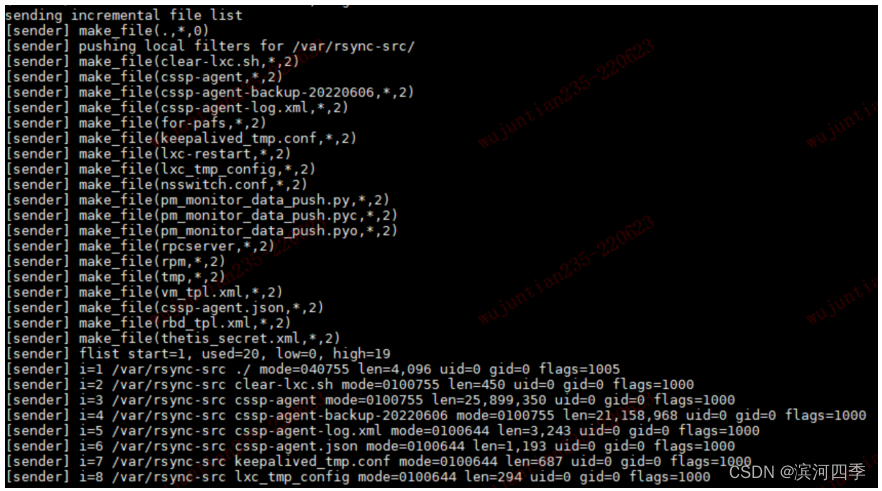
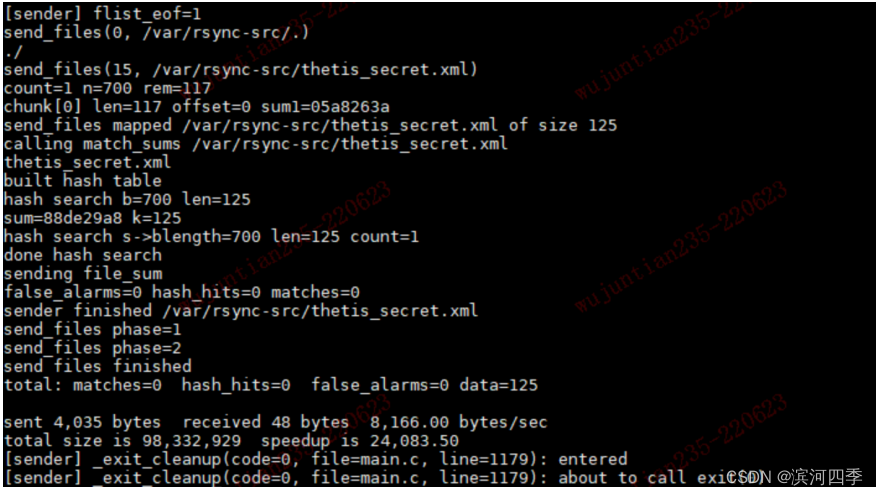
-v:显示同步过程中详细信息(文件列表)。可以使用"-vvvv"获取更详细信息。通常跟-a结合使用。

建立链接:

开始传送增量文件列表:(部分截图)
开始传送文件数据:(部分截图)

同步完成,输出统计信息:
--exclude 参数
有时,我们希望同步时排除某些文件或目录,这时可以用 --exclude 参数指定排除模式。
$ rsync -av --exclude='*.txt' source/ destination

# 或者

$ rsync -av --exclude '*.txt' source/ destination
上面命令排除了所有 TXT 文件。
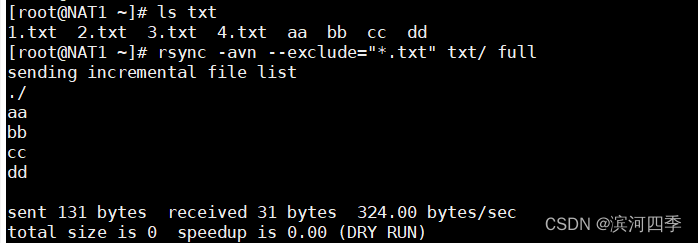
注意,rsync 会同步以"点"开头的隐藏文件,如果要排除隐藏文件,可以这样写 --exclude=".*" 。
①如果要排除某个目录里面的所有文件,但不希望排除目录本身,可以写成下面这样。
rsync -av --exclude 'dir1/*' source/ destination
②多个排除模式,可以用多个 --exclude 参数。
$ rsync -av --exclude 'file1.txt' --exclude 'dir1/*' source/ destination
排除了所有以txt和file结尾的文件,所以只同步了aa,bb,cc,dd四个文件;
③多个排除模式也可以利用 Bash 的大扩号的扩展功能,只用一个 --exclude 参数。
$ rsync -av --exclude={'file1.txt','dir1/*'} source/ destination
④如果排除模式很多,可以将它们写入一个文件,每个模式一行,然后用 --excludefrom 参数指定这个文件。
$ rsync -av --exclude-from='exclude-file.txt' source/ destination
--include 参数
--include 参数用来指定必须同步的文件模式,往往与 --exclude 结合使用。
$ rsync -av --include="*.txt" --exclude='*' source/ destination
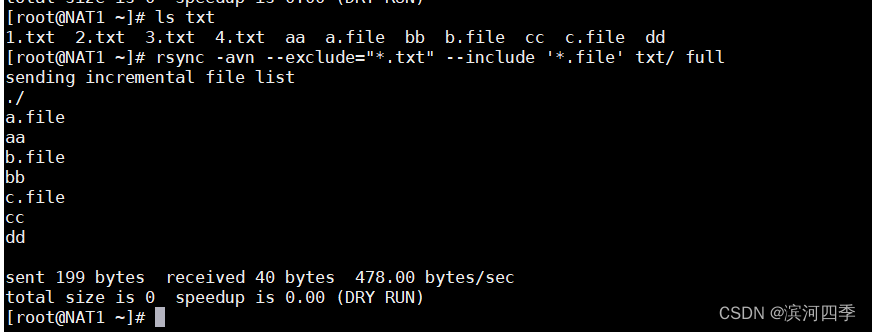
只排除了以txt结尾的文件
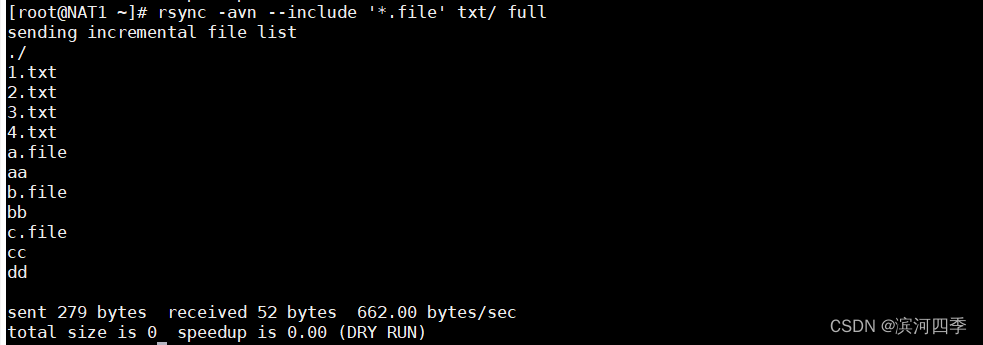
注意:如果你只写了--include="XXX",没有写exclude,那么它就会将源目录下的所有文件都同步到目标目录下。
