并发编程(高并发、多线程)
并发编程
- 1.并发编程
- 2.线程
1.并发编程
1.1 Java程序中怎么保证多线程的运行安全?(难度:★★ 频率:★★★★★)
1.1.1 并发编程三要素
首先我们要了解并发编程的三要素
- 原子性
- 可见性
- 有序性
1.原子性
原子性是指一个操作是不可分割的单元,要么全部执行成功,要么全部失败。
在并发环境中,多个线程可能同时访问和修改共享的数据,为了确保数据的一致性,需要确保一组相关的操作是原子执行的。
例如,如果多个线程同时尝试更新同一个变量,需要使用锁或其他同步机制来确保原子性。
2.可见性
可见性是指一个线程对共享数据的修改应该对其他线程是可见的
在多处理器系统中,每个线程可能在不同的处理器上执行,它们有各自的缓存。因此,对一个线程的修改可能不会立即被其他线程看到。为了确保可见性,需要使用同步机制,例如锁或volatile变量,来通知其他线程共享数据的变化。
3.有序性
有序性是指程序的执行应该按照一定的顺序来进行,而不是随机的。
在多线程环境中,由于指令重排等原因,线程执行的顺序可能与程序中编写的顺序不同。为了确保有序性,需要使用同步机制来保持程序的预期执行顺序。
1.1.2 原子性、可见性、有序性问题的解决方法
1.线程切换带来的原子性问题解决办法:
- 同步机制
使用synchronized关键字、ReentrantLock锁确保一段代码在同一时刻只能被一个线程执行 - 原子类
使用AtomicInteger、AtomicLong等, 原子类底层是通过CAS操作来保证原子性的 - 事务(数据库操作)
如果涉及到数据库操作,可以使用数据库事务来确保一系列操作的原子性。数据库事务通常在开始和结束时设置边界,确保整个操作在一个原子性的单元中执行。 - 乐观锁机制
在执行更新操作时检查数据是否被其他线程修改。如果数据未被修改, 允许更新; 否则执行冲突解决策略。这样可以避免线程切换导致的原子性问题。(存在ABA问题)
public class Example {
    private AtomicReference<Data> dataReference = new AtomicReference<>();

    public void updateData() {
        Data currentData = dataReference.get();
        // 在更新前检查数据是否被其他线程修改
        // ...
        // 更新数据
        dataReference.compareAndSet(currentData, newData);
    }
}
2.缓存导致的可见性问题解决办法
- 使用volatile关键字
使用volatile关键字来修饰共享的变量。volatile保证了变量的可见性,即当一个线程修改了volatile变量的值,这个变化对其他线程是立即可见的 - 使用synchronized关键字
使用synchronized关键字来保护对共享数据的访问, 确保在进入和退出同步块时, 会刷新缓存, 从而保证可见性。 - 使用Lock接口
显式地使用Lock接口及其实现类, 如ReentrantLock, 以及ReadWriteLock可以提供更灵活的同步控制,确保在锁的释放时将数据的变化同步到主内存。 - 使用JUC(并发工具)
java.util.concurrent包提供了一些用于并发编程的工具,例如Atomic类、CountDownLatch、CyclicBarrier等。这些工具通常会处理可见性问题,避免了手动进行同步的复杂性。
3.编译优化带来的有序性问题解决办法
- 使用volatile关键字
volatile关键字不仅保证了变量的可见性,还防止了编译器对被volatile修饰的变量进行重排序。volatile变量的读写都会插入内存屏障,防止指令重排序。 - 使用synchronized关键字或锁
使用synchronized关键字或锁也能够防止指令重排序,因为在进入和退出同步块时都会插入内存屏障,确保了代码块的有序性。 - 使用final关键字
在Java中,final关键字除了用于声明常量外,还可以用于修饰字段、方法和类。对于字段,final关键字可以防止字段的写入重排序。 - 使用happens-before规则
在Java中,happens-before规则定义了在多线程环境下操作的顺序。通过正确使用同步、volatile等机制,可以利用happens-before规则来确保代码的正确有序执行。 - 使用JUC(并发工具)
java.util.concurrent包中的一些工具类,如CountDownLatch、CyclicBarrier等,也可以防止编译器对代码进行过度优化,确保有序性。
1.2 Synchronized(难度:★★ 频率:★★★)
1.2.1 synchronized的三种加锁方法
// 修饰普通方法
public synchronized void increase() {

}

// 修饰静态方法
public static synchronized void increase() {

}

// 修饰代码块
public Object synMethod(Object a1) {
    synchronized(a1) {
        // 操作
    }
}
| 作为范围 | 锁对象 |
|---|---|
| 普通方法 | 当前实例对象(this), 对于Class类的不同实例, 它们的实力方法是独立的, 可以同时执行 |
| 静态方法 | 整个类的Class对象, 对于Class类的所有实例,同一时间只能有一个线程执行该静态方法 |
| 代码块 | 指定对象 |
1.2.2 提高synchronized的并发性能
- 减小同步块的范围: 尽量缩小使用 synchronized 保护的代码块范围,以减少线程持有锁的时间。只在必要的代码块上使用同步。
- 使用局部变量代替共享变量: 尽量使用局部变量而不是共享变量,这可以减小锁的粒度,减少竞争
- 使用读写锁: 如果读操作远远多于写操作,可以考虑使用 ReentrantReadWriteLock,以允许多个线程同时读取而不互斥。
- 考虑锁分离: 将对象的锁分离,使用不同的锁来保护对象的不同部分,从而减小锁的争用。
扩展问题: Synchronized修饰的方法在抛出异常时,会释放锁吗?
当一个线程执行一个被 synchronized 关键字修饰的方法时,如果发生异常,虚拟机会将锁释放,允许其他线程进入相同的方法或代码块。这样,其他线程有机会执行相应的同步代码,而不会被阻塞。
public class SynchronizedExample {
    private static int counter = 0;

    public synchronized void synchronizedMethod() {
        System.out.println(Thread.currentThread().getName() + " entering synchronizedMethod.");

        if (counter < 3) {
            counter++;
            System.out.println(Thread.currentThread().getName() + " Counter: " + counter);
            throw new RuntimeException("Simulating an exception.");
        }

        System.out.println(Thread.currentThread().getName() + " exiting synchronizedMethod.");
    }

    public static void main(String[] args) {
        SynchronizedExample example = new SynchronizedExample();

        // 创建两个线程调用同一个对象的同步方法
        Thread thread1 = new Thread(() -> {
            example.synchronizedMethod();
        });

        Thread thread2 = new Thread(() -> {
            example.synchronizedMethod();
        });

        thread1.start();
        thread2.start();
    }
}
扩展问题: synchronized 是公平锁还是非公平锁?
synchronized关键字默认是非公平锁。这意味着在多个线程竞争同一个锁的情况下,无法保证线程获取锁的顺序与线程请求锁的顺序一致。
非公平锁的特点是,当一个线程释放锁时,下一个要获得锁的线程是任意选择的,不考虑这个线程是否在等待队列中等待更长的时间。
1.3 volatile(难度:★★ 频率:★★★★)
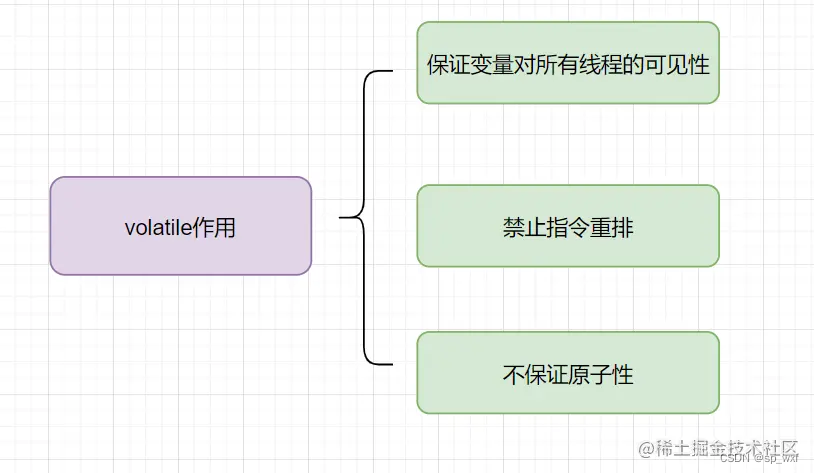
1.3.1 保证可见性
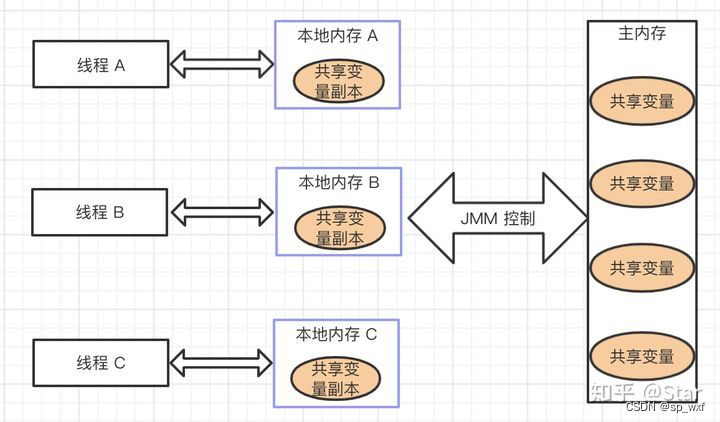
当一个变量被声明为volatile时,对该变量的读写操作都会直接在主内存中进行,而不会在线程的本地缓存中进行。这确保了一个线程对该变量的修改对其他线程是可见的。即使一个线程修改了volatile变量,其他线程立即看到的是最新的值。
public class VisibilityExample {
    private static volatile boolean flag = false;

    public static void main(String[] args) {
        // 线程 A
        new Thread(() -> {
            System.out.println("Thread A started");
            while (!flag) {
                // 在没有使用 volatile 的情况下,可能会陷入无限循环,因为 flag 的修改对线程 A 不可见
            }
            System.out.println("Thread A finished");
        }).start();

        try {
            Thread.sleep(1000); // 等待一段时间,确保线程 A 已经启动
        } catch (InterruptedException e) {
            e.printStackTrace();
        }

        // 线程 B
        new Thread(() -> {
            System.out.println("Thread B started");
            flag = true; // 修改 flag 的值
            System.out.println("Thread B set flag to true");
        }).start();
    }
}
知识扩展: 工作内存
工作内存是线程独享的内存区域, 线程在执行时会将主内存中的共享变量复制到自己的工作内存中进行操作, 然后再将修改后的值刷新回主内存, 这是为了提高性能和避免过多的主内存访问
这个过程会涉及到两个动作
- 读操作
当线程需要读取一个共享变量的值时,它首先从主内存中将这个变量的值读取到自己的工作内存中 - 写操作
当线程需要写入一个共享变量的值时,它首先将这个值写入到自己的工作内存中,然后再刷新到主内存中
1.3.2 禁止指令重排序
volatile 关键字还能够禁止虚拟机对指令的重排序,这是通过在生成的字节码中插入特殊的内存屏障指令来实现的。
- Load Barrier(读屏障): 在一个volatile变量的读操作前会插入一个读屏障,确保读取操作不会受到后续指令的影响。
- Store Barrier(写屏障): 在一个volatile变量的写操作后会插入一个写屏障,确保写入操作不会受到前面指令的影响。
这些屏障的存在确保了 volatile 变量的一致性语义。具体来说,对于一个 volatile 变量的读操作,读屏障会防止在读取之前的操作被移到读取之后,而对于一个 volatile 变量的写操作,写屏障会防止在写入之后的操作被移到写入之前。这种保证了对 volatile 变量的操作不会被重排序。
public class VolatileExample {
    private static volatile boolean flag = false;
    private static int value = 0;

    public static void main(String[] args) {
        // 线程1:写操作
        Thread writerThread = new Thread(() -> {
            value = 42;     // 写操作1
            flag = true;    // 写操作2
        });

        // 线程2:读操作
        Thread readerThread = new Thread(() -> {
            while (!flag) {
                // 等待flag变为true
            }
            System.out.println("Read value: " + value);  // 读操作
        });

        // 启动两个线程
        writerThread.start();
        readerThread.start();

        try {
            // 等待两个线程执行完毕
            writerThread.join();
            readerThread.join();
        } catch (InterruptedException e) {
            e.printStackTrace();
        }
    }
}
1.3.3 不保证原子性
即使一个变量被声明为volatile, 多线程对它进行读取和写入的操作仍然可能导致不一致的结果
public class ThreadTest {

    private static volatile int counter = 0;

    public static void main(String[] args) {
        Thread incrementThread = new Thread(() -> {
            for (int i = 0; i < 10000; i++) {
                counter++;  // 非原子性操作
            }
        });

        Thread decrementThread = new Thread(() -> {
            for (int i = 0; i < 10000; i++) {
                counter++;  // 非原子性操作
            }
        });

        incrementThread.start();
        decrementThread.start();

        try {
            incrementThread.join();
            decrementThread.join();
        } catch (InterruptedException e) {
            e.printStackTrace();
        }

        System.out.println("Final counter value: " + counter);
    }
}
由于自增和自减操作不是原子性的, 最终的结果是不确定的, 如果需要保证一系列操作的原子性,可以考虑使用锁或者使用 java.util.concurrent包中提供的原子类
public class ThreadTest {

    private static AtomicInteger counter = new AtomicInteger(0);

    public static void main(String[] args) {
        Thread incrementThread = new Thread(() -> {
            for (int i = 0; i < 10000; i++) {
                counter.incrementAndGet();
            }
        });

        Thread decrementThread = new Thread(() -> {
            for (int i = 0; i < 10000; i++) {
                counter.incrementAndGet();
            }
        });

        incrementThread.start();
        decrementThread.start();

        try {
            incrementThread.join();
            decrementThread.join();
        } catch (InterruptedException e) {
            e.printStackTrace();
        }

        System.out.println("Final counter value: " + counter);
    }
}
1.4 volatile和synchronized的区别(难度:★★ 频率:★★)
- volatile主要用于保证变量的
可见性和禁止指令重排序,但不保证原子性。适用于一个线程写入,多个线程读取的场景。 - synchronized用于
保证一段代码或方法的原子性,也能保证变量的可见性。适用于对共享资源进行安全访问和控制的场景。 - volatile的开销相对较低,适用于读多写少的场景;而 synchronized的开销较大,适用于读写操作都比较频繁的场景。
- volatile不会造成线程的阻塞;synchronized可能会造成线程的阻塞。
- volatile关键字是线程同步的轻量级实现,所以volatile性能肯定比synchronized关键字要好。但是volatile关键字只能用于变量而synchronized关键字可以修饰方法以及代码块。
1.5 死锁(难度:★★ 频率:★★★★★)
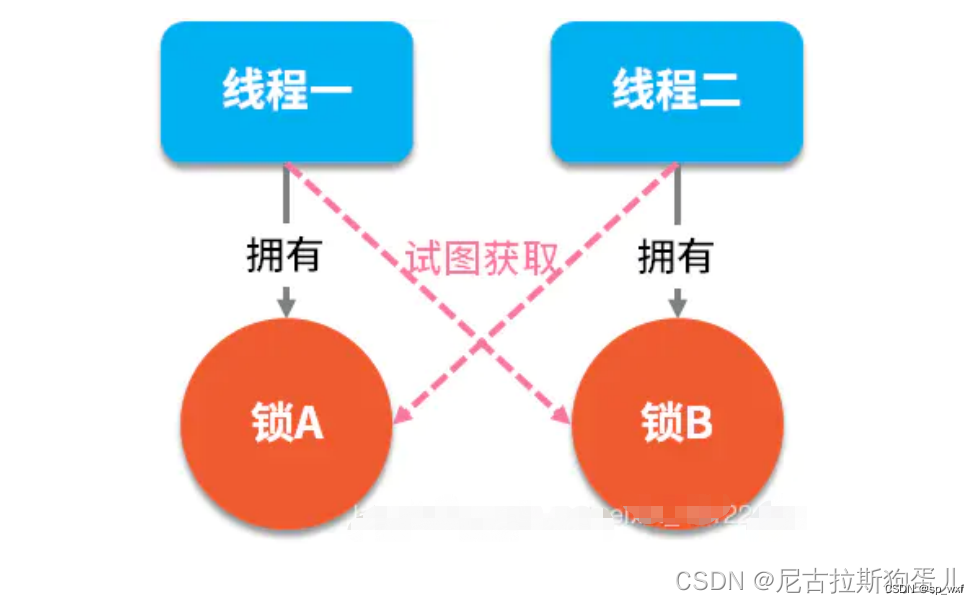
死锁是指在多进程或多线程系统中,每个进程(或线程)被互斥地持有一些资源,并等待获取其他进程(或线程)持有的资源,从而导致所有进程(或线程)都无法继续执行的状态。
简而言之,死锁是由于资源互斥和进程(或线程)之间的相互等待而造成的一种系统状态。
public class DeadLockDemo {
	private static String A = "A";
	private static String B = "B";

	public static void main(String[] args) {

		Thread t1 = new Thread(new Runnable() {
			@Override
			public void run() {
				synchronized (A) {
					// 休眠2秒,等待t2线程锁了B
					try {
						Thread.currentThread().sleep(2000);
					} catch (Exception e) {
						e.printStackTrace();
					}
					// 等待t2线程释放B
					synchronized (B) {
						System.out.println("BBBBBBBBBBBBb");
					}
				}
			}
		});

		Thread t2 = new Thread(new Runnable() {
			@Override
			public void run() {
				synchronized (B) {
					// 等待t1线程释放A
					synchronized (A) {
						System.out.println("AAAAAAAA");
					}
				}
			}
		});

		t1.start();
		t2.start();
	}
}
1.5.1 形成死锁的四个必要条件是什么
- 互斥条件:在一段时间内某资源只由一个进程占用。如果此时还有其它进程请求资源,就只能等待,直至占有资源的进程用毕释放。
- 占有且等待条件:指进程已经保持至少一个资源,但又提出了新的资源请求,而该资源已被其它进程占有,此时请求进程阻塞,但又对自己已获得的其它资源保持不放。
- 不可抢占条件:别人已经占有了某项资源,你不能因为自己也需要该资源,就去把别人的资源抢过来。
- 循环等待条件:若干进程之间形成一种头尾相接的循环等待资源关系。(比如一个进程集合,A在等B,B在等C,C在等A)
1.5.2 如何避免线程死锁
- 锁定顺序
确保所有线程按照相同的顺序获取锁。这样可以消除循环等待条件。例如,如果一个线程首先获取锁A,再获取锁B,那么其他线程也应该按照相同的顺序获取这两个锁。 - 锁定超时
引入锁定超时机制,即在请求锁的时候设定一个最大等待时间,如果超过这个时间还未获得锁,则放弃锁。这可以避免因为等待时间过长而导致的死锁 - 降低锁的使用粒度
尽量不要几个功能用同一把锁。 - 使用高级并发工具
使用Java并发包提供的高级工具,如java.util.concurrent包中的Executor、Lock、Condition等,这些工具提供了更灵活和安全的线程管理机制,能够降低发生死锁的概率。
2.线程
2.1 创建线程的几种方式(难度:★ 频率:★★★★★)
- 继承Thread类
- 实现Runnable接口
- 实现Callable接口
- 使用Executors工具类创建线程池
1.继承Thread类
public class ThreadTest {

    public static void main(String[] args) throws InterruptedException {
        // 继承Thread
        MyThread thread1 = new MyThread();
        thread1.start();

        // 匿名内部类
        Thread thread2 =new Thread() {
            @Override
            public void run() {
                System.out.println("Hello World 2");
            }
        };
        thread2.start();
    }
}

class MyThread extends Thread {
    @Override
    public void run() {
        System.out.println("Hello World");
    }
}
2.实现Runnable接口
public class ThreadTest {

    public static void main(String[] args) throws InterruptedException {
        // 继承Thread
        Thread thread1 = new Thread(new MyRunnable());
        thread1.start();

        // 匿名内部类
        Thread thread2 = new Thread(new Runnable() {
            @Override
            public void run() {
                System.out.println("Hello World 2");
            }
        });
        thread2.start();
    }
}
class MyRunnable implements Runnable {
    @Override
    public void run() {
        System.out.println("Hello World");
    }
}
3.实现Callable接口
Callable不能直接交给Thread来运行, 我们可以使用FutureTask包装Callable, 让它变成一个Runnable
FutureTask 是一个类,它实现了Runnable和Future接口
public class FutureTaskThreadDemo {
    public static void main(String[] args) {
        // 创建一个实现 Callable 接口的匿名类实例,该实例在 call() 方法中返回一个字符串
        Callable<String> callableTask = new Callable<String>() {
            @Override
            public String call() throws Exception {
                // 在这里执行你的任务,并返回结果
                String result = "Hello from Callable!";
                return result;
            }
        };

        // 使用 Callable 任务创建一个 FutureTask 实例
        FutureTask<String> futureTask = new FutureTask<>(callableTask);

        // 创建一个新线程,并将 FutureTask 作为参数传递给它
        Thread taskThread = new Thread(futureTask);

        // 启动新线程,这将执行 FutureTask 中的 Callable 任务
        taskThread.start();

        try {
            // 从 FutureTask 对象中获取计算结果,如果任务尚未完成,此方法会阻塞等待
            String result = futureTask.get();
            System.out.println("Result: " + result);
        } catch (InterruptedException e) {
            // 当前线程在等待过程中被中断时抛出 InterruptedException
            e.printStackTrace();
        } catch (ExecutionException e) {
            // 计算任务抛出异常时抛出 ExecutionException
            e.printStackTrace();
        }
    }
}
4.使用Executors工具类创建线程池
Executors提供了一系列工厂方法用于创先线程池,返回的线程池都实现了ExecutorService接口。
public static void main(String[] args) {
    ExecutorService executorService = Executors.newSingleThreadExecutor();
    MyRunnable runnableTest = new MyRunnable();
    for (int i = 0; i < 5; i++) {
        executorService.execute(runnableTest);
    }

    System.out.println("线程任务开始执行");
    executorService.shutdown();
}
2.2 runnable和callable的区别(难度:★ 频率:★★★)
| runnable | callable | |
|---|---|---|
| 返回值 | run()方法没有返回值, 因此任务执行完毕后无法返回任何结果 | call()方法可以返回执行结果,它使用泛型来指定返回类型 |
| 异常抛出 | run()方法不能抛出受检查异常,只能捕获并处理异常。 | call()方法可以抛出受检查异常,但调用方需要显式处理这些异常或声明抛出。 |
| 使用场景 | 适用于那些不需要返回结果的简单任务,例如线程池中的任务执行 | 适用于那些需要返回结果、可能抛出受检查异常的任务。通常与ExecutorService结合使用,可以通过Future对象获取任务执行的结果。 |
知识扩展: 异常抛出
- 不能抛出受检查异常
run()方法中抛出的异常, 无法在外部处理, 只能在方法内部捕获并处理, 这是处理异常的唯一方式
public class MyRunnable implements Runnable {
    public void run() {
        try {
            // 任务执行逻辑,需要在内部处理受检查异常
        } catch (Exception e) {
            e.printStackTrace();
        }
    }
}
- 可以抛出受检查异常
call()方法可以返回结果, 包括异常信息. 我们可以调用get()方法在外部捕获并处理异常
import java.util.concurrent.Callable;

public class MyCallable implements Callable<String> {
    public String call() throws Exception {
        // 任务执行逻辑,可以在这里声明抛出受检查异常
        return "Task completed";
    }
}
2.3 为什么是调用start(), 而不调用run()(难度:★ 频率:★★★★★)
- run()方法仅是用来存储线程执行逻辑, 直接调用run()方法, 只会在当前线程的上下文中执行, 而不会创建新的线程
- 调用start()方法, JVM就会调配资源, 启动一个线程并使线程进入了就绪状态, 当分配到时间片后就可以开始运行了。运行的过程中, 它会调用run()方法里的执行逻辑
总结: 调用start()方法启动线程并使线程进入就绪状态,而run()只是thread的一个普通方法调用,还是在主线程里执行。
2.4 Future(难度:★★ 频率:★★)
Future接口用于表示一个可能还没有完成的计算,允许在未来的某个时间点获取计算的结果。
Future常常配合Callable一起使用
Future<String> future =  Executors.newSingleThreadExecutor().submit(new Callable<String>() {
    @Override
    public String call() throws Exception {
        return "Hello World";
    }
});
以下是Future接口的主要方法:
2.4.1 Future的常用方法
1.获取结果
get()方法用于获取异步任务的结果。如果任务已经完成,它会立即返回结果;否则,它会阻塞直到任务完成。
// 用于获取计算的结果。如果计算尚未完成,调用get()方法的线程将被阻塞,直到计算完成。
V get() throws InterruptedException, ExecutionException;
// 在指定的时间内等待计算完成,并获取计算的结果。如果在指定的时间内计算未完成,将抛出TimeoutException
V get(long timeout, TimeUnit unit) throws InterruptedException, ExecutionException, TimeoutException;
2.检查任务是否完成
// 用于检查计算是否已经完成
boolean isDone();
3.取消任务
// 尝试取消计算任务。如果计算任务已经完成,或者由于其他原因无法取消,返回false。如果任务被成功取消,返回true。如果任务已经开始执行且参数mayInterruptIfRunning为true,则可能中断执行该任务的线程。
boolean cancel(boolean mayInterruptIfRunning);
4.处理异常
如果在执行过程中, 线程抛出异常, 使用 try-catch 块来处理异步任务中的异常。
try {
    String result = future.get();
    System.out.println(result);
} catch (InterruptedException | ExecutionException e) {
    e.printStackTrace();
}
2.4.2 Future的局限性
- 阻塞
Future的get()方法是阻塞的, 这意味着如果任务没有完成, 调用get()方法的线程将一直阻塞等待, 这可能导致程序的响应性变差,特别是在需要等待很长时间的情况下 - 取消困难
主要是因为异步任务的执行是在后台线程中进行的,而取消一个正在执行的线程可能会面临线程安全、资源释放等问题。这些挑战使得在实际应用中确保任务的可靠取消变得相对复杂。在一些情况下,可以通过使用CompletableFuture等更高级的工具来更灵活地处理取消和异常情况。 - 只能获取单个结果
Future只能表示单一的异步结果。如果需要处理多个并发任务的结果,可能需要使用更复杂的数据结构,比如CompletionService - 异常处理不灵活
Future的get()方法抛出异常,但这样的异常处理对于多个任务的情况可能不够灵活。每个任务的异常可能需要单独处理,而Future对于这种情况提供的支持相对有限。 - 缺乏通知机制
Future缺乏内置的通知机制,不能直接注册回调函数,因此在任务完成时无法直接执行某些操作。这使得编写异步代码相对复杂。
2.4.3 FutureTask
FutureTask是Future接口的一个实现,同时也是Runnable接口的实现,它允许异步执行任务,并且在任务完成时获取结果。
FutureTask通常结合ExecutorService一起使用,可以通过submit方法将它提交给线程池执行。此外,FutureTask还可以直接被用作Runnable,通过Thread的构造函数传递给线程执行。
在实际应用中,通常会通过FutureTask来封装一个异步任务,然后将其提交给ExecutorService执行。通过FutureTask,可以方便地获取任务的执行结果,同时也可以使用Future的特性,如取消任务等。
|  |  |
|--|--|
|  |  |

public class FutureTaskAndFutureExample {
    public static void main(String[] args) {
        // 创建一个 FutureTask
        FutureTask<String> futureTask = new FutureTask<>(() -> {
            // 模拟一个耗时的任务
            Thread.sleep(3000);
            return "Task completed";
        });

        // 创建一个线程池
        ExecutorService executorService = Executors.newFixedThreadPool(1);

        // 提交任务给线程池执行
        executorService.submit(futureTask);

        try {
            // 使用 Future 的方式获取任务结果
            Future<String> future = futureTask;
            String result = future.get();
            System.out.println("Result using Future: " + result);
        } catch (InterruptedException | ExecutionException e) {
            e.printStackTrace();
        }

        // 关闭线程池
        executorService.shutdown();
    }
}
2.5 CompletableFuture(难度:★★ 频率:★★★)
CompletableFuture是Future的一个实现, 它提供了更强大、更灵活的功能, 用于异步编程和组合多个异步操作的结果
2.5.1 异步执行
public static CompletableFuture<Void> runAsync(Runnable runnable)
public static CompletableFuture<Void> runAsync(Runnable runnable, Executor executor)
public static <U> CompletableFuture<U> supplyAsync(Supplier<U> supplier)
public static <U> CompletableFuture<U> supplyAsync(Supplier<U> supplier, Executor executor)
1.runAsync和supplyAsync的区别
- runAsync用于执行没有
返回结果的异步任务, 即Runnable任务, 并返回一个CompletableFuture<Void>, 表示任务执行完成后没有返回值
public static CompletableFuture<Void> runAsync(Runnable runnable)

CompletableFuture<Void> future = CompletableFuture.runAsync(() -> {
    // 异步执行的任务
    System.out.println("Task running asynchronously");
});
- supplyAsync用于执行
有返回结果的异步任务, 即Supplier任务, 返回一个CompletableFuture<U>,表示任务执行完成后将产生的结果。
public static <U> CompletableFuture<U> supplyAsync(Supplier<U> supplier)

CompletableFuture<String> future = CompletableFuture.supplyAsync(() -> {
    // 异步执行的任务,返回一个结果
    return "Task result";
});
2.Executor参数的作用?
Executor参数的作用是指定任务在哪个执行器(线程池)上执行。它提供了一种方式,使得你可以自定义异步任务的执行环境。
如果你不指定Executor, 任务将在默认的ForkJoinPool中执行,这是一个通用的线程池,适用于大多数场景
使用Executor参数的一个典型场景是在需要避免线程饥饿或者需要更灵活的线程管理时。
public class RunAsyncWithExecutorExample {
    public static void main(String[] args) {
        // 使用默认的 ForkJoinPool 执行任务
        CompletableFuture<Void> defaultExecutorFuture = CompletableFuture.runAsync(() -> {
            System.out.println("Running in default executor");
        });

        // 使用自定义的固定大小线程池执行任务
        Executor customExecutor = Executors.newFixedThreadPool(2);
        CompletableFuture<Void> customExecutorFuture = CompletableFuture.runAsync(() -> {
            System.out.println("Running in custom executor");
        }, customExecutor);

        // 等待任务完成
        defaultExecutorFuture.join();
        customExecutorFuture.join();
    }
}
默认的ForkJoinPool
ForkJoinPool.commonPool(), 这个线程池默认创建的线程数是 CPU 的核数(也可以通过 JVM option:-Djava.util.concurrent.ForkJoinPool.common.parallelism 来设置ForkJoinPool线程池的线程数)
如果所有CompletableFuture共享一个线程池,那么一旦有任务执行一些很慢的 I/O 操作,就会导致线程池中所有线程都阻塞在 I/O 操作上,从而造成线程饥饿,进而影响整个系统的性能。所以,强烈建议你要根据不同的业务类型创建不同的线程池,以避免互相干扰
2.5.2 获取异步执行结果
join()和get()方法都是用来获取CompletableFuture异步执行的返回值。
- get()
- join()
两者的区别:
- get()方法抛出的是经过检查的异常,ExecutionException, InterruptedException 需要用户手动处理(抛出或者 try catch)
get()方法会抛出 InterruptedException 和 ExecutionException 异常,因此需要进行异常处理。在实际应用中,通常需要处理这些异常,以确保对异步任务的正确处理。 - join()方法抛出的是uncheck异常(即未经检查的异常),不会强制开发者抛出。
join()方法不会抛出受检查异常,因此在使用时不需要处理异常,这使得代码更加清晰简洁。
总的来说,如果你不需要处理异常,并且可以确保异步任务不会抛出异常,那么使用 join() 方法可能更为方便。如果需要处理异常或者希望更细粒度地控制异常的处理,可以选择使用 get() 方法。
2.5.3 任务结束后执行方法
不关心前一个任务的结果,因此它不接受前一个任务的结果作为参数
1.thenRun
在当前CompletableFuture执行完成后, 执行一个Runnable操作, 它并不关心前一个CompletableFuture的结果
public CompletableFuture<Void> thenRun(Runnable action)
public CompletableFuture<Void> thenRunAsync(Runnable action)
public CompletableFuture<Void> thenRunAsync(Runnable action, Executor executor)
CompletableFuture<String> original = CompletableFuture.supplyAsync(() -> "Hello");
CompletableFuture<Void> result = original.thenRun(() -> System.out.println("Task completed"));
非Async方法和Async方法的区别
CompletableFuture<String> future = CompletableFuture.supplyAsync(() -> {
    System.out.println("Thread: " + Thread.currentThread().getName());
    return "Hello, CompletableFuture!";
});

// 使用thenRun
CompletableFuture run = future.thenRun(() -> {
    System.out.println("run Thread: " + Thread.currentThread().getName());
});

// 使用thenRunAsync
CompletableFuture runAsync = future.thenRunAsync(() -> {
    System.out.println("runAsync Thread: " + Thread.currentThread().getName());
});

// Ensure the program doesn't exit before the CompletableFutures complete
CompletableFuture.allOf(run, runAsync).join();
thenRun的回调函数在异步任务的执行线程上执行,因此在输出中你会看到Thread和run Thread的线程名称是一致的。thenRunAsync的回调函数会在默认的ForkJoinPool中的某个线程上执行,因此runAsync Thread的线程名称可能不同于Thread- CompletableFuture.allOf(…).join()用于等待所有的CompletableFutures完成,以保证程序不会在异步任务未完成时退出。
2.5.4 处理异步任务结果
2.5.4.1 转换结果
1.thenApply
任务完成后, 执行给定Function操作, 将任务结果转换为新的结果
public <U> CompletableFuture<U> thenApply(Function<? super T,? extends U> fn)
public <U> CompletableFuture<U> thenApplyAsync(Function<? super T,? extends U> fn)
public <U> CompletableFuture<U> thenApplyAsync(Function<? super T,? extends U> fn, Executor executor)
CompletableFuture<String> original = CompletableFuture.supplyAsync(() -> "Hello");
CompletableFuture<Integer> result = original.thenApply(s -> s.length());
2.thenCompose
thenCompose 方法用于组合两个异步操作, 把其中一个操作的结果作为另一个操作的输入参数, 该函数返回一个新的CompletableFuture,该CompletableFuture代表两个阶段的组合
public <U> CompletableFuture<U> thenCompose(Function<? super T, ? extends CompletionStage<U>> fn)
public <U> CompletableFuture<U> thenComposeAsync(Function<? super T, ? extends CompletionStage<U>> fn)
public <U> CompletableFuture<U> thenComposeAsync(Function<? super T, ? extends CompletionStage<U>> fn, Executor executor)
CompletableFuture<String> future1 = CompletableFuture.supplyAsync(() -> "Hello");
// thenCompose 接受一个返回 CompletableFuture<U> 的映射函数
CompletableFuture<Integer> future2 = future1.thenCompose(s -> CompletableFuture.supplyAsync(() -> s.length()));
3.whenComplete
任务完成后, 执行给定BiConsumer 操作, 该操作接收异步操作的结果和可能的异常作为参数, 它不返回新的结果,而是返回原始的
public CompletableFuture<T> whenComplete(BiConsumer<? super T,? super Throwable> action)
public CompletableFuture<T> whenCompleteAsync(BiConsumer<? super T,? super Throwable> action)
public CompletableFuture<T> whenCompleteAsync(BiConsumer<? super T,? super Throwable> action, Executor executor)
CompletableFuture<String> future = CompletableFuture.supplyAsync(() -> {
   // Simulate some computation
    int i = 1 / 0;
    return "Hello, CompletableFuture!";
}).whenComplete((result, exception) -> {
    if (exception == null) {
        System.out.println("Result: " + result);
    } else {
        System.out.println("Exception: " + exception.getMessage());
    }
});
4.handle
public <U> CompletableFuture<U> handle(BiFunction<? super T, Throwable, ? extends U> fn)
public <U> CompletableFuture<U> handleAsync(BiFunction<? super T, Throwable, ? extends U> fn)
 public <U> CompletableFuture<U> handleAsync(BiFunction<? super T, Throwable, ? extends U> fn, Executor executor)
CompletableFuture<String> future = CompletableFuture.supplyAsync(() -> {
    // some operation that may throw an exception
    throw new RuntimeException("Exception occurred!");
});

CompletableFuture<String> resultFuture = future.handle((result, ex) -> {
    if (ex != null) {
        return "Default Value";
    } else {
        return result;
    }
});
thenApply、thenCompose、whenComplete的区别
- thenApply用于将异步操作的结果映射为新的值,并返回新的CompletableFuture
- thenCompose用于处理嵌套的异步操作,接收一个返回CompletableFuture<U> 的映射函数。
- whenComplete用于执行一些操作,无论异步操作成功还是失败,不返回新的结果。
thenCompose的优点
- 灵活性
thenCompose 允许你在转换函数中返回一个新的 CompletableFuture,这样你可以继续定义后续的异步操作,形成更复杂的异步操作链。这使得你可以更灵活地组合多个异步操作。
CompletableFuture<String> future = CompletableFuture.supplyAsync(() -> "Hello");

CompletableFuture<Integer> result = future.thenCompose(s -> {
    System.out.println("Transforming Thread: " + Thread.currentThread().getName());
    return CompletableFuture.supplyAsync(() -> s.length())
        .thenCompose(len -> CompletableFuture.supplyAsync(() -> len * 2));
});
在这个例子中,thenCompose 允许我们在转换函数中定义另一个异步操作,而不是只能返回简单的值。
- 扁平化结果
thenCompose 的结果是扁平化的,即最终的 CompletableFuture 不会包含嵌套的 CompletableFuture 结构。这样可以避免多层嵌套,使代码更清晰。
CompletableFuture<String> future = CompletableFuture.supplyAsync(() -> "Hello");

CompletableFuture<Integer> result = future.thenCompose(s -> {
    System.out.println("Transforming Thread: " + Thread.currentThread().getName());
    return CompletableFuture.supplyAsync(() -> s.length());
});
在这个例子中,thenCompose 返回的 CompletableFuture 直接包含了最终的转换结果,而不是嵌套的 CompletableFuture。
总的来说,thenCompose 更适合处理多个异步操作的组合,特别是当你需要根据前一个阶段的结果定义后续的异步操作时,以及希望结果扁平化的情况。
2.5.4.2 消费结果
1.thenAccept
任务完成后, 执行给定Consumer操作, 消费任务的结果
public CompletableFuture<Void> thenAccept(Consumer<? super T> action)
public CompletableFuture<Void> thenAcceptAsync(Consumer<? super T> action)
public CompletableFuture<Void> thenAcceptAsync(Consumer<? super T> action, Executor executor)
CompletableFuture<String> original = CompletableFuture.supplyAsync(() -> "Hello");
CompletableFuture<Void> result = original.thenAccept(s -> System.out.println("Result: " + s));
2.5.5 两个结果组合
1.thenCombine
public <U,V> CompletableFuture<V> thenCombine(CompletionStage<? extends U> other,BiFunction<? super T,? super U,? extends V> fn);
public <U,V> CompletableFuture<V> thenCombineAsync(CompletionStage<? extends U> other,BiFunction<? super T,? super U,? extends V> fn);
public <U,V> CompletableFuture<V> thenCombineAsync(CompletionStage<? extends U> other,BiFunction<? super T,? super U,? extends V> fn, Executor executor);
CompletableFuture<String> future1 = CompletableFuture.supplyAsync(() -> "Hello");
CompletableFuture<String> future2 = CompletableFuture.supplyAsync(() -> " World");

// 组合两个异步操作的结果,并返回新的结果
CompletableFuture<String> result = future1.thenCombine(future2, (s1, s2) -> s1 + s2);
2.thenAcceptBoth
public <U> CompletableFuture<Void> thenAcceptBoth(CompletionStage<? extends U> other, BiConsumer<? super T, ? super U> action)
public <U> CompletableFuture<Void> thenAcceptBothAsync(CompletionStage<? extends U> other, BiConsumer<? super T, ? super U> action)
public <U> CompletableFuture<Void> thenAcceptBothAsync(CompletionStage<? extends U> other, BiConsumer<? super T, ? super U> action, Executor executor)
CompletableFuture<String> future1 = CompletableFuture.supplyAsync(() -> "Hello");
CompletableFuture<String> future2 = CompletableFuture.supplyAsync(() -> " World");
CompletableFuture<Void> result = future1.thenAcceptBoth(future2, (s1, s2) -> System.out.println(s1 + s2));
3.runAfterBoth
public CompletableFuture<Void> runAfterBoth(CompletionStage<?> other, Runnable action)
public CompletableFuture<Void> runAfterBothAsync(CompletionStage<?> other, Runnable action)
public CompletableFuture<Void> runAfterBothAsync(CompletionStage<?> other, Runnable action, Executor executor)
CompletableFuture<String> future1 = CompletableFuture.supplyAsync(() -> "Hello");
CompletableFuture<String> future2 = CompletableFuture.supplyAsync(() -> " World");
CompletableFuture<Void> result = future1.runAfterBoth(future2, () -> System.out.println("Both completed"));
2.5.6 任务竞速
1.applyToEither
处理优先完成的那个CompletableFuture的结果
public <U> CompletableFuture<U> applyToEither(CompletionStage<? extends T> other, Function<? super T, U> fn)
public <U> CompletableFuture<U> applyToEitherAsync(CompletionStage<? extends T> other, Function<? super T, U> fn)
public <U> CompletableFuture<U> applyToEitherAsync(CompletionStage<? extends T> other, Function<? super T, U> fn, Executor executor)
CompletableFuture<String> future1 = CompletableFuture.supplyAsync(() -> "Hello");
CompletableFuture<String> future2 = CompletableFuture.supplyAsync(() -> " World");
CompletableFuture<String> result = future1.applyToEither(future2, t -> t);
2.acceptEither
消费优先完成的那个CompletableFuture的结果
public CompletableFuture<Void> acceptEither(CompletionStage<? extends T> other, Consumer<? super T> action)
public CompletableFuture<Void> acceptEitherAsync(CompletionStage<? extends T> other, Consumer<? super T> action)
public CompletableFuture<Void> acceptEitherAsync(CompletionStage<? extends T> other, Consumer<? super T> action, Executor executor)
CompletableFuture<String> future1 = CompletableFuture.supplyAsync(() -> "Hello");
CompletableFuture<String> future2 = CompletableFuture.supplyAsync(() -> " World");
CompletableFuture<Void> result = future1.acceptEither(future2, t -> System.out.println(t));
3.runAfterEither
任何一个CompletableFuture完成时, 执行一个无返回值的操作
public CompletableFuture<Void> runAfterBoth(CompletionStage<?> other, Runnable action)
public CompletableFuture<Void> runAfterBothAsync(CompletionStage<?> other, Runnable action)
public CompletableFuture<Void> runAfterBothAsync(CompletionStage<?> other, Runnable action, Executor executor)
CompletableFuture<String> future1 = CompletableFuture.supplyAsync(() -> "Hello");
CompletableFuture<String> future2 = CompletableFuture.supplyAsync(() -> " World");
CompletableFuture<Void> result = future1.runAfterBoth(future2, () -> System.out.println("completed"));
applyToEither、acceptEither、runAfterEither使用时注意点:
applyToEither、acceptEither方法要求两个CompletableFuture的返回值类型相同或可以相互转换(extends T)- 对于
applyToEither和acceptEither方法,如果优先完成的CompletableFuture抛出异常,那么最终结果也会包含异常。反之,如果优先完成的CompletableFuture没有抛出异常,即使后完成的 CompletableFuture 抛出了异常,最终结果仍然是正确的结果而不会包含异常。 - 对于
runAfterBoth方法, 只要其中有一个CompletableFuture抛出了异常, 最终结果也会包含异常
2.5.7 处理异常
1.exceptionally
public CompletableFuture<T> exceptionally(Function<Throwable, ? extends T> fn)
public CompletableFuture<T> exceptionallyAsync(Function<Throwable, ? extends T> fn)
public CompletableFuture<T> exceptionallyAsync(Function<Throwable, ? extends T> fn, Executor executor)
CompletableFuture<String> future = CompletableFuture.supplyAsync(() -> {
    int i = 1 / 0;
    return "test";
}).exceptionally(new Function<Throwable, String>() {
    @Override
    public String apply(Throwable t) {
        System.out.println("执行失败:" + t.getMessage());
        return "异常xxxx";
    }
});
使用exceptionally时的注意点: 链式编程导致的差异
public static void main(String[] args) throws ExecutionException, InterruptedException {
    // 链式编程
    CompletableFuture<String> future = CompletableFuture.supplyAsync(() -> {
        int i = 1 / 0;
        return "test";
    }).exceptionally(new Function<Throwable, String>() {
        @Override
        public String apply(Throwable t) {
            System.out.println("执行失败:" + t.getMessage());
            return "异常xxxx";
        }
    });
    future.get();

    // 普遍编程
    CompletableFuture<String> future_2 = CompletableFuture.supplyAsync(() -> {
        int i = 1 / 0;
        return "test";
    });
    future_2.exceptionally(new Function<Throwable, String>() {
        @Override
        public String apply(Throwable t) {
            System.out.println("执行失败:" + t.getMessage());
            return "异常xxxx";
        }
    });
    future_2.get();
}
我们发现future.get()并没有抛异常, 而future_2.get()抛出了异常
这是因为exceptionally方法返回了一个新的CompletableFuture, 它包装了原始的CompletableFuture, 新的CompletableFuture将使用指定的异常处理函数来计算结果,而不会抛出原始的异常
而future_2.get()抛出异常,是因为你在原始的CompletableFuture上调用了exceptionally方法,但并没有使用返回的新的CompletableFuture。exceptionally方法返回的新CompletableFuture并没有被存储在变量中,因此对future_2.get()的调用仍然会抛出原始的异常。
2.5.8 全部结束、任意一个结束
1.allOf
public static CompletableFuture<Void> allOf(CompletableFuture<?>... cfs)
CompletableFuture<String> future1 = CompletableFuture.supplyAsync(() -> {
   try {
        TimeUnit.SECONDS.sleep(1);
    } catch (InterruptedException e) {
        throw new RuntimeException(e);
    }
    return "Hello";
});

CompletableFuture<String> future2 = CompletableFuture.supplyAsync(() -> {
    try {
        TimeUnit.SECONDS.sleep(2);
    } catch (InterruptedException e) {
        throw new RuntimeException(e);
    }
    return "Hi";
});

CompletableFuture<Void> allOf = CompletableFuture.allOf(future1, future2);
allOf.get();
allOf和get的区别
allOf用于等待一组CompletableFuture完成,而get用于获取单个 CompletableFuture 的结果。在使用get方法时要小心,因为它可能会导致线程阻塞,应谨慎使用以避免可能的死锁或性能问题。
2.anyOf
anyOf()的参数是多个给定的CompletableFuture,当其中的任何一个完成时,方法返回这个CompletableFuture。
public static CompletableFuture<Object> anyOf(CompletableFuture<?>... cfs)
CompletableFuture<String> future1 = CompletableFuture.supplyAsync(() -> {
    try {
        TimeUnit.SECONDS.sleep(1);
    } catch (InterruptedException e) {
        throw new RuntimeException(e);
    }
    return "Hello";
});

CompletableFuture<Integer> future2 = CompletableFuture.supplyAsync(() -> {
    try {
        TimeUnit.SECONDS.sleep(2);
    } catch (InterruptedException e) {
        throw new RuntimeException(e);
    }
    return 6;
});

CompletableFuture<Object> anyOf = CompletableFuture.anyOf(future1, future2);
System.out.println(anyOf.join());
2.5.9 异步线程阻塞主线程的情况
CompletableFuture<String> future = CompletableFuture.supplyAsync(() -> "Hello");
CompletableFuture<Void> run = future.thenRun(() -> {
    try {
        Thread.sleep(5000);
        System.out.println("thenRun begin!");
    } catch (InterruptedException e) {
        throw new RuntimeException(e);
    }
});
System.out.println("method over!");

执行结果
thenRun begin!
method over!
CompletableFuture的thenRun、thenApply等方法都是非阻塞的, 它们会在异步操作完成后执行相应的操作。
但是在上面这个案例中, 我们看到了相反的结果
原因: supplyAsync中方法执行太快了, 在调用thenRun方法时, 前一个异步线程已经回收了, thenRun中的函数执行的线程是取决于前一个 CompletableFuture 阶段的执行线程,而不是直接在调用 thenApply 的线程中执行。
- 如果前一个CompletableFuture阶段未完成,当前线程是异步线程(通过 CompletableFuture.supplyAsync创建的),那么此时thenRun中的函数会在当前异步线程中执行。
- 如果前一个 CompletableFuture 阶段已经完成,而且当前线程是主线程,那么thenRun中的函数会在主线程中执行
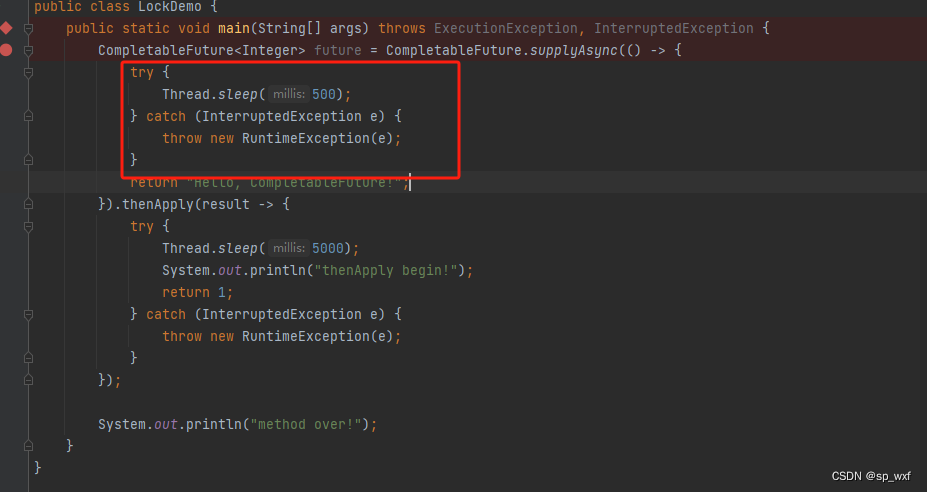
我们可以在supplyAsync中让线程sleep一会儿, 让这个future有时间调用thenRun, 我们可以看看结果
2.6 CompletionService(难度:★★ 频率:★★)
CompletionService 是一个接口,它提供了一种在任务完成时将其结果放入队列的机制,以便按照完成的顺序获取结果。
import java.util.concurrent.*;

public class CompletionServiceExample {
    public static void main(String[] args) {
        // 创建线程池
        ExecutorService executorService = Executors.newFixedThreadPool(5);

        // 创建CompletionService
        CompletionService<Integer> completionService = new ExecutorCompletionService<>(executorService);

        // 提交一组任务
        for (int i = 1; i <= 5; i++) {
            final int taskId = i;
            completionService.submit(() -> {
                // 模拟任务的耗时操作
                Thread.sleep(1000);
                System.out.println("Task " + taskId + " completed");
                return taskId;
            });
        }

        // 按照任务完成的顺序获取结果
        try {
            for (int i = 0; i < 5; i++) {
                Future<Integer> completedTask = completionService.take();
                int result = completedTask.get();
                System.out.println("Result from Task " + result);
            }
        } catch (InterruptedException | ExecutionException e) {
            e.printStackTrace();
        } finally {
            // 关闭 ExecutorService
            executorService.shutdown();
        }
    }
}
- submit(Callable<V> task)
用于提交一个可调用的任务并返回一个表示该任务的 Future 对象。任务的执行由底层的 Executor 来管理。 - take()
用于获取一个已完成任务的 Future 对象。如果没有任务完成,它会阻塞等待,直到有任务完成为止。 - poll()
用于获取一个已完成任务的 Future 对象。如果没有任务完成,它会立即返回 null。 - poll(long timeout, TimeUnit unit)
用于获取一个已完成任务的 Future 对象,但在指定的超时时间内等待。如果超时时间内没有任务完成,它会返回 null
选择使用CompletionService还是CompletableFuture取决于你的具体需求。如果你主要关注按照任务完成的顺序获取结果,并且使用了 ExecutorService,那么 CompletionService 是一个不错的选择。如果你需要更灵活的异步编程和任务组合能力,那么 CompletableFuture 可能更适合。有时候,两者也可以结合使用,根据具体情况选择合适的工具。
2.7 线程的生命周期(难度:★★ 频率:★★★)
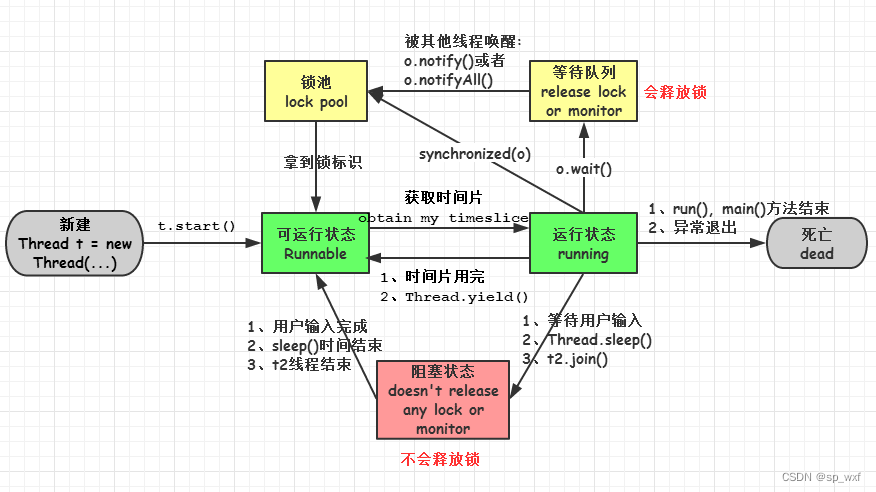
线程有7种状态
- 新建(NEW)
当一个Thread对象被创建时,它处于新建状态。在这个阶段,线程还没有启动。
public static void main(String[] args) throws Exception{
    System.out.println("Thread State is:"+new Thread().getState());
}
- 就绪(Runnable)
当调用线程对象的start()方法后,线程进入就绪状态。在就绪状态下,线程已经准备好运行,但还没有得到 CPU 时间片。
public static void main(String[] args) {
   new Thread(() -> {
        System.out.println("Thread State is:"+Thread.currentThread().getState());
    }).start();
}
- 运行(Running)
线程获得CPU时间片后,进入运行状态。在运行状态下,线程执行具体的任务代码。 - 阻塞(Blocked)
线程在某些情况下会由于某些原因放弃CPU时间片,进入阻塞状态。例如,线程等待某个资源的释放,或者调用了sleep()方法。
public class ThreadTest {

    public static void main(String[] args) throws InterruptedException {
        Object lock = new Object();//锁
        BlockThread t1 = new BlockThread(lock,"T1");
        BlockThread t2 = new BlockThread(lock,"T2");
        t1.start(); //线程 T1开始运行
        t2.start(); //线程 T2开始运行
        Thread.sleep(100);  //阻塞主线程,等待T1,T2抢锁
        System.out.println("Thread T1 State is " + t1.getState());  //获取T1线程状态
        System.out.println("Thread T2 State is " + t2.getState());  //获取T2线程状态
    }
}

class BlockThread extends Thread {
    private String name;    //当前线程名称
    private Object lock;    //锁

    public BlockThread(Object lock, String name) {
        this.lock = lock;
        this.name = name;
    }

    @Override
    public void run() {
        System.out.println("Thread " + name + " State is " + Thread.currentThread().getState());
        synchronized (lock) {
            System.out.println("Thread " + name + " hold the lock");
            try {
                System.out.println("Thread " + name + " State is " + Thread.currentThread().getState());
                Thread.sleep(1000 * 10);    //抢到锁的线程执行逻辑,这里用睡眠模拟
            } catch (InterruptedException e) {
                e.printStackTrace();
            }
            System.out.println("Thread " + name + " release the lock");
        }
    }
}
- 等待(Waiting)
线程在等待某个条件的触发时进入等待状态。例如,调用Object.wait()方法或者 Thread.join()方法。
public class ThreadTest {

    public static void main(String[] args) throws InterruptedException {
        Object lock = new Object();
        WaitingThread t = new WaitingThread("T", lock);
        t.start();
        Thread.sleep(1000);
        System.out.println("Thread T State is " + t.getState());
        System.out.println("Thread "+Thread.currentThread().getName()+" State is " + Thread.currentThread().getState());
    }
}

class WaitingThread extends Thread {
    private Object lock;
    public WaitingThread(String name, Object lock) {
        super(name);
        this.lock = lock;
    }

    @Override
    public void run() {
        System.out.println("Thread " + Thread.currentThread().getName()+" try to wait");
        synchronized (lock) {
            try {
                lock.wait();
            } catch (InterruptedException e) {
                e.printStackTrace();
            }
        }
    }
}
- 超时等待(Timed Waiting): 类似于等待状态,但有一个超时时间。例如,调用 Thread.sleep() 方法或者带有超时参数的 Object.wait() 方法。
- 终止(Terminated)
线程执行完毕或者因异常退出时,进入终止状态。线程一旦终止,就不能再进入其他状态。
很多文章在讨论线程状态时,通常会简化为五种主要状态: 新建、就绪、运行、阻塞、终止
知识扩展: 阻塞和等待的区别
等待状态为主动等待某些条件的状态,而阻塞状态通常是由于某些被动事件的发生而被迫暂停的状态。
- 等待状态(Waiting): 线程在等待某种条件的满足时,通过调用
Object.wait()、Thread.join()、LockSupport.park()
等方法进入等待状态。这通常是一种主动等待,因为线程在等待某种条件发生时主动调用了相应的方法。 - 阻塞状态(Blocked):
线程在试图获取锁时,如果锁已被其他线程持有,或者进行阻塞式I/O操作时,可能会进入阻塞状态。这通常是一种被动的状态,因为线程被迫等待某种条件的释放或完成,而不是主动等待。
需要注意的是,Thread.sleep() 方法也会导致线程进入阻塞状态,但它是一种主动的暂停,因为线程在调用 sleep 方法时主动选择休眠一段时间
两者重要的区别在于在锁资源的释放
- 等待状态下会释放对象锁, 使其他线程有机会获取该锁并执行相应的同步代码块
- 阻塞状态下并不会释放锁, 例如sleep方法或者因为synchronized关键字导致的阻塞
知识扩展: 阻塞和等待结束后, 会重新进入就绪状态
阻塞状态和等待状态在条件满足后通常会进入就绪状态。在Java中,线程的状态之间存在状态的转换,而就绪状态表示线程已经准备好被调度执行。
- 等待状态结束: 当线程处于等待状态时,它在等待某种条件的满足。一旦条件满足,例如其他线程调用了 Object.notify() 或 Object.notifyAll() 方法,或者等待时间超时,线程就会结束等待状态,进入就绪状态。
- 阻塞状态结束: 当线程处于阻塞状态时,它可能因为等待获取锁、等待I/O操作完成等被动事件而暂时无法执行。一旦阻塞条件满足,例如成功获取锁,或者I/O操作完成,线程就会结束阻塞状态,进入就绪状态。
2.8 sleep() 和 wait() 有什么区别?(难度:★ 频率:★★★★)
- 类不同
sleep()是Thread线程类的静态方法,wait()是Object类的方法 - 线程状态不同
调用sleep()后线程进入阻塞状态, 调用wait()后线程进入等待状态 - 释放锁资源不同
sleep()不会释放当前占用的锁;wait()会释放当前占用的锁, 但调用它的前提是当前线程占有锁(即代码要在synchronized中)。 - 用途不同
sleep()通常被用于暂停执行, wait()通常被用于线程间交互/通信 - 唤醒方式不同
sleep() 方法执行完成后,线程会自动苏醒; wait() 方法被调用后,线程不会自动苏醒,需要别的线程调用同一个对象上的 notify() 或者 notifyAll() 方法