docker命令及Centos8安装
Docker视频学习推荐 here
Docker简介
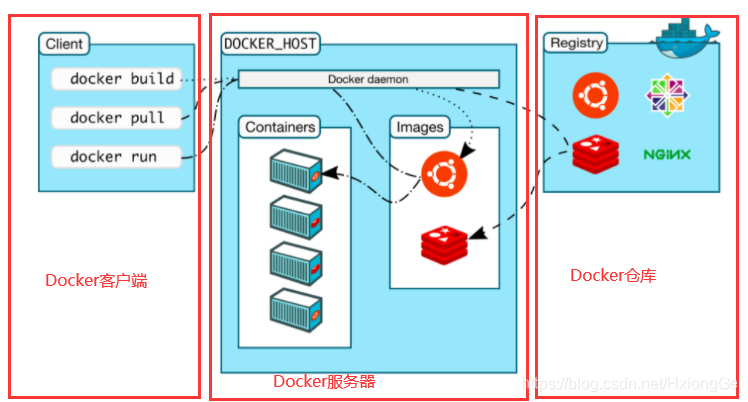
镜像(image)
- docker镜像就好比是一个模板,可以通过这个模板来创建容器服务,创建数量不限
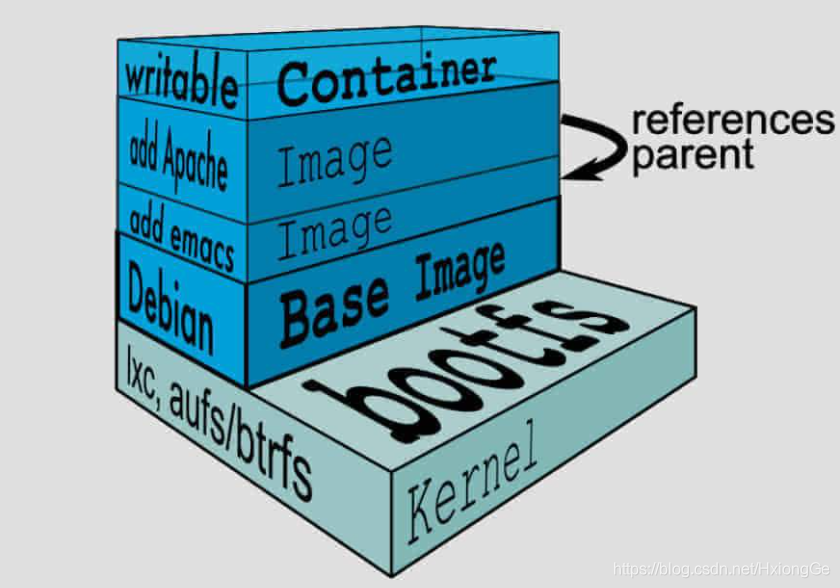
- 镜像层级结构
容器(container)
- docker利用容器技术,独立运行一个或者一组应用,通过镜像来创建。
- 类似于一个简易的Linux系统
- 虚拟机&Docker对比
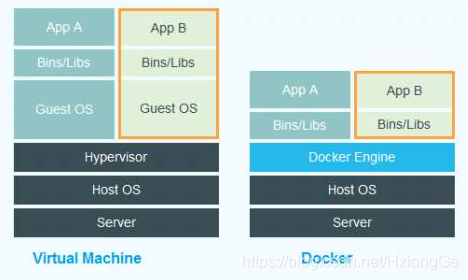
如下面的对比图中,是两个非常轻量级的docker容器在运行

仓库(repository)
- 仓库是存放镜像的地方,分为私有仓库和公有仓库。
- 目前国外和国内均有仓库地址,如国内的阿里云。
从无到有的过程
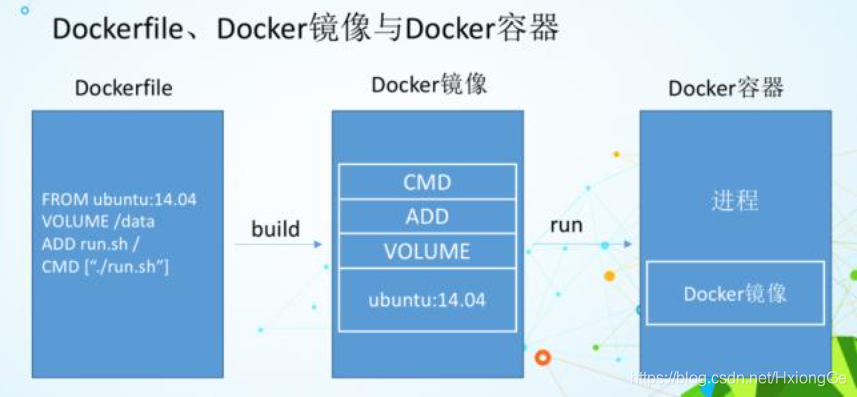
系统环境检查
- 检查Linux内核版本
OS requirements:To install Docker Engine, you need a maintained version of CentOS 7. Archived versions aren’t supported or tested.
[root@localhost ~]# uname -r
4.18.0-147.el8.x86_64
- 查询系统版本信息
[root@localhost ~]# cat /etc/os-release
NAME="CentOS Linux"
VERSION="8 (Core)"
ID="centos"
ID_LIKE="rhel fedora"
VERSION_ID="8"
PLATFORM_ID="platform:el8"
PRETTY_NAME="CentOS Linux 8 (Core)"
ANSI_COLOR="0;31"
CPE_NAME="cpe:/o:centos:centos:8"
HOME_URL="https://www.centos.org/"
BUG_REPORT_URL="https://bugs.centos.org/"

CENTOS_MANTISBT_PROJECT="CentOS-8"
CENTOS_MANTISBT_PROJECT_VERSION="8"
REDHAT_SUPPORT_PRODUCT="centos"
REDHAT_SUPPORT_PRODUCT_VERSION="8"
- 查看Docker官方安装文档
点击here查看Centos安装文档 - 首先卸载旧的Docker
[root@localhost ~]# yum remove docker \
                  docker-client \
                  docker-client-latest \
                  docker-common \
                  docker-latest \
                  docker-latest-logrotate \
                  docker-logrotate \
                  docker-engine
- 方式一
仓库安装
准备安装环境
[root@localhost ~]# yum install -y yum-utils
设置镜像仓库为阿里云
[root@localhost ~]# yum-config-manager \
    --add-repo \
    http://mirrors.aliyun.com/docker-ce/linux/centos/docker-ce.repo
更新系统yum软件索引
[root@localhost ~]# yum clean all
[root@localhost ~]# yum makecache
安装docker
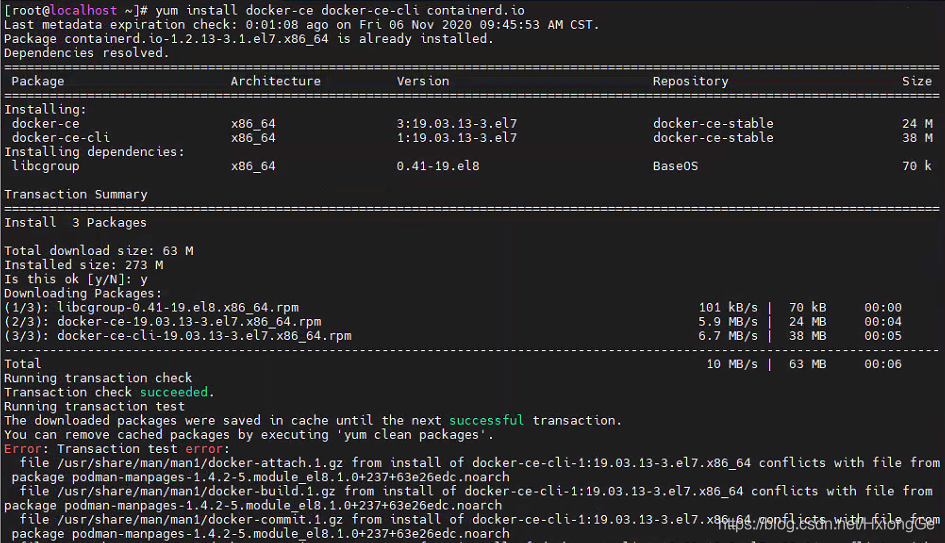
yum install docker-ce docker-ce-cli containerd.io
containerd.io错误

错误处理
[root@localhost ~]# wget https://download.docker.com/linux/centos/7/x86_64/stable/Packages/containerd.io-1.2.13-3.1.el7.x86_64.rpm

[root@localhost ~]# yum -y install ./containerd.io-1.2.13-3.1.el7.x86_64.rpm
podman buildah错误

错误处理
#卸装podman指令,再安装docker

yum erase podman buildah
[root@localhost ~]#  rpm -q podman

[root@localhost ~]# dnf remove podman
启动Docker
[root@localhost ~]# systemctl start docker
测试Docker
[root@localhost ~]# docker run hello-world
# 出现一下信息表示安装成功
Unable to find image 'hello-world:latest' locally
latest: Pulling from library/hello-world
0e03bdcc26d7: Pull complete
Digest: sha256:8c5aeeb6a5f3ba4883347d3747a7249f491766ca1caa47e5da5dfcf6b9b717c0
Status: Downloaded newer image for hello-world:latest

Hello from Docker!
This message shows that your installation appears to be working correctly.

To generate this message, Docker took the following steps:
 1. The Docker client contacted the Docker daemon.
 2. The Docker daemon pulled the "hello-world" image from the Docker Hub.
    (amd64)
 3. The Docker daemon created a new container from that image which runs the
    executable that produces the output you are currently reading.
 4. The Docker daemon streamed that output to the Docker client, which sent it
    to your terminal.

To try something more ambitious, you can run an Ubuntu container with:
 $ docker run -it ubuntu bash

Share images, automate workflows, and more with a free Docker ID:
 https://hub.docker.com/

For more examples and ideas, visit:
 https://docs.docker.com/get-started/
卸载Docker
# 卸载依耐
[root@localhost ~]# yum remove docker-ce docker-ce-cli containerd.io
# 删除资源
[root@localhost ~]# rm -rf /var/lib/docker
自启动
[root@localhost ~]# systemctl enable docker
Docker常用命令
帮助命令
# 查看docker客户端和服务端版本信息
[root@localhost ~]# docker version
# 查看docker更详细的信息
[root@localhost ~]# docker info
# 查看docker命令帮助
[root@localhost ~]# docker 命令 --help
# 退出已连接的docker命令, 如果docker无程序在执行,退出后会停止运行容器
[root@localhost ~]# exit
# 退出已连接的docker快捷键, 无论docker有无程序在执行,退出后均不会停止运行容器
Ctrl + P + Q
镜像命令
docker images : 列出本地镜像。
docker images [OPTIONS] [REPOSITORY[:TAG]]
实例
查看本地镜像列表。
[root@localhost ~]# docker images

列出本地镜像中REPOSITORY为ubuntu的镜像列表。
[root@localhost ~]# docker images  ubuntu
docker rmi : 删除本地一个或多少镜像
docker rmi [OPTIONS] IMAGE [IMAGE...]
实例
强制删除本地镜像 runoob/ubuntu:v4。
[root@localhost ~]# docker rmi -f runoob/ubuntu:v4

根据查找结果删除镜像
docker rmi $(docker images -a |grep 镜像名称模糊匹配特征 | awk '{ print $3 }')

删除所有镜像
docker rmi $(docker images -q)

要清理无用的 Docker 镜像,可以运行以下命令:
docker image prune

该命令将删除所有没有被任何容器使用的镜像。如果您还想要删除未被打标签的镜像,可以在命令后面添加 -a 参数,如下所示:
docker image prune -a
docker tag : 标记本地镜像,将其归入某一仓库
docker tag [OPTIONS] IMAGE[:TAG] [REGISTRYHOST/][USERNAME/]NAME[:TAG]
实例
将镜像ubuntu:15.10标记为 runoob/ubuntu:v3 镜像。
[root@localhost ~]# docker tag ubuntu:15.10 runoob/ubuntu:v3
docker build : 命令用于使用 Dockerfile 创建镜像
docker build [OPTIONS] PATH | URL | -
实例
使用当前目录的 Dockerfile 创建镜像,标签为 runoob/ubuntu:v1
[root@localhost ~]# docker build -t runoob/ubuntu:v1 .

使用URL github.com/creack/docker-firefox 的 Dockerfile 创建镜像
[root@localhost ~]# docker build github.com/creack/docker-firefox

也可以通过 -f Dockerfile 文件的位置
[root@localhost ~]# docker build -f /path/to/a/Dockerfile .

在 Docker 守护进程执行 Dockerfile 中的指令前,首先会对 Dockerfile 进行语法检查,有语法错误时会返回
[root@localhost ~]# docker build -t test/myapp .

在build时需要在线安装软件时可用 --network命令指定组网
第1步. 查看服务器的docker可用网络 docker network ls
[root@localhost ~]# docker network ls
NETWORK ID          NAME                DRIVER              SCOPE
86396ed1c9e3        bridge              bridge              local
45d975e3c00b        dev_default         bridge              local
e67ec0c6b2d8        host                host                local
929d62663366        none                null                local

第2步. 假设host网络可以连接外网,build是可以指定它
docker build -t test/demo:1 -f Dockerfile . --network host
docker history : 查看指定镜像的创建历史
docker history [OPTIONS] IMAGE
实例
查看本地镜像runoob/ubuntu:v3的创建历史
[root@localhost ~]# docker history runoob/ubuntu:v3
docker save : 将指定镜像保存成 tar 归档文件
docker save [OPTIONS] IMAGE [IMAGE...]
实例
将镜像 runoob/ubuntu:v3 生成 my_ubuntu_v3.tar 文档
[root@localhost ~]# docker save -o my_ubuntu_v3.tar runoob/ubuntu:v3
docker load : 导入使用 docker save 命令导出的镜像
docker load [OPTIONS]
实例
导入镜像:

[root@localhost ~]# docker image ls
REPOSITORY          TAG                 IMAGE ID            CREATED             SIZE

[root@localhost ~]# docker load < busybox.tar.gz
Loaded image: busybox:latest

[root@localhost ~]# docker images
REPOSITORY          TAG                 IMAGE ID            CREATED             SIZE
busybox             latest              769b9341d937        7 weeks ago         2.489 MB

[root@localhost ~]# docker load --input fedora.tar
Loaded image: fedora:rawhide
Loaded image: fedora:20

[root@localhost ~]# docker images
REPOSITORY          TAG                 IMAGE ID            CREATED             SIZE
busybox             latest              769b9341d937        7 weeks ago         2.489 MB
fedora              rawhide             0d20aec6529d        7 weeks ago         387 MB
fedora              20                  58394af37342        7 weeks ago         385.5 MB
fedora              heisenbug           58394af37342        7 weeks ago         385.5 MB
fedora              latest              58394af37342        7 weeks ago         385.5 MB
docker import : 从归档文件中创建镜像
docker import [OPTIONS] file|URL|- [REPOSITORY[:TAG]]
实例
从镜像归档文件my_ubuntu_v3.tar创建镜像,命名为runoob/ubuntu:v4

[root@localhost ~]# docker import  my_ubuntu_v3.tar runoob/ubuntu:v4
sha256:63ce4a6d6bc3fabb95dbd6c561404a309b7bdfc4e21c1d59fe9fe4299cbfea39

[root@localhost ~]# docker images runoob/ubuntu:v4
REPOSITORY          TAG                 IMAGE ID            CREATED             SIZE
runoob/ubuntu       v4                  63ce4a6d6bc3        20 seconds ago      142.1 MB
容器生命周期命令
docker run :创建一个新的容器并运行一个命令
docker run [OPTIONS] IMAGE [COMMAND] [ARG...]
OPTIONS说明:
	-a stdin: 指定标准输入输出内容类型,可选 STDIN/STDOUT/STDERR 三项;
	-d: 后台运行容器,并返回容器ID;
	-i: 以交互模式运行容器,通常与 -t 同时使用;
	-P: 随机端口映射,容器内部端口随机映射到主机的端口
	-p: 指定端口映射,格式为:主机(宿主)端口:容器端口
	-t: 为容器重新分配一个伪输入终端,通常与 -i 同时使用;
	--name="nginx-lb": 为容器指定一个名称;
	--dns 8.8.8.8: 指定容器使用的DNS服务器,默认和宿主一致;
	--dns-search example.com: 指定容器DNS搜索域名,默认和宿主一致;
	-h "mars": 指定容器的hostname;
	-e username="ritchie": 设置环境变量;
	--env-file=[]: 从指定文件读入环境变量;
	--cpuset="0-2" or --cpuset="0,1,2": 绑定容器到指定CPU运行;
	-m :设置容器使用内存最大值;
	--net="bridge": 指定容器的网络连接类型,支持 bridge/host/none/container: 四种类型;
	--link=[]: 添加链接到另一个容器;
	--expose=[]: 开放一个端口或一组端口;
	--volume , -v: 绑定一个卷
实例
使用docker镜像nginx:latest以后台模式启动一个容器,并将容器命名为mynginx
[root@localhost ~]# docker run --name mynginx -d nginx:latest

使用镜像nginx:latest以后台模式启动一个容器,并将容器的80端口映射到主机随机端口
[root@localhost ~]# docker run -P -d nginx:latest

使用镜像 nginx:latest,以后台模式启动一个容器,将容器的 80 端口映射到主机的 80 端口,主机的目录 /data 映射到容器的 /data
[root@localhost ~]# docker run -p 80:80 -v /data:/data -d nginx:latest

绑定容器的 8080 端口,并将其映射到本地主机 127.0.0.1 的 80 端口上
[root@localhost ~]#  docker run -p 127.0.0.1:80:8080/tcp ubuntu bash

使用镜像nginx:latest以交互模式启动一个容器,在容器内执行/bin/bash命令
[root@localhost ~]# docker run -it nginx:latest /bin/bash
root@b8573233d675:/#
docker start :启动一个或多个已经被停止的容器
docker start [OPTIONS] CONTAINER [CONTAINER...]
实例
启动已被停止的容器mysql
[root@localhost ~]# docker start mysql
docker stop :停止一个运行中的容器
docker stop [OPTIONS] CONTAINER [CONTAINER...]
实例
停止运行中的容器mysql
[root@localhost ~]# docker stop mysql
docker restart :重启容器
docker restart [OPTIONS] CONTAINER [CONTAINER...]
实例
重启容器mysql
[root@localhost ~]# docker restart mysql
docker kill :杀掉一个运行中的容器
docker kill [OPTIONS] CONTAINER [CONTAINER...]
实例
杀掉运行中的容器mynginx
[root@localhost ~]# docker kill -s KILL mynginx
docker rm :删除一个或多个容器
docker rm [OPTIONS] CONTAINER [CONTAINER...]
实例
强制删除容器 db01、db02
[root@localhost ~]# docker rm -f db01 db02

移除容器 nginx01 对容器 db01 的连接,连接名 db
[root@localhost ~]# docker rm -l db

删除容器 nginx01, 并删除容器挂载的数据卷
[root@localhost ~]# docker rm -v nginx01

删除所有已经停止的容器
[root@localhost ~]# docker rm $(docker ps -aq)
docker pause :暂停容器中所有的进程
docker pause [OPTIONS] CONTAINER [CONTAINER...]
实例
暂停数据库容器db01提供服务
[root@localhost ~]# docker pause db01
docker unpause :恢复容器中所有的进程
docker unpause [OPTIONS] CONTAINER [CONTAINER...]
实例
恢复数据库容器db01提供服务
[root@localhost ~]# docker unpause db01
docker create :创建一个新的容器但不启动它
docker create [OPTIONS] IMAGE [COMMAND] [ARG...]
实例
使用docker镜像nginx:latest创建一个容器,并将容器命名为mycon
[root@localhost ~]# docker create --name mycon nginx:latest
docker exec :在运行的容器中执行命令
docker exec [OPTIONS] CONTAINER COMMAND [ARG...]
OPTIONS说明:
	-d :分离模式: 在后台运行
	-i :即使没有附加也保持STDIN 打开
	-t :分配一个伪终端
实例
在容器 mynginx 中以交互模式执行容器内 /root/runoob.sh 脚本
[root@localhost ~]# docker exec -it mynginx /bin/sh /root/runoob.sh

在容器 mynginx 中开启一个交互模式的终端
[root@localhost ~]# docker exec -i -t  mynginx /bin/bash
root@b1a0703e41e7:/#

也可以通过 docker ps -a 命令查看已经在运行的容器,然后使用容器 ID 进入容器
查看已经在运行的容器 ID
[root@localhost ~]# docker ps -a
...
9df70f9a0714        openjdk             "/usercode/script.sh…"
...
第一列的 9df70f9a0714 就是容器 ID。
通过 exec 命令对指定的容器执行 bash:
[root@localhost ~]# docker exec -it 9df70f9a0714 /bin/bash
容器操作命令
docker ps : 列出容器
docker ps [OPTIONS]
OPTIONS说明:
	-a :显示所有的容器,包括未运行的。
	-f :根据条件过滤显示的内容。
	--format :指定返回值的模板文件。
	-l :显示最近创建的容器。
	-n :列出最近创建的n个容器。
	--no-trunc :不截断输出。
	-q :静默模式,只显示容器编号。
	-s :显示总的文件大小。
实例
列出所有在运行的容器信息
[root@localhost ~]# docker ps
CONTAINER ID   IMAGE          COMMAND                ...  PORTS                    NAMES
09b93464c2f7   nginx:latest   "nginx -g 'daemon off" ...  80/tcp, 443/tcp          myrunoob
96f7f14e99ab   mysql:5.6      "docker-entrypoint.sh" ...  0.0.0.0:3306->3306/tcp   mymysql

输出详情介绍:
CONTAINER ID: 容器 ID
IMAGE: 使用的镜像
COMMAND: 启动容器时运行的命令
CREATED: 容器的创建时间
STATUS: 容器状态, 状态有7种:
	created(已创建)
	restarting(重启中)
	running(运行中)
	removing(迁移中)
	paused(暂停)
	exited(停止)
	dead(死亡)
PORTS: 容器的端口信息和使用的连接类型(tcp\udp)
NAMES: 自动分配的容器名称

列出最近创建的5个容器信息
[root@localhost ~]# docker ps -n 5
CONTAINER ID        IMAGE               COMMAND                   CREATED
09b93464c2f7        nginx:latest        "nginx -g 'daemon off"    2 days ago   ...
b8573233d675        nginx:latest        "/bin/bash"               2 days ago   ...
b1a0703e41e7        nginx:latest        "nginx -g 'daemon off"    2 days ago   ...
f46fb1dec520        5c6e1090e771        "/bin/sh -c 'set -x \t"   2 days ago   ...
a63b4a5597de        860c279d2fec        "bash"                    2 days ago   ...

列出所有创建的容器ID
[root@localhost ~]# docker ps -a -q
09b93464c2f7
b8573233d675
b1a0703e41e7
f46fb1dec520
a63b4a5597de
6a4aa42e947b
de7bb36e7968
43a432b73776
664a8ab1a585
ba52eb632bbd
...
docker inspect : 获取容器/镜像的元数据
docker inspect [OPTIONS] NAME|ID [NAME|ID...]
实例
获取镜像mysql:5.6的元信息
[root@localhost ~]# docker inspect mysql:5.6

获取正在运行的容器mymysql的 IP
[root@localhost ~]# docker inspect --format='{{range .NetworkSettings.Networks}}{{.IPAddress}}{{end}}' mymysql
172.17.0.3
docker top :查看容器中运行的进程信息,支持 ps 命令参数
docker top [OPTIONS] CONTAINER [ps OPTIONS]
实例
查看容器mymysql的进程信息
[root@localhost:~/mysql]# docker top mymysql
docker attach :连接到正在运行中的容器
docker attach [OPTIONS] CONTAINER
要attach上去的容器必须正在运行,可以同时连接上同一个container来共享屏幕(与screen命令的attach类似)。
实例
容器mynginx将访问日志指到标准输出,连接到容器查看访问信息
[root@localhost ~]# docker attach --sig-proxy=false mynginx
192.168.239.1 - - [10/Jul/2016:16:54:26 +0000] "GET / HTTP/1.1" 304 0 "-" "Mozilla/5.0 (Windows NT 6.1; WOW64) AppleWebKit/537.36 (KHTML, like Gecko) Chrome/45.0.2454.93 Safari/537.36" "-"
docker events : 从服务器获取实时事件
docker events [OPTIONS]
如果指定的时间是到秒级的,需要将时间转成时间戳。如果时间为日期的话,可以直接使用,如--since="2016-07-01"。
实例
显示docker 2016年7月1日后的所有事件
[root@localhost:~/mysql]# docker events  --since="1467302400"

显示docker 镜像为mysql:5.6 2016年7月1日后的相关事件
[root@localhost:~/mysql]# docker events -f "image"="mysql:5.6" --since="1467302400"
docker logs : 获取容器的日志
docker logs [OPTIONS] CONTAINER
实例
跟踪查看容器mynginx的日志输出
[root@localhost ~]# docker logs -f mynginx

查看容器mynginx从2016年7月1日后的最新10条日志
[root@localhost ~]# docker logs --since="2016-07-01" --tail=10 mynginx
docker wait : 阻塞运行直到容器停止,然后打印出它的退出代码
docker wait [OPTIONS] CONTAINER [CONTAINER...]
实例
[root@localhost ~]# docker wait CONTAINER
docker export :将文件系统作为一个tar归档文件导出到STDOUT
docker export [OPTIONS] CONTAINER
实例
将id为a404c6c174a2的容器按日期保存为tar文件
[root@localhost ~]# docker export -o mysql-`date +%Y%m%d`.tar a404c6c174a2
[root@localhost ~]# ls mysql-`date +%Y%m%d`.tar
mysql-20160711.tar
docker port :列出指定的容器的端口映射,或者查找将PRIVATE_PORT NAT到面向公众的端口
docker port [OPTIONS] CONTAINER [PRIVATE_PORT[/PROTO]]
实例
查看容器mynginx的端口映射情况
[root@localhost ~]# docker port mymysql
3306/tcp -> 0.0.0.0:3306
退出容器

仓库命令
docker login : 登陆到一个Docker镜像仓库,如果未指定镜像仓库地址,默认为官方仓库 Docker Hub
docker login [OPTIONS] [SERVER]
实例
登陆到Docker Hub
[root@localhost ~]# docker login -u 用户名 -p 密码
docker logout : 登出一个Docker镜像仓库,如果未指定镜像仓库地址,默认为官方仓库 Docker Hub
docker logout [OPTIONS] [SERVER]
实例
登出Docker Hub
[root@localhost ~]# docker logout
docker pull : 从镜像仓库中拉取或者更新指定镜像
docker pull [OPTIONS] NAME[:TAG|@DIGEST]
实例
从Docker Hub下载java最新版镜像
[root@localhost ~]# docker pull java

从Docker Hub下载java的tag为1.8的镜像
[root@localhost ~]# docker pull java:1.8

从Docker Hub下载REPOSITORY为java的所有镜像
[root@localhost ~]# docker pull -a java
docker push : 将本地的镜像上传到镜像仓库,要先登陆到镜像仓库
docker push [OPTIONS] NAME[:TAG]
实例
上传本地镜像myapache:v1到镜像仓库中
[root@localhost ~]# docker push myapache:v1
docker search : 从Docker Hub查找镜像
docker search [OPTIONS] TERM
实例
从Docker Hub查找所有镜像名包含java
[root@localhost ~]# docker search java
NAME                  DESCRIPTION                           STARS   OFFICIAL   AUTOMATED
java                  Java is a concurrent, class-based...   1037    [OK]
anapsix/alpine-java   Oracle Java 8 (and 7) with GLIBC ...   115                [OK]
develar/java                                                 46                 [OK]
isuper/java-oracle    This repository contains all java...   38                 [OK]
lwieske/java-8        Oracle Java 8 Container - Full + ...   27                 [OK]
nimmis/java-centos    This is docker images of CentOS 7...   13                 [OK]

从Docker Hub查找所有镜像名包含java,并且收藏数大于1000的镜像
[root@localhost ~]# docker search --filter=STARS=1000 java
NAME                  DESCRIPTION                           STARS   OFFICIAL   AUTOMATED
java                  Java is a concurrent, class-based...   1037    [OK]

**参数说明:**
	NAME: 镜像仓库源的名称
	DESCRIPTION: 镜像的描述
	OFFICIAL: 是否 docker 官方发布
	stars: 类似 Github 里面的 star,表示点赞、喜欢的意思
	AUTOMATED: 自动构建。
命令小结
'''
attach	Attach local standard input, output, and error streams to a running container #当前shell下attach连接指定运行的镜像
build	Build an image from a Dockerfile # 通过Dockerfile定制镜像
commit	create a new image from a container's changes #提交当前容器为新的镜像
cp		copy files/folders between a container and the local filesystem #拷贝文件
create	create a new container #仓键一个新的容器
diff	inspect changes to files or di rectories on a container'sfilesystem #查看docker容器的变化
events	Get real time events from the server # 从服务获取容器实时时间
exec	Run a command in a running container #在运行中的容器上运行命令
export	Export a container's filesystem as a tar archive #导出容器文件系统作为一个tar归档文件[对应import]
history	Show the hi story of an image # 展示一个镜像形成历史
images	List images #列出系统当前的镜像
import	import the contents from a tarball to create a filesystem image #从tar包中导入内容创建一个文件系统镜像
info	Display system-wide information # 显示全系统信息
inspect	Return low-level information on Docker objects #查看容器详细信息
kill	Kill one or more running containers # kill指定docker容器
load	Load an image from a tar archive or STDIN #从一个tar包或标准输入中力口载—个镜像[对应save]
login	Log in to a Docker registry #
logout	Log out from a Docker registry
logs	Fetch the logs of a container
pause	Pause all processes within one or more containers
port	List port mappings or a specific	mapping for the container
ps		List containers
pull	Pull an image or a repository from a registry
push	Push an image or a repository to a registry
rename	Rename a container
restart	Restart one or more containers
rm		Remove one or more containers
rmi		Remove one or more images
run		Run a command in a new container
save	Save one or more images to a tar archive (streamed to STDOUT by default)
search	Search the Docker Hub for images
start	Start one or more stopped containers
stats	Display a live stream of container(s) resource usage statistics
stop	Stop one or more running containers
tag		Create a tag target一image that refers to source一image
top		Display the running processes of a container
unpause	Unpause all processes within one or more containers
update	Update configuration of one or more containers
version	Show the Docker version information
wait	Block until one or more containers stop, then print their exit codes
'''
数据卷命令
docker run -v 指定docker与宿主机目录挂载
> docker run -v 宿主机目录:docker目录
# 可以使用多个v设置多个挂载卷

[root@localhost docker]# docker run --name tomcat01 -it -v /home/tomcat01:/home tomcat /bin/bash
root@9d0f0414f19c:/usr/local/tomcat#

# 通过"docker inspect 容器ID"命令查看docker的详细信息,包含挂载目录
[root@localhost home]# docker ps
CONTAINER ID        IMAGE               COMMAND             CREATED             STATUS
9d0f0414f19c        tomcat              "/bin/bash"         6 minutes ago       Up 6 minutes

[root@localhost home]# docker inspect 9d0f0414f19c
具名数据卷
> docker run -v 卷名称:docker目录

[root@localhost ~]# docker run --name tomcat01 -it -v volume01:/home tomcat /bin/bash
root@0f275805e7bf:/usr/local/tomcat# [root@localhost ~]#
[root@localhost ~]# docker ps
CONTAINER ID        IMAGE               COMMAND             CREATED             STATUS              PORTS               NAMES
0f275805e7bf        tomcat              "/bin/bash"         15 seconds ago      Up 15 seconds       8080/tcp            tomcat01
[root@localhost ~]# docker volume ls
DRIVER              VOLUME NAME
local               volume01
匿名数据卷
> docker run -v docker目录

[root@localhost ~]# docker run --name tomcat02 -it -v /home tomcat /bin/bash
root@855998a3cf66:/usr/local/tomcat# [root@localhost ~]# docker ps
CONTAINER ID        IMAGE               COMMAND             CREATED             STATUS              PORTS               NAMES
855998a3cf66        tomcat              "/bin/bash"         13 seconds ago      Up 12 seconds       8080/tcp            tomcat02
0f275805e7bf        tomcat              "/bin/bash"         2 minutes ago       Up 2 minutes        8080/tcp            tomcat01
docker volume 查看数据卷名称
该命令只能查询“具名/匿名数据卷”,路径数据卷只能通过docker inspect查询路径。
“具名/匿名数据卷”的宿主机路径在"/var/lib/docker/volumes"路径下/VOLUME NAME/_data中
[root@localhost ~]# docker volume ls
DRIVER              VOLUME NAME
local               2750faebc0f0a4ac78a973560e2ff4b4e42a9ab2264eeb9ac413f0aed4dc2fa1  # 匿名数据卷
local               volume01	# 具名数据卷
数据卷容器
新建的docker通过复制历史docker达到共用数据卷的目的
# 1. 先创建一个挂载数据卷的docker
[root@localhost ~]# docker run -it -v :/home --name tomcat01 tomcat /bin/bash

# 2. 创建另一个docker与上面的docker拥有同宿主机挂载目录
[root@localhost ~]# docker run -it --name tomcat02 --volumes-from tomcat01 tomcat /bin/bash

# 3. 查看数据卷数量
[root@localhost ~]# docker volume ls
DRIVER              VOLUME NAME
local               8a0cb089458695402f8da9dcbff95b3ed9368dae871a349971a2eebc53cb043c
local               2750faebc0f0a4ac78a973560e2ff4b4e42a9ab2264eeb9ac413f0aed4dc2fa1
local               volume01

# “8a0cb089458695402f8da9dcbff95b3ed9368dae871a349971a2eebc53cb043c” 即是两个docker共用的数据卷,
# docker tomcat01叫数据卷容器
Dockerfile
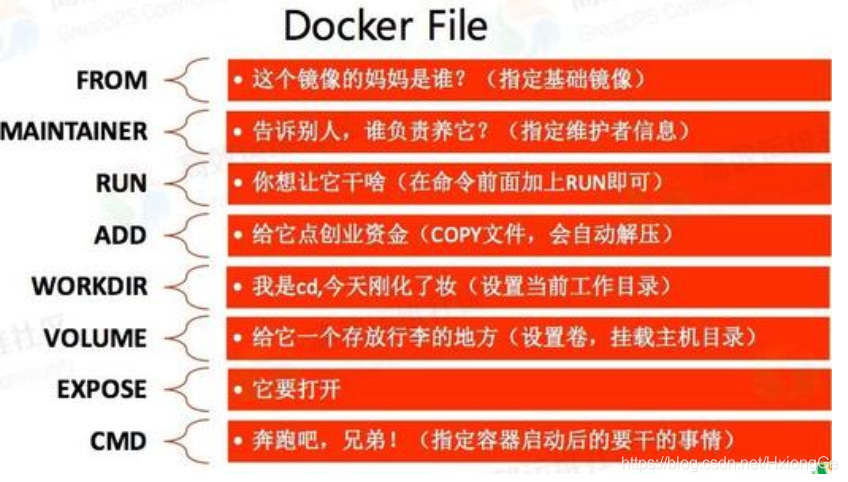
Dockerfile是一个包含用于组合映像的命令的文本文档。可以使用在命令行中调用任何命令。 Docker通过读取Dockerfile中的指令自动生成映像。
docker build命令用于从Dockerfile构建映像。可以在docker build命令中使用-f标志指向文件系统中任何位置的Dockerfile。
实例
这里举一个自行构建镜像的例子:
- 基于centos构建自定义镜像
- 将jdk和tomcat安装包构建在镜像中,并配置环境变量
- 将web程序的war包构建在tomcat的webapps里,按需是否要解压
- 若需要解压可以安装unzip工具,linux发行版tools搜索引擎点here
- 赋予tomcat启动脚本运行权限
- 设定运行镜像后自动start tomcat
FROM centos
MAINTAINER creator<email@qq.com>

ENV MYPATH /usr/local
WORKDIR $MYPATH

# 添加 jdk、tomcat到镜像中,ADD会自动解压压缩包
ADD jdk-8u271-linux-x64.tar.gz /usr/local
ADD apache-tomcat-8.5.38.tar.gz /usr/local

# 添加程序war包到镜像中,ADD不会解压war包
ADD web1.war /usr/local/apache-tomcat-8.5.38/webapps/
ADD web2.war /usr/local/apache-tomcat-8.5.38/webapps/

# add unzip install package to image
# ADD unzip-6.0-43.el8.x86_64.rpm /usr/local/

# set envionment variables
ENV JAVA_HOME /usr/local/jdk1.8.0_271
ENV CLASSPATH $JAVA_HOME/lib/dt.jar:$JAVA_HOME/lib/tools.jar
ENV CATALINA_HOME /usr/local/apache-tomcat-8.5.38
ENV PATH $PATH:$CATALINA_HOME/bin:$JAVA_HOME/bin:$CATALINA_HOME/lib
EXPOSE 8080

# run command
RUN cp /usr/share/zoneinfo/Asia/Shanghai /etc/localtime \
    && cd /usr/local/apache-tomcat-8.5.38/bin \
    && chmod +x startup.sh \
    && chmod +x catalina.sh

#    && rpm -ivh unzip-6.0-43.el8.x86_64.rpm --force --nodeps \
#    && cd /usr/local/apache-tomcat-8.5.38/webapps/ \
#    && unzip -d web1 web1.war \
#    && rm -f web1.war \
#    && unzip -d web2 web2.war \
#    && rm -f web2.war

# run tomcat
ENTRYPOINT ["catalina.sh","run"]
若需要在线安装组件,以node镜像安装mongodb,pm2为例
FROM node:latest

#install mongodb
RUN apt-key adv --keyserver hkp://keyserver.ubuntu.com:80 --recv 9DA31620334BD75D9DCB49F368818C72E52529D4
RUN echo "deb http://repo.mongodb.org/apt/debian stretch/mongodb-org/4.0 main" | tee /etc/apt/sources.list.d/mongodb-org-4.0.list
RUN apt-get update
RUN apt-get install -y mongodb-org=4.0.6 mongodb-org-server=4.0.6 mongodb-org-shell=4.0.6 mongodb-org-mongos=4.0.6 mongodb-org-tools=4.0.6
RUN apt-get install -y vim

#install pm2
RUN apt-get update && apt-get install -y apt-transport-https && \
    curl -sS https://dl.yarnpkg.com/debian/pubkey.gpg | apt-key add - && \
    echo "deb https://dl.yarnpkg.com/debian/ stable main" | tee /etc/apt/sources.list.d/yarn.list && \
    apt-get update && apt-get install -y yarn

RUN yarn config set registry https://registry.npm.taobao.org --global && \
    yarn config set disturl https://npm.taobao.org/dist --global

RUN npm config set registry https://registry.npm.taobao.org --global && \
    npm config set disturl https://npm.taobao.org/dist --global

RUN npm install -g pm2

EXPOSE 8001

# change dir
WORKDIR /data/db

ENTRYPOINT ["/bin/sh", "-c", "./docker-entrypoint.sh"]
Docker: 精通ENTRYPOINT指令 请点击这里
问题
- linux环境解决docker容器里tomcat的时区不正确问题:
- Dockerfile增加命令:RUN cp /usr/share/zoneinfo/Asia/Shanghai /etc/localtime
- tomcat/bin/catalina.sh 增加一行代码:JAVA_OPTS=“${JAVA_OPTS} -Duser.timezone=GMT+08”
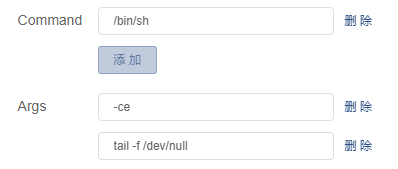
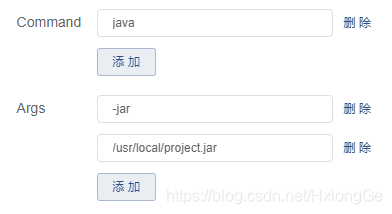
- 当docker构建镜像时无挂起命令,k8s的负载应该如何启动docker可以解决容器启动后自动停止:
仅运行容器
仅执行jar程序
- 有些命令启动程序后是后台运行的可以寻找其命令在前台运行,如
使用命令 pm2 start app.js 之后, pm2 默认在后台运行,如果使用了docker后,容器运行并立即退出,需要手动指定参数--no-daemon

pm2 start app.js --no-daemon // 设置启动方式


同理forever也是Forever start script.js runs in the background. To run forever in the foreground, try forever script.js.

forever -c 'node --harmony' app.js // 设置启动方式
