centos8安装gpu驱动
查看显卡列信息
[admin@server1 ~]$  lspci | grep -i vga
04:00.0 VGA compatible controller: NVIDIA Corporation GP107GL [Quadro P600] (rev a1)

[admin@server1 ~]$ sudo lshw -numeric -C display
[sudo] password for admin:
  *-display
       description: VGA compatible controller
       product: GP107GL [Quadro P600] [10DE:1CB2]
       vendor: NVIDIA Corporation [10DE]
       physical id: 0
       bus info: pci@0000:04:00.0
       version: a1
       width: 64 bits
       clock: 33MHz
       capabilities: pm msi pciexpress vga_controller bus_master cap_list rom
       configuration: driver=nouveau latency=0
       resources: irq:74 memory:a3000000-a3ffffff memory:90000000-9fffffff memory:a0000000-a1ffffff ioport:2000(size=128) memory:c0000-dffff
[admin@server1 ~]$
显卡驱动查询下载
https://www.nvidia.com/Download/index.aspx?lang=en-us
https://www.nvidia.cn/Download/index.aspx?lang=en-us#

英伟达驱动和 cuda cudnn区别 参考1,参考2
安装过程中的坑
https://www.cnblogs.com/matthewli/p/6715553.html
安装之前要 dnf update 防止核心和header版本不一致
安装dkms
sudo yum install gcc dkms
sudo yum install kernel-devel
dnf groupinstall “Development Tools”
dnf install libglvnd-devel elfutils-libelf-devel
需要安装这几个依赖,不然报错
please install libelf-dev, libelf-devel or elfutils-libelf-devel". Stop.
在 /etc/modprobe.d/blacklist.conf 创建文件blacklist.conf
在blacklist.conf 中添加这两行
blacklist nouveau
options nouveau modeset=0
打开/etc/modprobe.d/blacklist.conf 添加 blacklist nouveau 打开 /usr/lib/modprobe.d/dist-blacklist.conf 添加两行: blacklist nouveau options nouveau modeset=0
重建initramfs image步骤
mv /boot/initramfs-
(
u
n
a
m
e
−
r
)
.
i
m
g
/
b
o
o
t
/
i
n
i
t
r
a
m
f
s
−
(uname -r).img /boot/initramfs-
(uname−r).img/boot/initramfs−(uname -r).img.bak
dracut /boot/initramfs-$(uname -r).img $(uname -r)
4 修改运行级别为文本模式,不能在图形界面运行
systemctl set-default multi-user.target
重启,检查bios禁用secure boot
reboot
6 查看nouveau是否已经禁用
ls mod | grep nouveau
安装 另外参数 –no-opengl-files表示不安装OpenGL文件,这个参数能够避免无法进入图形界面的问题
sudo ./NVIDIA.run -no-x-check -no-nouveau-check -no-opengl-files
建议这样安装
sudo ./NVIDIA.run -no-opengl-files
安装报错,需要加上核路径,报错原因是/usr/src/kernels没有源码,需要安装源码 yum install kernel-devel
https://blog.csdn.net/zhangsh87/article/details/106178825/
./NVIDIA-Linux-x86_64-440.82.run --kernel-source-path=/usr/src/kernels/4.18.0-147.el8.x86_64
报错不能加载 nvidia-drp是内核和内核头版本不一致
https://blog.csdn.net/sinat_23619409/article/details/85220561
修改了
/etc/modprobe.d/blacklist.conf
/usr/lib/modprobe.d/dist-blacklist.conf
/etc/default/grub
https://www.cnblogs.com/wq242424/p/13851430.html
执行了这里禁用显卡
全部显示yes
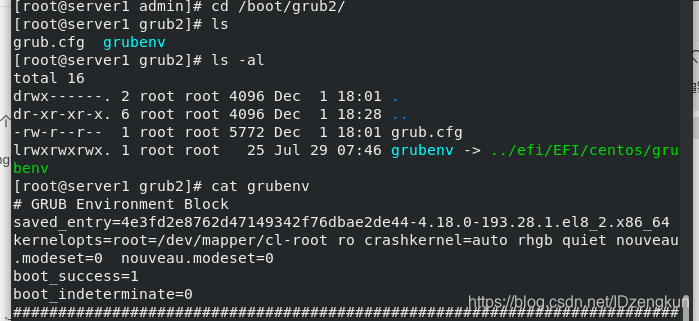
禁用nouveau不用看是否有输出,主要看/boot/grub2/grub.cfg这个文件后面是否有禁用项
https://www.cnblogs.com/ttrrpp/p/12175322.html

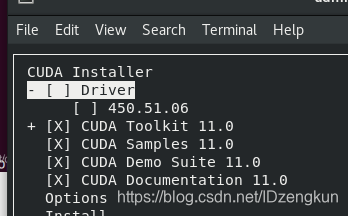
安装cuda,下载的是11.0版本,选择历史版本,下载runfile版本

wget https://developer.download.nvidia.com/compute/cuda/11.0.3/local_installers/cuda_11.0.3_450.51.06_linux.run
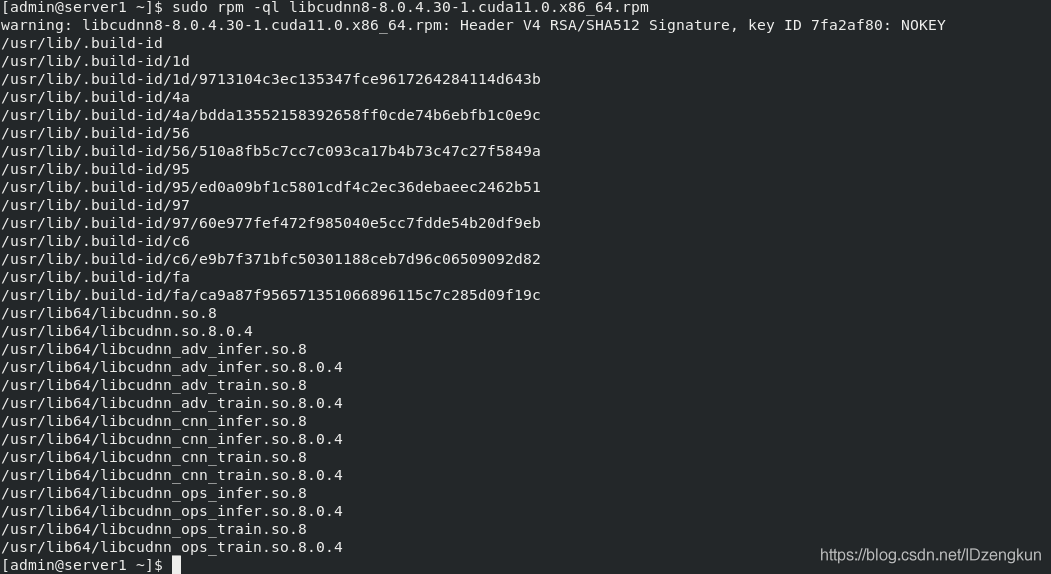
sudo rpm -ivh libcudnn8-8.0.4.30-1.cuda11.0.x86_64.rpm
sudo rpm -ql libcudnn8-samples-8.0.4.30-1.cuda11.0.x86_64.rpm
安装目录
/usr/src/cudnn_samples_v8


cuda目录
官方文档
选择不安装驱动,已经安装了驱动

conda 离线安装包
https://blog.csdn.net/zhaotun123/article/details/100765510?utm_medium=distribute.pc_relevant_t0.none-task-blog-BlogCommendFromBaidu-1.control&depth_1-utm_source=distribute.pc_relevant_t0.none-task-blog-BlogCommendFromBaidu-1.control
conda install --use-local pytorch-1.2.0-py3.5_cuda100_cudnn7_1.tar.bz2
用mv改文件名,去掉tar
(test) [zengkun@server1 ~]$ cat test.py
import torch
flag = torch.cuda.is_available()
print(flag)
ngpu= 1
Decide which device we want to run on
device = torch.device(“cuda:0” if (torch.cuda.is_available() and ngpu > 0) else “cpu”)
print(device)
print(torch.cuda.get_device_name(0))
print(torch.rand(3,3).cuda())
测试pytorchgpu计算
(test) [zengkun@server1 ~]$ python test.py
True
cuda:0
Quadro P600
tensor([[0.6118, 0.8537, 0.0159],
[0.7428, 0.5277, 0.6581],
[0.1101, 0.4284, 0.0459]], device=‘cuda:0’)
(test) [zengkun@server1 ~]$
安装成功测试
https://blog.csdn.net/liming_2464/article/details/99457626
测试代码
import torch
import time
print(torch.version) # 返回pytorch的版本
print(torch.cuda.is_available()) # 当CUDA可用时返回True
a = torch.randn(10000, 1000) # 返回10000行1000列的张量矩阵
b = torch.randn(1000, 2000) # 返回1000行2000列的张量矩阵
t0 = time.time() # 记录时间
c = torch.matmul(a, b) # 矩阵乘法运算
t1 = time.time() # 记录时间
print(a.device, t1 - t0, c.norm(2)) # c.norm(2)表示矩阵c的二范数
device = torch.device(‘cuda’) # 用GPU来运行
a = a.to(device)
b = b.to(device)
# 初次调用GPU,需要数据传送,因此比较慢
t0 = time.time()
c = torch.matmul(a, b)
t2 = time.time()
print(a.device, t2 - t0, c.norm(2))
# 这才是GPU处理数据的真实运行时间,当数据量越大,GPU的优势越明显
t0 = time.time()
c = torch.matmul(a, b)
t2 = time.time()
print(a.device, t2 - t0, c.norm(2))