学习Spring
1. Spring
1.1 简介
![[外链图片转存失败,源站可能有防盗链机制,建议将图片保存下来直接上传(img-ux9LNLOY-1679916395533)(C:\Users\Administrator\AppData\Roaming\Typora\typora-user-images\image-20230321104135060.png)]](https://images2.imgbox.com/10/bd/9iTOkaA5_o.png)
1.2 优点
-
Spring是一个开源的免费的框架(容器)
-
Spring是一个轻量级的,非入侵式的框架!
-
控制反转 (IOC) ,面向切面编程(AOP)
-
支持事务的处理, 对框架整合的支持
总结: Spring就是一个轻量级的控制反转(IOC)和面向切面编程(AOP)的框架!
1.3 组成
![[外链图片转存失败,源站可能有防盗链机制,建议将图片保存下来直接上传(img-0EKM4K5P-1679916395534)(C:\Users\Administrator\AppData\Roaming\Typora\typora-user-images\image-20230321104734801.png)]](https://images2.imgbox.com/1c/c0/xZozGL4d_o.png)
1.4 拓展
官网介绍: 现代化的java开发! 基于spring开发!
![[外链图片转存失败,源站可能有防盗链机制,建议将图片保存下来直接上传(img-NDtMo5aC-1679916568919)(C:\Users\Administrator\AppData\Roaming\Typora\typora-user-images\image-20230321104908744.png)]](https://images2.imgbox.com/a9/67/SAdjL0Gu_o.png)
- SpringBoot
- 一个快速开发的脚手架
- 基于SpringBoot可以快速的开发单个微服务
- 约定大于配置!
- SpringCloud
- SpringCloud是基于SpringBoot实现的
因为大多数公司都在使用SpringBoot进行快速开发, 学习SpringBoot的前提,需要完全掌握Spring一级SpringMVC!承上启下的作用!
弊端: 发展了太久之后, 违背了原来的理念!
[外链图片转存失败,源站可能有防盗链机制,建议将图片保存下来直接上传(img-UvvEYp0D-1679916395534)(C:\Users\Administrator\AppData\Roaming\Typora\typora-user-images\image-20230321105450006.png)]
2. IOC理论推导
![[外链图片转存失败,源站可能有防盗链机制,建议将图片保存下来直接上传(img-lvyjHQUN-1679916395535)(C:\Users\Administrator\AppData\Roaming\Typora\typora-user-images\image-20230321111211259.png)]](https://images2.imgbox.com/71/f2/Jv32cKyC_o.png)
![[外链图片转存失败,源站可能有防盗链机制,建议将图片保存下来直接上传(img-X1ibbOZh-1679916395535)(C:\Users\Administrator\AppData\Roaming\Typora\typora-user-images\image-20230321111352831.png)]](https://images2.imgbox.com/f7/10/5RlHyA3S_o.png)
![[外链图片转存失败,源站可能有防盗链机制,建议将图片保存下来直接上传(img-izER7FEl-1679916395535)(C:\Users\Administrator\AppData\Roaming\Typora\typora-user-images\image-20230321111601271.png)]](https://images2.imgbox.com/72/3c/EwMl6thh_o.png)
![[外链图片转存失败,源站可能有防盗链机制,建议将图片保存下来直接上传(img-VzU97zFl-1679916395535)(C:\Users\Administrator\AppData\Roaming\Typora\typora-user-images\image-20230321111833407.png)]](https://images2.imgbox.com/64/74/SScvtfqQ_o.png)
![[外链图片转存失败,源站可能有防盗链机制,建议将图片保存下来直接上传(img-f0olBxYK-1679916395536)(C:\Users\Administrator\AppData\Roaming\Typora\typora-user-images\image-20230321111946431.png)]](https://images2.imgbox.com/44/33/eB0PpnZa_o.png)
![[外链图片转存失败,源站可能有防盗链机制,建议将图片保存下来直接上传(img-OX40C7Tr-1679916395536)(C:\Users\Administrator\AppData\Roaming\Typora\typora-user-images\image-20230321112530566.png)]](https://images2.imgbox.com/ea/a8/6oon73Wq_o.png)
IOC本质
![[外链图片转存失败,源站可能有防盗链机制,建议将图片保存下来直接上传(img-6RymjwxT-1679916395536)(C:\Users\Administrator\AppData\Roaming\Typora\typora-user-images\image-20230321112810719.png)]](https://images2.imgbox.com/4b/ba/dYvj0nSl_o.png)
3. HelloSpring
![[外链图片转存失败,源站可能有防盗链机制,建议将图片保存下来直接上传(img-k7nue1dx-1679916395536)(C:\Users\Administrator\AppData\Roaming\Typora\typora-user-images\image-20230321113508144.png)]](https://images2.imgbox.com/0e/6d/OeVdHsXK_o.png)
![[外链图片转存失败,源站可能有防盗链机制,建议将图片保存下来直接上传(img-lzt05GA0-1679916395536)(C:\Users\Administrator\AppData\Roaming\Typora\typora-user-images\image-20230321113602327.png)]](https://images2.imgbox.com/79/e3/IoLH5d8r_o.png)
![[外链图片转存失败,源站可能有防盗链机制,建议将图片保存下来直接上传(img-s2qx1Zm5-1679916395537)(C:\Users\Administrator\AppData\Roaming\Typora\typora-user-images\image-20230321113630718.png)]](https://images2.imgbox.com/f7/0b/382pAQLv_o.png)
![[外链图片转存失败,源站可能有防盗链机制,建议将图片保存下来直接上传(img-wFx1wJRp-1679916395537)(C:\Users\Administrator\AppData\Roaming\Typora\typora-user-images\image-20230321113857926.png)]](https://images2.imgbox.com/ad/90/liBXC9ce_o.png)
![[外链图片转存失败,源站可能有防盗链机制,建议将图片保存下来直接上传(img-jiEDN8nl-1679916395537)(C:\Users\Administrator\AppData\Roaming\Typora\typora-user-images\image-20230321114051722.png)]](https://images2.imgbox.com/59/30/IGYizTaI_o.png)
4. IOC创建对象的方式
- 使用无参构造创建对象, 默认!
- 假设我们要使用有参构造创建对象!
![[外链图片转存失败,源站可能有防盗链机制,建议将图片保存下来直接上传(img-PyNC8aTX-1679916395537)(C:\Users\Administrator\AppData\Roaming\Typora\typora-user-images\image-20230321121644681.png)]](https://images2.imgbox.com/3a/4f/0tmjcUAP_o.png)
总结: 在配置文件加载的时候, 容器中管理就已经初始化了!
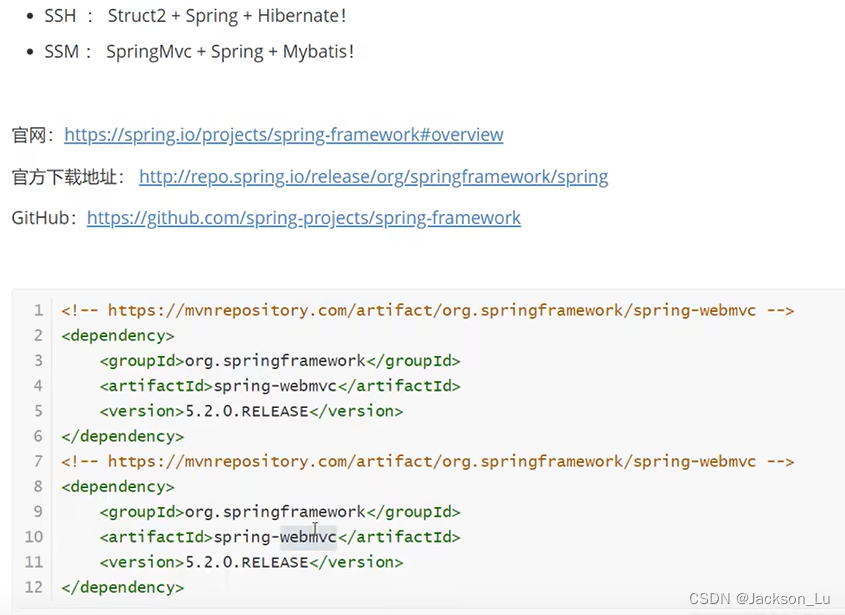
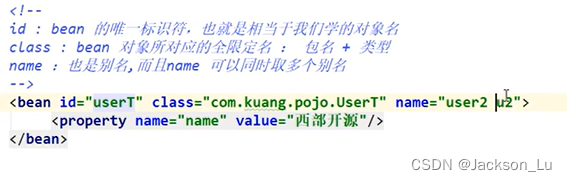
5.Spring配置
5.1 别名
<!-- 如果使用了别名,  -->
<alias name="user" alias="userNew"/>
5.2 Bean的配置
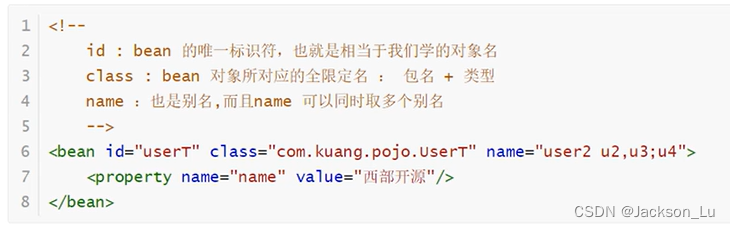
5.3 import
6. 依赖注入
6.1 构造器注入
6.2 Set方式注入
- 依赖注入: Set注入
- bean对象创建依赖 容器
- bean对象中的所有属性, 有 容器来注入!!
环境搭建
- 复杂类型
public class Address {
	private String address;

	public String getAddress() {
		return address;
	}
	public void setAddress(String address) {
		this.address = address;
	}

}
- 真实测试对象
public class Student {

	private String name;
	private Address address;
	private String[] bookes;
	private List<String> hobbies;
	private Map<String, String> card;
	private String wife;
	private Set<String> games;
	private Properties info;
}
- beans.xml
<?xml version="1.0" encoding="UTF-8"?>
<beans xmlns="http://www.springframework.org/schema/beans"
    xmlns:xsi="http://www.w3.org/2001/XMLSchema-instance"
    xsi:schemaLocation="http://www.springframework.org/schema/beans
        http://www.springframework.org/schema/beans/spring-beans.xsd">

	<bean id="student" class="com.ljs.pojo.Student">
		<!-- 1. 普通纸注入, value设置 -->
		<property name="name" value="张三丰"></property>
		<property name="address" value="广西南宁"></property>
	</bean>

</beans>
- 测试类
public class MyTest {
@SuppressWarnings("resource")
public static void main(String[] args) {
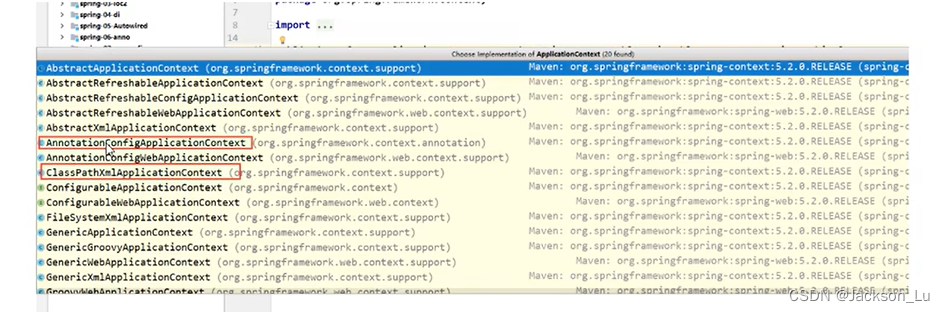
ApplicationContext context = new ClassPathXmlApplicationContext("beans.xml");
Student student = (Student) context.getBean("student");
System.out.println(student.toString());
}
}
完善注入信息:
	<bean id="address" class="com.ljs.pojo.Address">
		<property name="address" value="南宁"></property>
	</bean>

	<bean id="student" class="com.ljs.pojo.Student">
		<!-- 1. 普通纸注入, value设置 -->
		<property name="name" value="张三丰"></property>

		<!-- 2. Bean注入, ref -->
		<property name="address" ref="address"></property>

		<!-- 数组注入, ref -->
		<property name="books">
			<array>
				<value>红楼梦</value>
				<value>西游记</value>
				<value>水浒传</value>
				<value>三国演义</value>
				<value>金瓶梅</value>
			</array>
		</property>

		<!-- list -->
		<property name="hobbies">
			<list>
				<value>听歌</value>
				<value>看电影</value>
				<value>敲代码</value>
			</list>

		</property>

		<!-- Map -->
		<property name="card">
			<map>
				<entry key="身份证" value="123456789132456"></entry>
				<entry key="银行卡" value="621722222555555555555"></entry>
			</map>
		</property>

		<!-- Set -->
		<property name="games">
			<set>
				<value>LOL</value>
				<value>COC</value>
				<value>BOB</value>
			</set>
		</property>

		<!-- null -->
		<property name="wife">
			<null/>
		</property>

		<!-- Properties -->
		<property name="info">
			<props>
				<prop key="学号">20220255</prop>
				<prop key="性别">男</prop>
				<prop key="username">张三丰</prop>
				<prop key="pad">123456</prop>
			</props>

		</property>

	</bean>
6.3 拓展方式注入
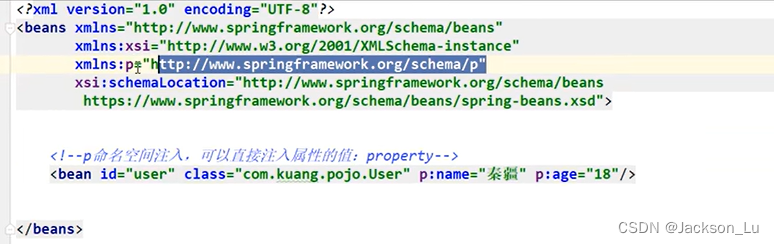
我们可以使用p命名空间和c命名空间进行注入
官方解释:
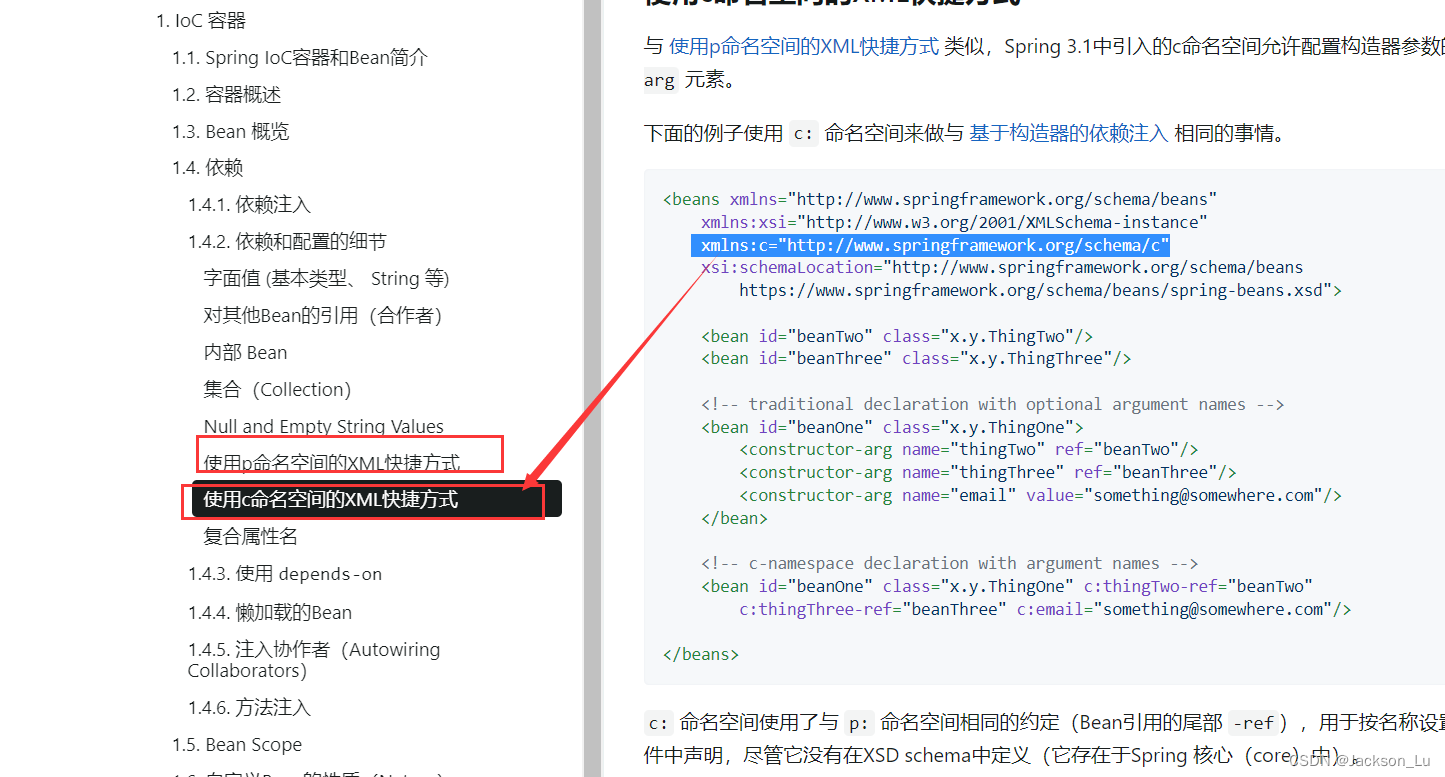
注意点: p和c命名空间不能直接使用, 需要导入xml约束
xmlns:p=“http://www.springframework.org/schema/p”
xmlns:c=“http://www.springframework.org/schema/c”
p命名空间
c命名空间
xmlns:c=“http://www.springframework.org/schema/c”

6.4 bean作用域
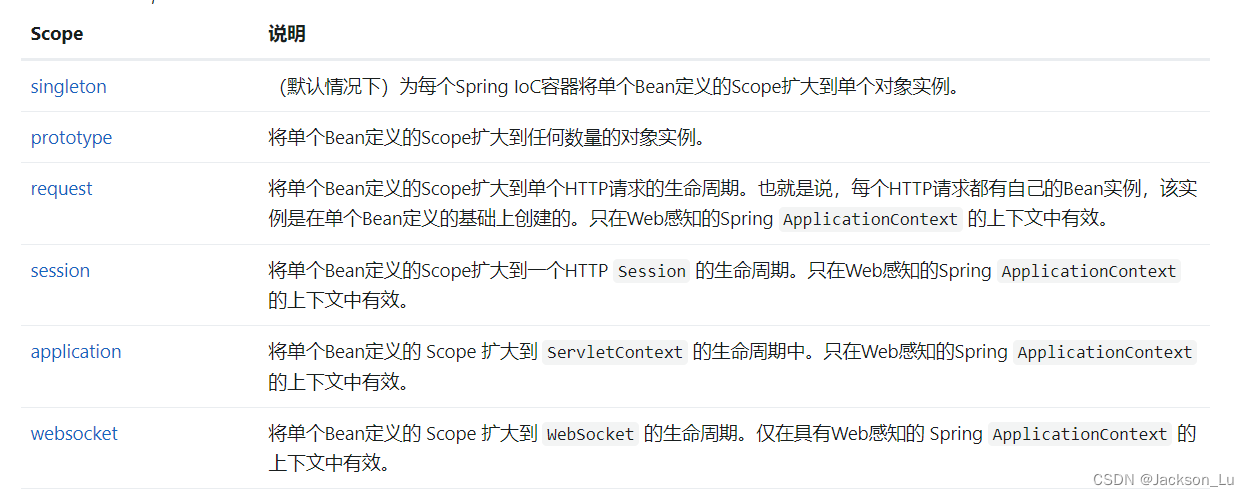
- 单例模式 (Spring 默认机制)

-
原型模式: 每次从容器中get的时候, 都会产生一个新的对象!

-
其余的Request、 Session、 Application 这些只能在web开发中使用到!
7. bean的自动装配
- 自动装配是Spring满足bean依赖的一种方式!
- Spring会在上下文中自动寻找, 并自动 给bean装配属性!
在Spring中有三种装配的方式
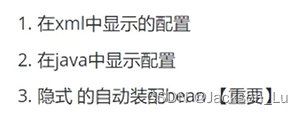
- 在xml中显示的配置
- 在java中显示配置
- 隐式的自动装配bean
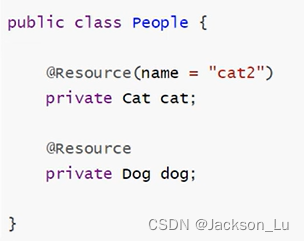
7.1 测试
环境搭建: 一个人两个宠物
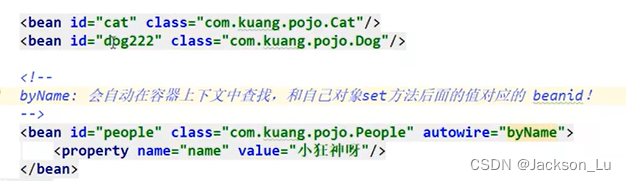
7.2 ByName自动装配

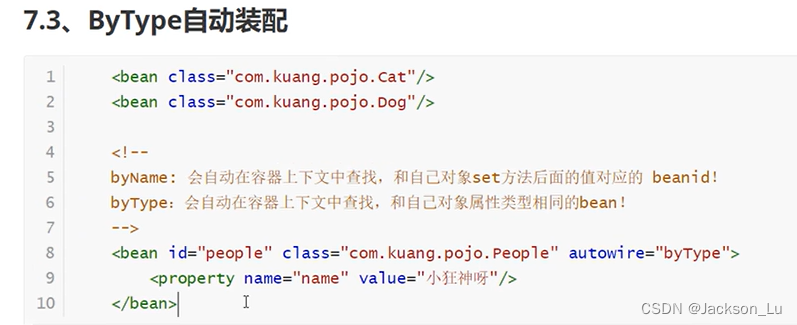
7.3 byType 自动装配

7.4 使用注解实现自动装配
jdk1.5 支持的注解, Spring2.5支持的注解
要使用注解须知:
- 导入约束 xmlns:context=“http://www.springframework.org/schema/context”
- 配置注解的支持 context:annotation-config/
<?xml version="1.0" encoding="UTF-8"?>
<beans xmlns="http://www.springframework.org/schema/beans"
    xmlns:xsi="http://www.w3.org/2001/XMLSchema-instance"
    xmlns:context="http://www.springframework.org/schema/context"
    xsi:schemaLocation="http://www.springframework.org/schema/beans
        https://www.springframework.org/schema/beans/spring-beans.xsd
        http://www.springframework.org/schema/context
        https://www.springframework.org/schema/context/spring-context.xsd">
	<!-- 开启注解 -->
    <context:annotation-config/>

</beans>
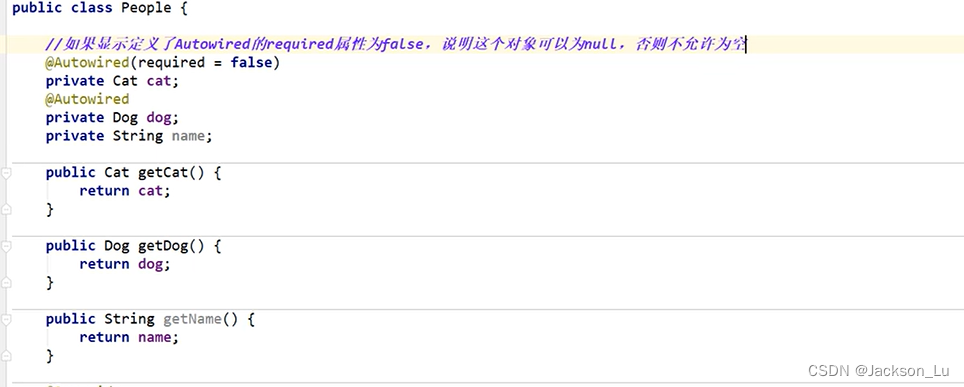
@Autowired
直接在属性上使用即可!也可以在set方法上使用!
使用Autowired 我们可以不用编写Set方法了, 前提是你这个自动装配的属性在IOC(Spring) 容器中存在 且符合名字byname!
科普:
@NullAble

@Resource注解
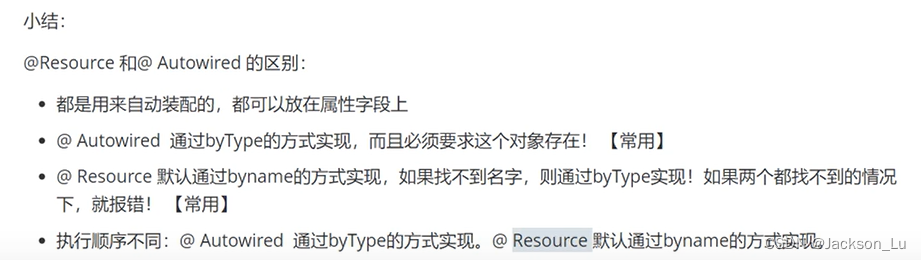
小结:
@Autowired和@Resource的区别
- 都是用来自动装配的,都可以放在属性字段上
8. 使用注解开发
在Spring4之后,要使用注解开发,必须保证aop的包的导入了
- bean
- 属性如何注入
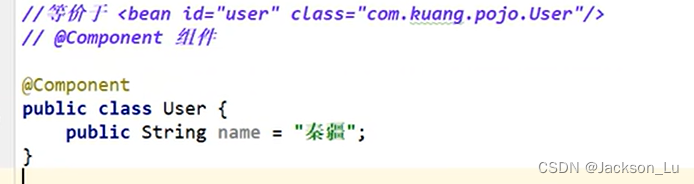
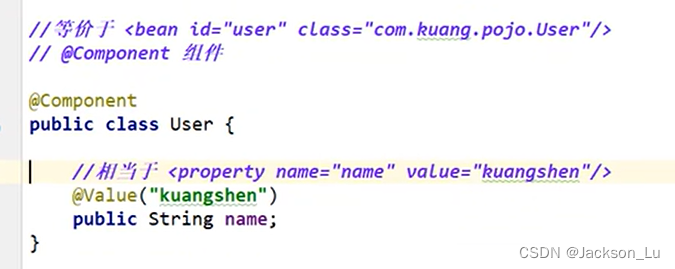
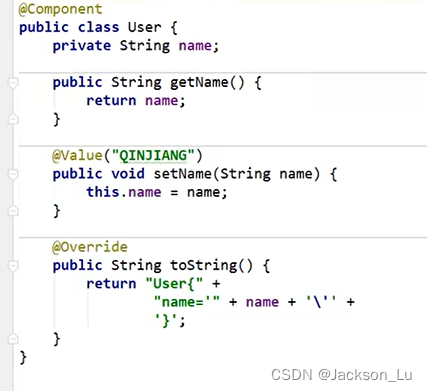
@Component
public class User {

	@Value("张三丰")
	private String name;


}
- 衍生的注解
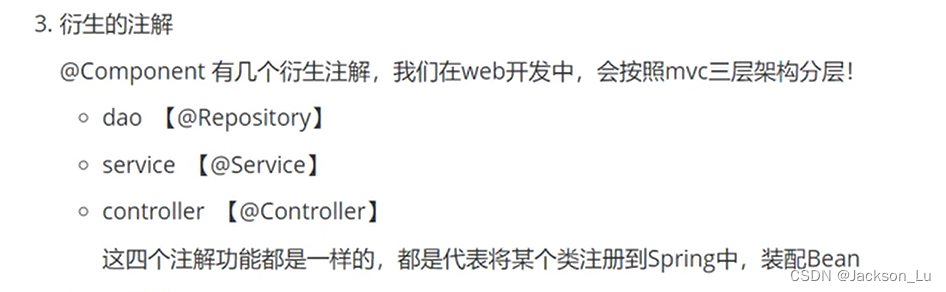
@Component
- 自动装配置
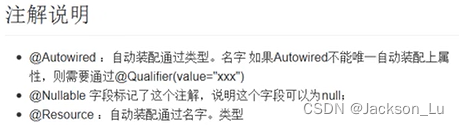
## 1. @Autowired
**自动转配,通过类型,名字;**
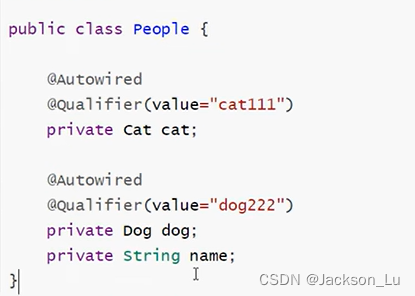
**如果Autowired不能唯一自动装配属性,则需要通过@Qualifier(value="xxx")**
## 2.@Nullable
**字段标记 了这个注解,说明这个字段可以为null**
## 3. @Resource
**自动装配通过名字, 类型**
-
作用域
@Component//组件标识bean @Scope("singleton")//作用域 public class User { @Value("张三丰")//set注入属性值 private String name; } -
小结
xml 与注解:
- xml 更万能, 使用与任何场合,维护简单方便!
- 注解 不是自己的类使用不了,维护相对复杂
xml 与 纾解最佳实践
- xml 用来管理bean
- 注解只负责完成属性的注入
- 我们在使用的过程中, 只需要注意一个问题: 必须让注解生效, 就需要开启注解的支持
	<!-- 注解驱动: 开启注解 -->
    <context:annotation-config/>
    <!-- 扫描的包 -->
    <context:component-scan base-package="com.ljs"></context:component-scan>

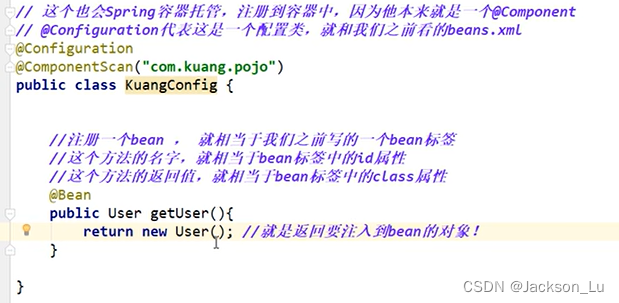
9. 使用Java的方式配置Spring
我们现在要完全不适用Spring的xml配置,全权交个Java来做!
JavaConfig 是Spring的一个子项目, 在Spring4之后, 他成为了一个核心的功能!
配置类:
@Import(xxx.class)
实体类:
测试类:

10. 代理模式

代理模式的分类:
- 静态代理
- 动态代理
10.1 静态代理
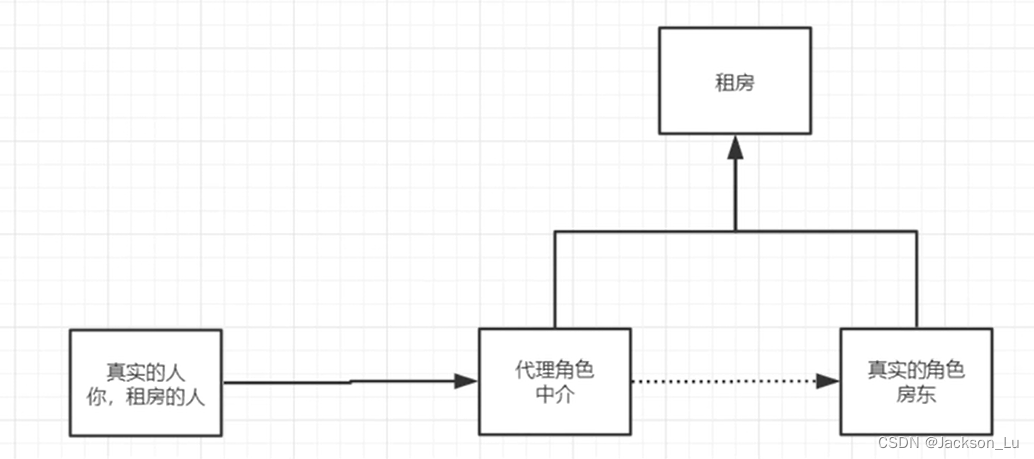
角色分析:
- 抽象角色: 一般会使用接口或者抽象类来角色
- 真实角色: 被代理的角色
- 代理角色: 代理真实角色, 代理真实角色后, 我们一般会做一些附属的操作
- 客户: 访问代理对象的人!
代码步骤:
- 接口
public interface Rent {

	public void rent();
}
- 真实角色
public class Host implements Rent{
	public void rent() {
		System.out.println("房东要出租房子!");
	}
}
- 代理角色
public class Proxy {

	private Host host;

	public Proxy() {
	}

	public Proxy(Host host) {
		this.host = host;
	}

	public void rent() {
		seeHouse();
		host.rent();
		contract();
		pare();
	}
	//看房
	public void seeHouse() {
		System.out.println("中介带你看房子!");
	}
	//前租赁合同
	public void contract() {
		System.out.println("前租赁合同");
	}
	//收中介费
	public void pare() {
		System.out.println("收中介费");
	}

}
- 客户端访问代理角色
public class Client {

	public static void main(String[] args) {

		//房东要出租房子
		Host host = new Host();

		//代理, 中介帮房东出租房子, 代理角色一般会做一些附属操作!
		Proxy proxy = new Proxy(host);

		proxy.rent();

	}
}
代理模式的好处:
- 可以使真实角色的操作更加纯粹! 不用关心一些公共的业务
- 公共也就交给代理角色,实现了业务的分工!
- 公共业务发生拓展的时候,方便集中管理!
缺点:
- 一个真实角色就产生一个代理角色; 代码量会翻倍, 开发效率变低!
10.2 加深理解
10.3 动态代理
- 动态代理和静态代理角色一样;
- 动态代理的代理类是动态生成的, 不是我们直接写好的!
- 动态代理分为两大类: 基于接口的动态代理; 基于类的动态代理
- 基于接口: —JDK 动态代理
- 基于类 : cglib
- java 字节码实现: JAVAssist
需要了解两个类: Proxy :代理 , InvocationHandler: 调用处理程序
动态代理的好处:
- 可以使真实角色的操作更加纯粹! 不用关心一些公共的业务
- 公共也就交给代理角色,实现了业务的分工!
- 公共业务发生拓展的时候,方便集中管理!
- 一个动态代理类代理的是一个接口, 一般就是对应的是一类业务;
- 一个动态代理类可以代理多个类.只要是实现了同一个接口即可!
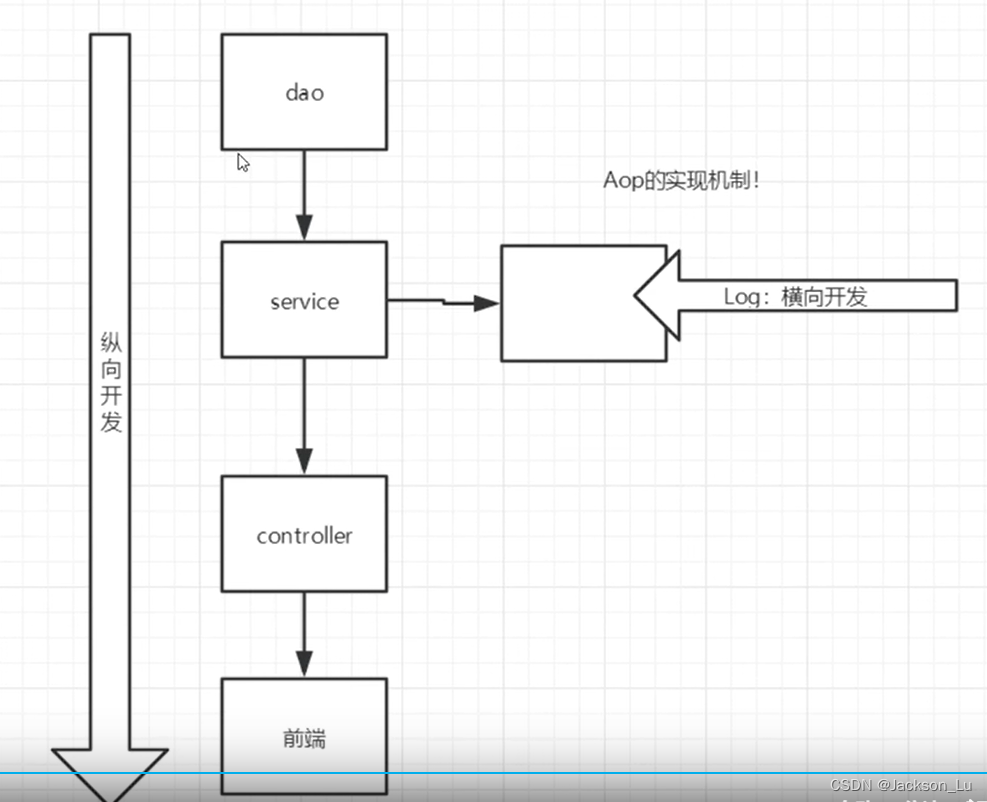
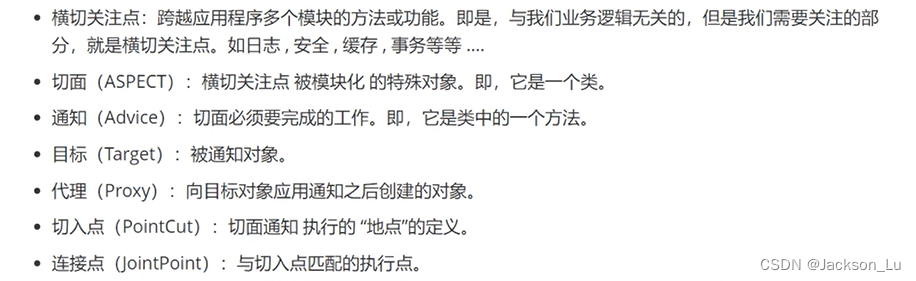
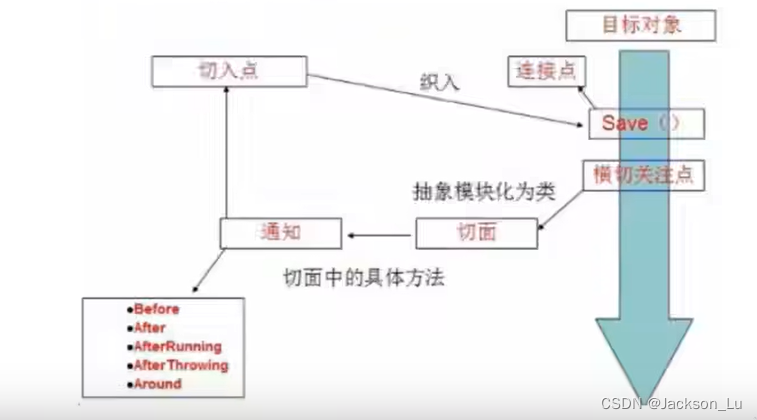
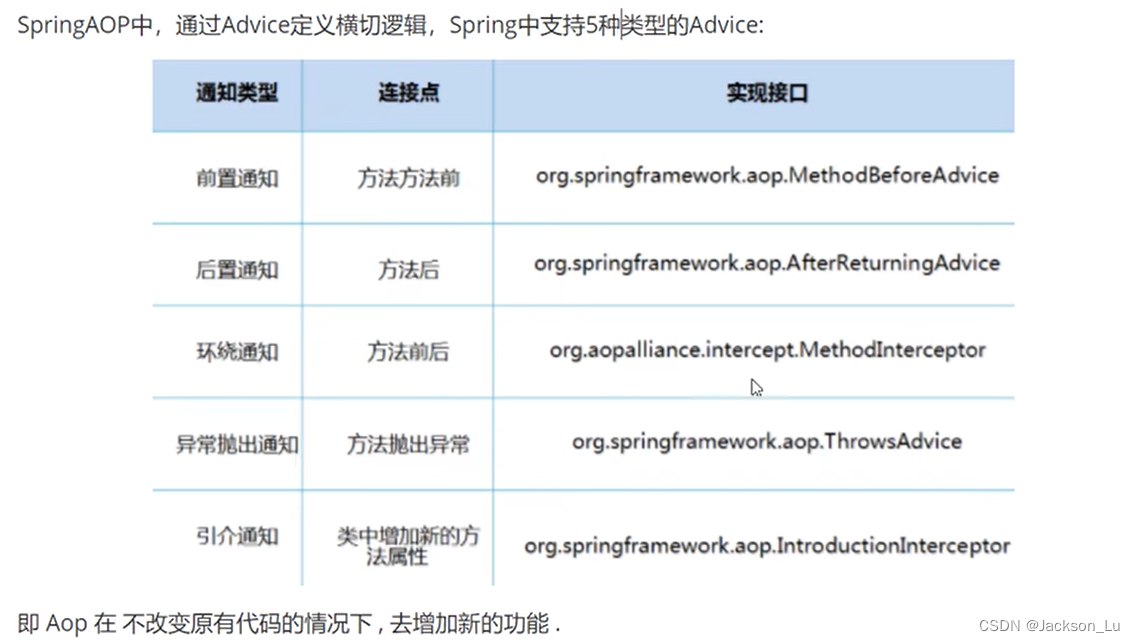
11. AOP
11.1 什么是AOP

11.2 AOP在Spring中作用
提供声明式事务;允许用户自定义切面
11.3 使用Spring实现AOP
[重点] 使用AOP植入,需要一个依赖包!
  	  <!-- https://mvnrepository.com/artifact/org.aspectj/aspectjweaver -->
    <dependency>
      <groupId>org.aspectj</groupId>
      <artifactId>aspectjweaver</artifactId>
      <version>1.9.4</version>
    </dependency>
方式一: 使用原生Spring API实现接口
- 准备业务接口
package com.ljs.service;

public interface UserService {

	public void add();
	public void delete();
	public void edit();
	public void select();

}
- 实现类
package com.ljs.service;

public class UserServiceImpl implements UserService {

	public void add() {
		System.out.println("add one --------");
	}

	public void delete() {
		System.out.println("delete one--------");
	}

	public void edit() {
		System.out.println("edit one --------");
	}

	public void select() {
		System.out.println("select one--------");
	}

}
- 增强类
import java.lang.reflect.Method;

import org.springframework.aop.AfterReturningAdvice;

public class AfterLog implements AfterReturningAdvice{

	//returnValue: 返回值
	public void afterReturning(Object returnValue, Method method, Object[] args, Object target) throws Throwable {
		System.out.println("执行了" + method.getName() + "方法, 返回结果为:" + returnValue);
	}

}
import java.lang.reflect.Method;

import org.springframework.aop.MethodBeforeAdvice;

public class BeforLog implements MethodBeforeAdvice{

	//method: 要执行的目标对象的方法
	//args: 参数
	//target: 目标
	public void before(Method method, Object[] args, Object target) throws Throwable {
		System.out.println(target.getClass().getName() + "的" + method.getName() + "方法被执行了!!!!");
	}

}
- xml配置
<?xml version="1.0" encoding="UTF-8"?>
<beans xmlns="http://www.springframework.org/schema/beans"
    xmlns:xsi="http://www.w3.org/2001/XMLSchema-instance"
    xmlns:aop="http://www.springframework.org/schema/aop"
    xsi:schemaLocation="http://www.springframework.org/schema/beans
        https://www.springframework.org/schema/beans/spring-beans.xsd
         http://www.springframework.org/schema/aop
        https://www.springframework.org/schema/aop/spring-aop.xsd">

    <!-- 注册bean -->
    <bean id="userService" class="com.ljs.service.UserServiceImpl"/>
    <bean id="beforLog" class="com.ljs.log.BeforLog"/>
    <bean id="afterLog" class="com.ljs.log.AfterLog"/>

    <!-- 方式一: 使用原生的Spring API接口 -->
    <!-- 配置aop: 需要导入aop的约束 -->
	<aop:config>
		<!-- 切入点: expression:表达式.execution(要执行的位置! * * * *)  -->
		<aop:pointcut id="pointcut1" expression="execution(* com.ljs.service.UserServiceImpl.*(..))"/>

		<!-- 执行环绕增加 -->
		<aop:advisor pointcut-ref="pointcut1" advice-ref="beforLog"/>
		<aop:advisor pointcut-ref="pointcut1" advice-ref="afterLog"/>
	</aop:config>

</beans>
- 测试类
import org.springframework.context.ApplicationContext;
import org.springframework.context.support.ClassPathXmlApplicationContext;

import com.ljs.service.UserService;

public class MyTest {

	public static void main(String[] args) {

		ApplicationContext context = new ClassPathXmlApplicationContext("applicationContext.xml");

		UserService user = (UserService) context.getBean("userService");

		user.add();

	}

}
测试结果:
com.ljs.service.UserServiceImpl的add方法被执行了!!!!
add one --------
执行了add方法, 返回结果为:null
方式二: 自定义实现
- 自定类
package com.ljs.diy;

public class DIYService {

	public void before() {
		System.out.println("=========执行方法前===========");
	}
	public void after() {
		System.out.println("------执行方法后--------");
	}

}
- 配置xml
<?xml version="1.0" encoding="UTF-8"?>
<beans xmlns="http://www.springframework.org/schema/beans"
    xmlns:xsi="http://www.w3.org/2001/XMLSchema-instance"
    xmlns:aop="http://www.springframework.org/schema/aop"
    xsi:schemaLocation="http://www.springframework.org/schema/beans
        https://www.springframework.org/schema/beans/spring-beans.xsd
         http://www.springframework.org/schema/aop
        https://www.springframework.org/schema/aop/spring-aop.xsd">

    <!-- 注册bean -->
    <bean id="userService" class="com.ljs.service.UserServiceImpl"/>
    <bean id="beforLog" class="com.ljs.log.BeforLog"/>
    <bean id="afterLog" class="com.ljs.log.AfterLog"/>

	<!-- 方式二: 自定义类 -->
	<bean id="diy" class="com.ljs.diy.DIYService"/>
	<aop:config>
		<!-- 自定义切面, ref 要引用的类 -->
		<aop:aspect ref="diy">
			<!-- 切入点 -->
			<aop:pointcut expression="execution(* com.ljs.service.UserServiceImpl.*(..))" id="point"/>
			<!-- 通知 -->
			<aop:before method="befor()" pointcut-ref="point"/>
			<aop:before method="after()" pointcut-ref="point"/>
		</aop:aspect>
	</aop:config>

</beans>
- 其他与方式一相同
测试结果:
=========执行方法前===========
add one --------
------执行方法后--------
方式三:使用注解实现
- 定义切面的类
import org.aspectj.lang.ProceedingJoinPoint;
import org.aspectj.lang.annotation.After;
import org.aspectj.lang.annotation.Around;
import org.aspectj.lang.annotation.Aspect;
import org.aspectj.lang.annotation.Before;

@Aspect//标识这个类是一个切面
public class AnnotationPointCut {

	@Before("execution(* com.ljs.service.UserServiceImpl.*(..))")
	public void before() {
		System.out.println("--=-=-=-=-=方法执行前-=------=--=-==-");
	}

	@After("execution(* com.ljs.service.UserServiceImpl.*(..))")
	public void after() {
		System.out.println("--=-=-=-=-=方法执行后后-=------=--=-==-");
	}

	@Around("execution(* com.ljs.service.UserServiceImpl.*(..))")
	public void around(ProceedingJoinPoint pj) throws Throwable {

		System.out.println("=====环绕前====");
		pj.proceed();//方法执行
		System.out.println("=====环绕后====");

	}
}
- 配置xml
<?xml version="1.0" encoding="UTF-8"?>
<beans xmlns="http://www.springframework.org/schema/beans"
    xmlns:xsi="http://www.w3.org/2001/XMLSchema-instance"
    xmlns:aop="http://www.springframework.org/schema/aop"
    xsi:schemaLocation="http://www.springframework.org/schema/beans
        https://www.springframework.org/schema/beans/spring-beans.xsd
         http://www.springframework.org/schema/aop
        https://www.springframework.org/schema/aop/spring-aop.xsd">

    <!-- 注册bean -->
    <bean id="userService" class="com.ljs.service.UserServiceImpl"/>
    <bean id="beforLog" class="com.ljs.log.BeforLog"/>
    <bean id="afterLog" class="com.ljs.log.AfterLog"/>

	<!-- 方式三: -->
	<bean id="annotationPointCut" class="com.ljs.diy.AnnotationPointCut"/>
	<!-- 开启注解支持 --><!-- JDK(默认 proxy-target-class="false") cglib(proxy-target-class="true") -->
	<aop:aspectj-autoproxy proxy-target-class="true"/>

</beans>
- 其他与方式一相同
测试结果:
=========执行方法前===========
add one --------
------执行方法后--------
12. 整合Mybatis
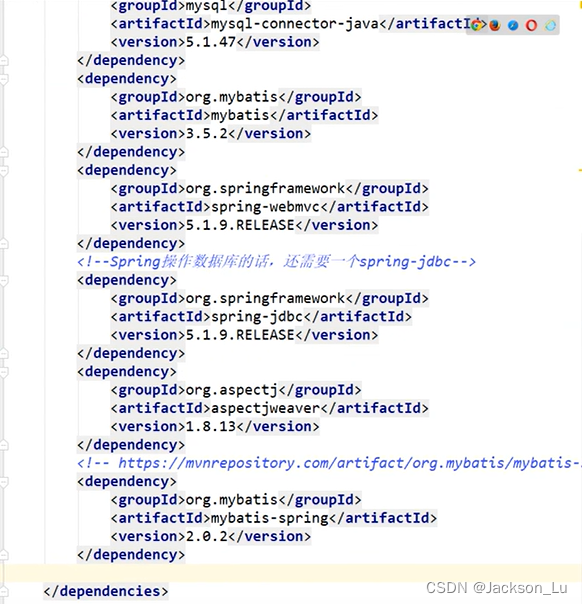
步骤:
-
导入相关jar包
- Junit
- mybatis
- mysql数据库
- spring相关的
- aop织入
- mybatis-config [new]
12.1 回忆mybatis
- 编写实体类
public class User {

	private int id;
	private String name;
	private String pwd;
}
- 编写核心配置文件
<?xml version="1.0" encoding="UTF-8" ?>
<!DOCTYPE configuration
PUBLIC "-//mybatis.org//DTD Config 3.0//EN"
"https://mybatis.org/dtd/mybatis-3-config.dtd">
<configuration>
<typeAliases>
<package name="com.ljs.pojo"/>
</typeAliases>
<environments default="development"><!-- 环境配置:development开发; test测试 -->
<environment id="development">
<transactionManager type="JDBC"/><!-- 配置事务管理方式:JDBC/MANAGED -->
<dataSource type="POOLED"><!-- 配置数据源,即连接池 JNDI已过时 /POOLED:使用连接池(推荐)/UNPOOLED:不使用连接池 -->
<property name="driver" value="com.mysql.cj.jdbc.Driver"/>
<property name="url" value="jdbc:mysql://localhost:3306/mybatis?useSSL=true&useUnicode=true&characterEncoding=utf8"/>
<property name="username" value="root"/>
<property name="password" value="root123"/>
</dataSource>
</environment>
</environments>
<mappers>
<mapper resource="com/ljs/mapper/UserMapper.xml"/>
</mappers>
</configuration>
- 编写接口
public interface UserMapper {

	public List<User> selectUser();
}
- 编写Mapper.xml
<?xml version="1.0" encoding="UTF-8" ?>
<!DOCTYPE mapper
  PUBLIC "-//mybatis.org//DTD Mapper 3.0//EN"
  "https://mybatis.org/dtd/mybatis-3-mapper.dtd">

<mapper namespace="com.ljs.mapper.UserMapper">

	<select id="selectUser" resultType="User">
		select * from User
	</select>

</mapper>
- 测试
@Test
public void test() throws IOException {
    InputStream inputStream = Resources.getResourceAsStream("mybatis-config.xml");

    SqlSessionFactory factory = new SqlSessionFactoryBuilder().build(inputStream);

    SqlSession sqlSession = factory.openSession(true);
    UserMapper mapper = sqlSession.getMapper(UserMapper.class);

    List<User> list = mapper.selectUser();

    for (User user : list) {
        System.out.println(user.toString());
    }
}
12.2 Mybatis-spring
- 编写数据源配置
<?xml version="1.0" encoding="UTF-8"?>
<beans xmlns="http://www.springframework.org/schema/beans"
xmlns:xsi="http://www.w3.org/2001/XMLSchema-instance"
xmlns:aop="http://www.springframework.org/schema/aop"
xsi:schemaLocation="http://www.springframework.org/schema/beans
https://www.springframework.org/schema/beans/spring-beans.xsd
http://www.springframework.org/schema/aop
https://www.springframework.org/schema/aop/spring-aop.xsd">
<!-- DadaSource: 使用Spring的数据源替换Mybatis的配置 c3p0 -->
<bean id="dataSource" class="org.springframework.jdbc.datasource.DriverManagerDataSource">
<property name="driverClassName" value="com.mysql.cj.jdbc.Driver"/>
<property name="url" value="jdbc:mysql://localhost:3306/mybatis?useSSL=true&useUnicode=true&characterEncoding=utf8"/>
<property name="username" value="root"/>
<property name="password" value="root123"></property>
</bean>
</beans>
- sqlSessionfactory
	<!--  sqlSessionFactory-->
	<bean id="sqlSessionFactory" class="org.mybatis.spring.SqlSessionFactoryBean">
	  <property name="dataSource" ref="dataSource" /><!-- 数据源 -->
	  <!-- 绑定Mybatis配置文件 -->
	  <property name="configLocation" value="classpath:mybatis-config.xml"></property>
	 <!--  <property name="mapperLocations" value="classpath:com/ljs/mapper/UserMapper.xml" /> -->
	  <property name="mapperLocations" value="classpath:com/ljs/mapper/*.xml" />
	</bean>
- sqlSessionTemplate
	<!--SqlSessionTemplate:就是我们使用的sqlSession  -->
	<bean id="sqlSession" class="org.mybatis.spring.SqlSessionTemplate" >
		<!-- 只能使用构造器注入sqlSessionFactory, 因为他没有set方法 -->
		<constructor-arg index="0" ref="sqlSessionFactory"></constructor-arg>
	</bean>
- 需要给接口加实现类
public class UserMapperImpl implements UserMapper{

	//我们使用的所有操作,都是用sqlSession来执行, 在原来, 现在都使用SqlSessionTemplate;
	private SqlSessionTemplate sqlSession;

	public void setSqlSession(SqlSessionTemplate sqlSession) {
		this.sqlSession = sqlSession;
	}

	public List<User> selectUser() {
		// TODO Auto-generated method stub
		UserMapper mapper = sqlSession.getMapper(UserMapper.class);
		return mapper.selectUser();
	}
}
- 将自己写的实现类注入到Spring中, 配置applicationContext.xml
<?xml version="1.0" encoding="UTF-8"?>
<beans xmlns="http://www.springframework.org/schema/beans"
    xmlns:xsi="http://www.w3.org/2001/XMLSchema-instance"
    xmlns:aop="http://www.springframework.org/schema/aop"
    xsi:schemaLocation="http://www.springframework.org/schema/beans
        https://www.springframework.org/schema/beans/spring-beans.xsd
         http://www.springframework.org/schema/aop
        https://www.springframework.org/schema/aop/spring-aop.xsd">

	<!-- 引用Spring配置文件(配置数据源,sqlSessionFactory, sqlSession) -->
	<import resource="spring-dao.xml"/>

	<!--  -->
	<bean id="userMapper" class="com.ljs.mapper.UserMapperImpl" >
		<property name="sqlSession" ref="sqlSession"></property>
	</bean>

</beans>
- 测试
@Test
public void test2() {

    ApplicationContext context = new ClassPathXmlApplicationContext("applicationContext.xml");

    UserMapper mapper = context.getBean("userMapper", UserMapper.class);
    List<User> list = mapper.selectUser();

    for (User user : list) {
        System.out.println(user.toString());
    }
}
13. 声明式事务
13.1 回顾事务
- 把一组业务当成一个业务来做,要么成功,要么失败!
- 事务在项目假发中涉及到数据的一致性和完整性;
事务ACID原则:
- 原子性
- 一致性
- 隔离性
- 多个业务可能操作同一个资源,防止数据损坏
- 持久性
- 事务一旦提交,无论系统发生什么, 结果都不会被影响, 被持久化到储存器中!
13.2 spring中的事务管理
- 声明式事务: AOP
- 编程式事务: 需要在代码中, 进行事务的管理;(由于要对代码进行 修改,故很少这样做)
声明式事务: 使用AOP方式进行实现
步骤:
- 配置声明式事务:
<!-- 配置声明式事务 -->
<bean id="transactionManager" class="org.springframework.jdbc.datasource.DataSourceTransactionManager">
    <constructor-arg ref="dataSource" name="dataSource" />
</bean>
- 配置事务的通知
<!-- 结合AOP实现事务的织入 -->
<!-- 配置事务的通知 -->
<tx:advice id="txAdvice" transaction-manager="transactionManager">
    <!-- 给哪些方法上事务 -->
    <tx:attributes>
        <tx:method name="delete" propagation="REQUIRED"/>
        <tx:method name="update" propagation="REQUIRED"/>
        <tx:method name="insert" propagation="REQUIRED"/>
        <tx:method name="select" propagation="REQUIRED"/>
        <!-- 给所有的方法上事务 -->
        <tx:method name="*" propagation="REQUIRED"/>
    </tx:attributes>
</tx:advice>
- 配置事务切入
	<!-- 配置事务切入 -->
	<aop:config>
		<aop:pointcut expression="execution(* com.ljs.mapper.*.*(..))" id="txpointcut"/>
		<aop:advisor advice-ref="txAdvice" pointcut-ref="txpointcut"/>
	</aop:config>
- 测试类
@Test
public void test() {

    ApplicationContext context = new ClassPathXmlApplicationContext("applicationContext.xml");

    UserMapper usermapper = context.getBean("userMapper", UserMapper.class);

    List<User> list = usermapper.selectUser();

    for (User user : list) {
        System.out.println(user);
    }
}
为什么需要事务:
- 如果不配置事务, 可能存在数据提交不一致的情况;
- 如果我们不在Spring中去配置声明式事务, 我们就需要早代码中手动配置事务!
- 事务在项目开发中十分重要! 涉及到数据的一致性和完整性!
此文章学习的是狂神说java中Spring,感谢狂神!