vim设置F8高亮的功能
tmux
tmux 终端复用详解
可以用来修改冲突
vim -O A文件(rej) B文件
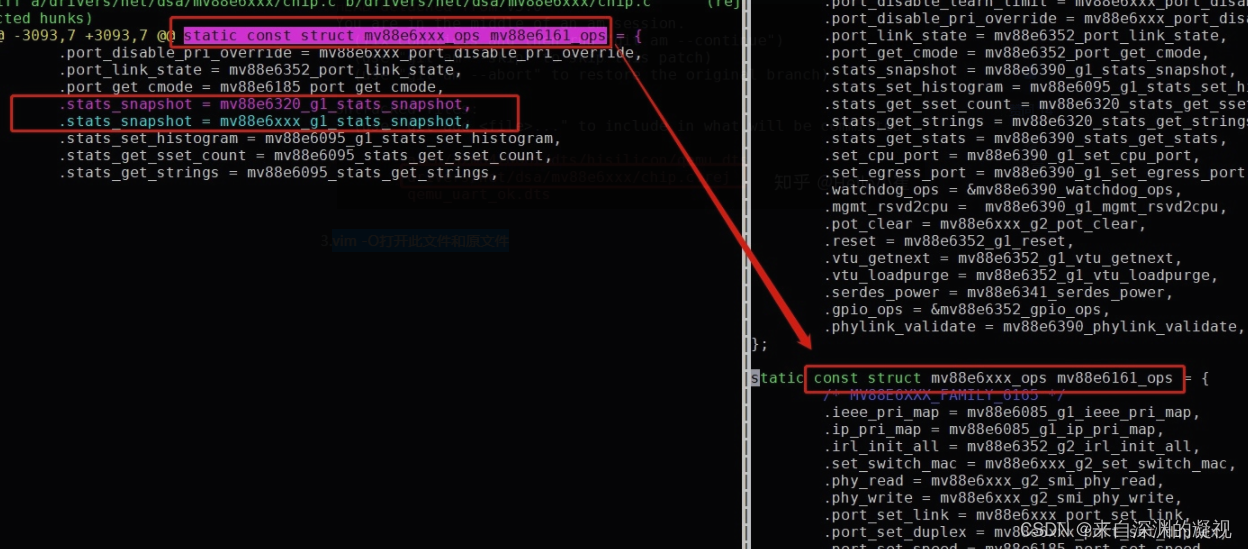
此时掌握几个命令:
ctrl+双w:左右界面切换;

/+字符串:在此文件搜索字符串匹配

shift+v:全选行;

shift+v,上下键:选多行

y:复制

p:粘贴

dd:删除行

活用如上快捷键,可实现从左侧粘贴对应内容,并复制到右侧文件,同时删除想要删除行;
如上修改步骤:
1)光标指向左侧文件+行,shift+v选中,y复制;

2)ctrl+ww到右侧文件,光标指向对应修改行,p粘贴;

3)光标指向希望删除行,dd删除;

4)保存文件;
简单使用方法:
tmux
- ctrl+b % 垂直分屏(组合键之后按一个百分号),用一条垂线把当前窗口分成左右两屏。
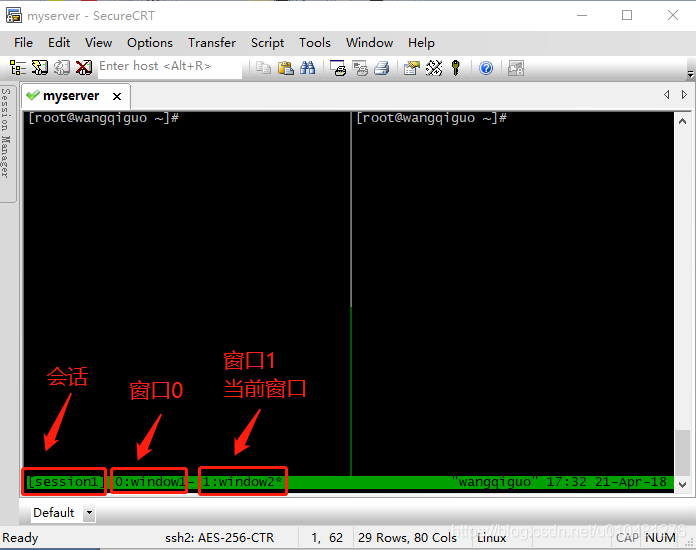
- ctrl+b " 水平分屏(组合键之后按一个双引号),用一条水平线把当前窗口分成上下两屏。
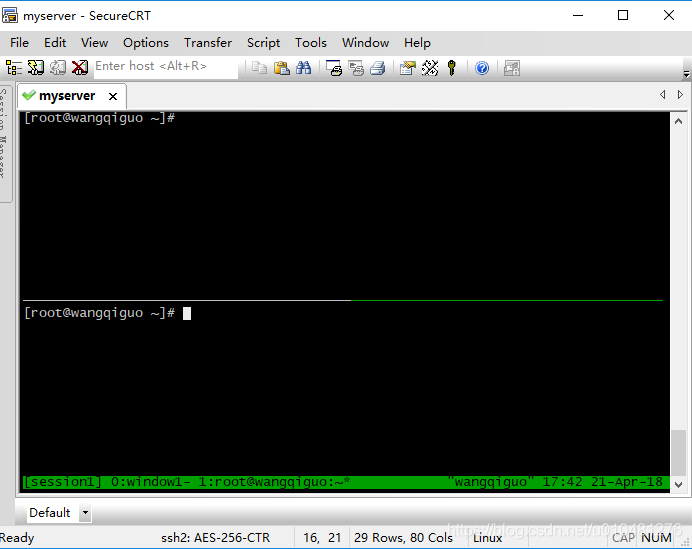
- 切换pane
ctrl+b o 依次切换当前窗口下的各个pane。
ctrl+b Up|Down|Left|Right 根据按箭方向选择切换到某个pane。
ctrl+b Space (空格键) 对当前窗口下的所有pane重新排列布局,每按一次,换一种样式。
ctrl+b z 最大化当前pane。再按一次后恢复。
- 关闭pane
ctrl+b x 关闭当前使用中的pane,操作之后会给出是否关闭的提示,按y确认即关闭。
五
笔输入法:
sudo apt-get install fcitx-table-wubi
配置方法:https://www.cnblogs.com/panlangen/p/8728577.html
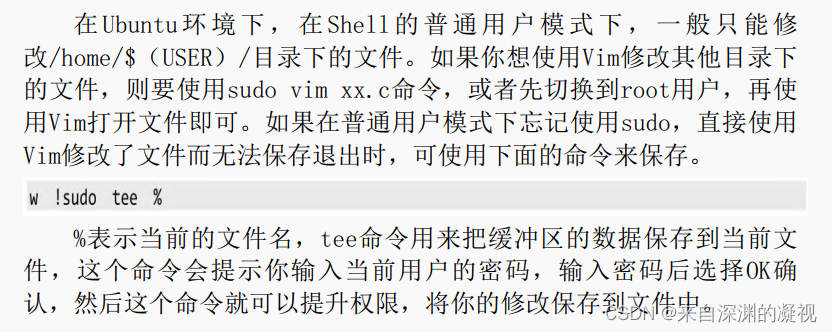
vim保存文件
F8高亮,直接*/#也可以实现
map <F8> m`×``
按住shfit按键,再鼠标右键点击也可以高亮
安装bundle:
git clone https://github.com/VundleVim/Vundle.vim.git ~/.vim/bundle/Vundle.vim
在.vimrc中添加
set nocompatible              " be iMproved, required
filetype on                  " required

" set the runtime path to include Vundle and initialize
set rtp+=~/.vim/bundle/Vundle.vim
call vundle#begin()
" 01.1alternatively, pass a path where Vundle should install plugins
"call vundle#begin('~/some/path/here')

" let Vundle manage Vundle, required
Plugin 'gmarik/Vundle.vim'

" plugin from http://vim-scripts.org/vim/scripts.html
"Plugin 'L9'
" Git plugin not hosted on GitHub
" Plugin 'git://git.wincent.com/command-t.git'
" git repos on your local machine (i.e. when working on your own plugin)
" Plugin 'file:///home/gmarik/path/to/plugin'
" The sparkup vim script is in a subdirectory of this repo called vim.
" Pass the path to set the runtimepath properly.
" Plugin 'rstacruz/sparkup', {'rtp': 'vim/'}
" Avoid a name conflict with L9
" Plugin 'user/L9', {'name': 'newL9'}

" All of your Plugins must be added before the following line
call vundle#end()            " required
filetype plugin indent on    " required
Plugin 'VundleVim/Vundle.vim'
只需要在该配置文件中
安装的插件需要放在
call vundle#begin()

call vundle#end()
之间
添加“Plugin xxx”即可
接下来就是在线安装插件了,启动 vim,然后运行命令“:PluginInstall”,就会从网络上
下载插件并安装
有时安装会出错,用以下方法解决 ,自己用的BundleInstall时就能安装成功了
cscope 工具
刚才介绍的 ctags 工具可以跳转到标签定义的地方,
但是如果想查找函数在哪里被调用过,
或者标签在哪些地方出现过,那么 ctags 就无能为力了,这时候 cscope 可以找到这些功能,
这也是 source insight 强大的功能之一。
cscope 最早由贝尔实验室开发,后来由 SCO 公司已 BSD License 开源发行。我们可以在
ubuntu 发行版中很容易安装它。
sudo apt-get install cscope
在使用 cscope 之前需要对源代码生成索引库。
#cscope -Rbkq
上述命令会生成三个文件:cscope.cout、cscope.in.out 和 cscope.po.out。其中 cscope.out
是基本符合的索引,后面两个文件是使用“-q”选项生成的,用于加快 cscope 索引速度。
在 vim 中使用 cscope 非常简单,首先调用"cscope add"命令添加一个 cscope 数据库,然
后就可以调用"cscope find"命令进行查找了。vim 支持 8 种 cscope 的查询功能,如下:
s: 查找 C 语言符号,即查找函数名、宏、枚举值等出现的地方
g: 查找函数、宏、枚举等定义的位置,类似 ctags 所提供的功能
d: 查找本函数调用的函数
c: 查找调用本函数的函数
t: 查找指定的字符串
e: 查找 egrep 模式,相当于 egrep 功能,但查找速度快多了
f: 查找并打开文件,类似 vim 的 find 功能
i: 查找包含本文件的文件
在.vimrc中添加
" cscope:建立数据库:cscope -Rbq;F5 查找c符号; F6 查找字符串;F7 查找函数定节ao义; F9 类似于egrep那样的快速搜索, "-----------------------------------------------------------
if has("cscope")
	set csprg=/usr/bin/cscope
	set csto=1
	set cst
	set nocsverb
if filereadable("cscope.out")
	cs add cscope.out
endif
set csverb
endif
set cscopequickfix=s-,c-,d-,i-,t-,e-
nmap <silent> <F5> :cs find s <C-R>=expand("<cword>")<CR><CR>
nmap <silent> <F6> :cs find t <C-R>=expand("<cword>")<CR><CR>
nmap <silent> <F7> :cs find c <C-R>=expand("<cword>")<CR><CR>
nmap <silent> <F9> :cs find e <C-R>=expand("<cword>")<CR><CR>
map <F4> :cw<CR><CR>
结果用cw /copen 打开quickfix窗口查看这里map成F4按键了
不同目录生成ctags cscope数据索引的方法:
find system/bt/ common/ hardware/ packages/apps/Bluetooth/ -name "*.h" -o -name "*.c" -o -name "*.cc" -o -name "*.cpp" > cscope.files
cscope -bkq -i cscope.files
ctags -R system/bt/ common/ hardware/ packages/apps/Bluetooth/
cscope -Rbq *
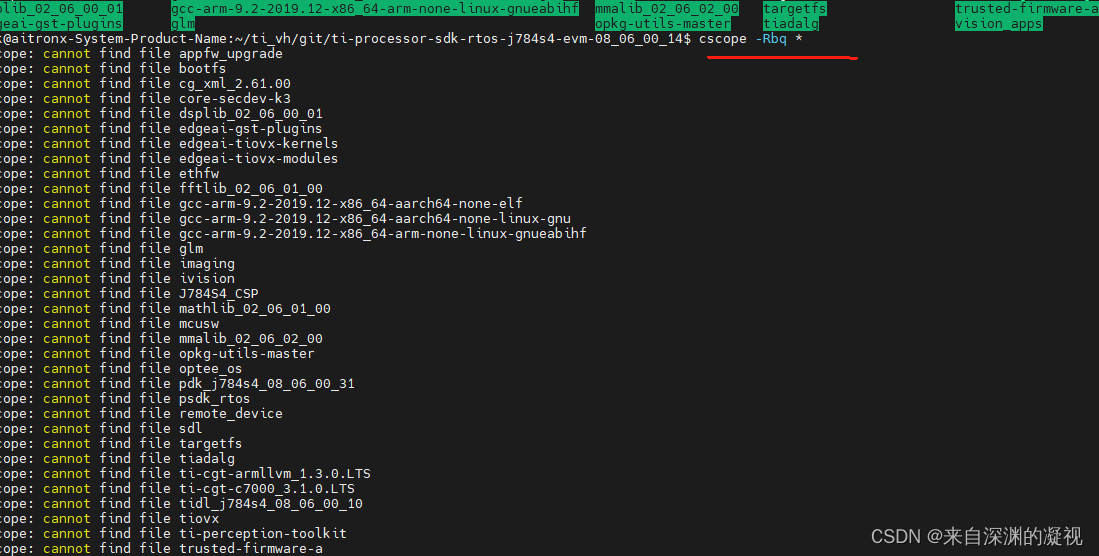
ctags对部分目录生成tags
轻松使用cscope-tags-vim浏览C/C++源代码

注:当某函数有多处定义时,"ctrl+]“默认跳转到第一处索引处,而"g+]” 可以列出该函数的所有索引。
快捷方法:ctrl+] ,g+]
Tagbar
在~/.vimrc中添加
Plugin 'majutsushi/tagbar' " Tag bar"
然后重启vim,执行:PluginInstall来安装
再在~/.vimrc中添加设置
autocmd BufReadPost *.cpp,*.c,*.h,*.cc,*.cxx,*.java,*.py,*.aidl,*.h,*.sh call tagbar#autoopen ()
let g:tagbar_autopreview = 1
let g:tagbar_left = 1
let g:tagbar_ctags_bin = 'ctags'
"let g:tagbar_width = 30
NERDTree
在~/.vimrc中添加
Plugin ‘scrooloose/nerdtree’
    " NetRedTree
    autocmd StdinReadPre * let s:std_in=1
    autocmd VimEnter * NERDTree
    let NERDTreeWinSize=15
    let NERDTreeShowLineNumbers=1
    let NERDTreeAutoCenter=1
    let NERDTreeShowBookmarks=1
    let NERDTreeWinPos="right"
    map :silent! NERDTreeToggle
YouCompleteMe代码补全
Plugin 'Valloric/YouCompleteMe'
或(在高版本中)
Bundle 'Valloric/YouCompleteMe'
然后重启vim,执行:PluginInstall来安装
插件下载后需要重新编译,首先安装编译环境
sudo apt-get install cmake python-dev python3-dev build-essential
检测python版本是否为python3
python
Python 2.7.18 (default, Mar  8 2021, 13:02:45)
[GCC 9.3.0] on linux2
Type "help", "copyright", "credits" or "license" for more information.
>>> quit
Use quit() or Ctrl-D (i.e. EOF) to exit
>>>
安装python-is-python3 YCM默认使用python3
sudo apt install python-is-python3
python
Python 3.8.5 (default, Jan 27 2021, 15:41:15)
[GCC 9.3.0] on linux
Type "help", "copyright", "credits" or "license" for more information.
>>> quit()
编译
$ cd ~/.vim/bundle/YouCompleteMe
$ python3 install.py --clangd-completer
/install.py --clang-completer
出现错误:
ERROR: folder waitress in /home/c2-1222/.vim/bundle/YouCompleteMe/third_party/ycmd/third_party is empty; you probably forgot to run:
	git submodule update --init --recursive
执行
git submodule update --init --recursive
再编译
正克隆到 'third_party/requests_deps/urllib3'...
remote: Enumerating objects: 16148, done.
接收对象中: 100% (16148/16148), 4.40 MiB | 71.00 KiB/s, done.
remote: Total 16148 (delta 0), reused 0 (delta 0), pack-reused 16148
处理 delta 中: 100% (11429/11429), done.
检查连接... 完成。
子模组路径 'third_party/ycmd/third_party/requests_deps/urllib3':检出 'a6ec68a5c5c5743c59fe5c62c635c929586c429b'
正克隆到 'third_party/waitress'...
remote: Enumerating objects: 111, done.
remote: Counting objects: 100% (111/111), done.
remote: Compressing objects: 100% (56/56), done.
remote: Total 3773 (delta 70), reused 79 (delta 55), pack-reused 3662
接收对象中: 100% (3773/3773), 1.26 MiB | 252.00 KiB/s, done.
处理 delta 中: 100% (2544/2544), done.
检查连接... 完成。
子模组路径 'third_party/ycmd/third_party/waitress':检出 '7bb27bb66322fc564e14005d29cb6fddd76a0ab6'
c2-1222@c21222:~/.vim/bundle/YouCompleteMe$
c2-1222@c21222:~/.vim/bundle/YouCompleteMe$ ./install.py --clang-completer
Searching Python 2.7 libraries...
Found Python library: /usr/lib/python2.7/config-x86_64-linux-gnu/libpython2.7.so
Found Python headers folder: /usr/include/python2.7
-- The C compiler identification is GNU 4.8.4
-- The CXX compiler identification is GNU 4.8.4
-- Check for working C compiler: /usr/bin/cc
-- Check for working C compiler: /usr/bin/cc -- works
-- Detecting C compiler ABI info
-- Detecting C compiler ABI info - done
-- Check for working CXX compiler: /usr/bin/c++
-- Check for working CXX compiler: /usr/bin/c++ -- works
-- Detecting CXX compiler ABI info
-- Detecting CXX compiler ABI info - done
-- Found PythonLibs: /usr/lib/python2.7/config-x86_64-linux-gnu/libpython2.7.so (found suitable version "2.7.6", minimum required is "2.7")
-- Downloading libclang 8.0.0 from https://dl.bintray.com/micbou/libclang/libclang-8.0.0-x86_64-unknown-linux-gnu.tar.bz2

CMake Error at ycm/CMakeLists.txt:107 (file):
  file DOWNLOAD HASH mismatch

    for file: [/home/c2-1222/.vim/bundle/YouCompleteMe/third_party/ycmd/cpp/../clang_archives/libclang-8.0.0-x86_64-unknown-linux-gnu.tar.bz2]
      expected hash: [e81a186cd1180ae80c17d67d8d0c101248f8ee032d138cf6f1e95001e733249c]
        actual hash: [e3b0c44298fc1c149afbf4c8996fb92427ae41e4649b934ca495991b7852b855]


CMake Error at ycm/CMakeLists.txt:123 (message):
  Cannot find path to libclang in prebuilt binaries


-- Configuring incomplete, errors occurred!
See also "/tmp/ycm_build_yeD2ra/CMakeFiles/CMakeOutput.log".
ERROR: the build failed.

NOTE: it is *highly* unlikely that this is a bug but rather
that this is a problem with the configuration of your system
or a missing dependency. Please carefully read CONTRIBUTING.md
and if you're sure that it is a bug, please raise an issue on the
issue tracker, including the entire output of this script
and the invocation line used to run it.
出错
安装clang
sudo apt-get install clang-3.3
再编译发现不知道为什么还是找不到python但已安装
后不竟然可以自动补全可以用,无语
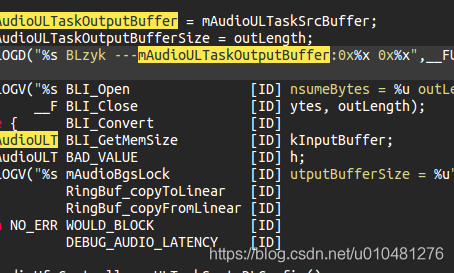
cp ~/.vim/bundle/YouCompleteMe/third_party/ycmd/examples/.ycm_extra_conf.py ~/.vim/
’
在~/.vimrc添加
let g:ycm_server_python_interpreter='/usr/bin/python'
let g:ycm_global_ycm_extra_conf='~/.vim/.ycm_extra_conf.py'
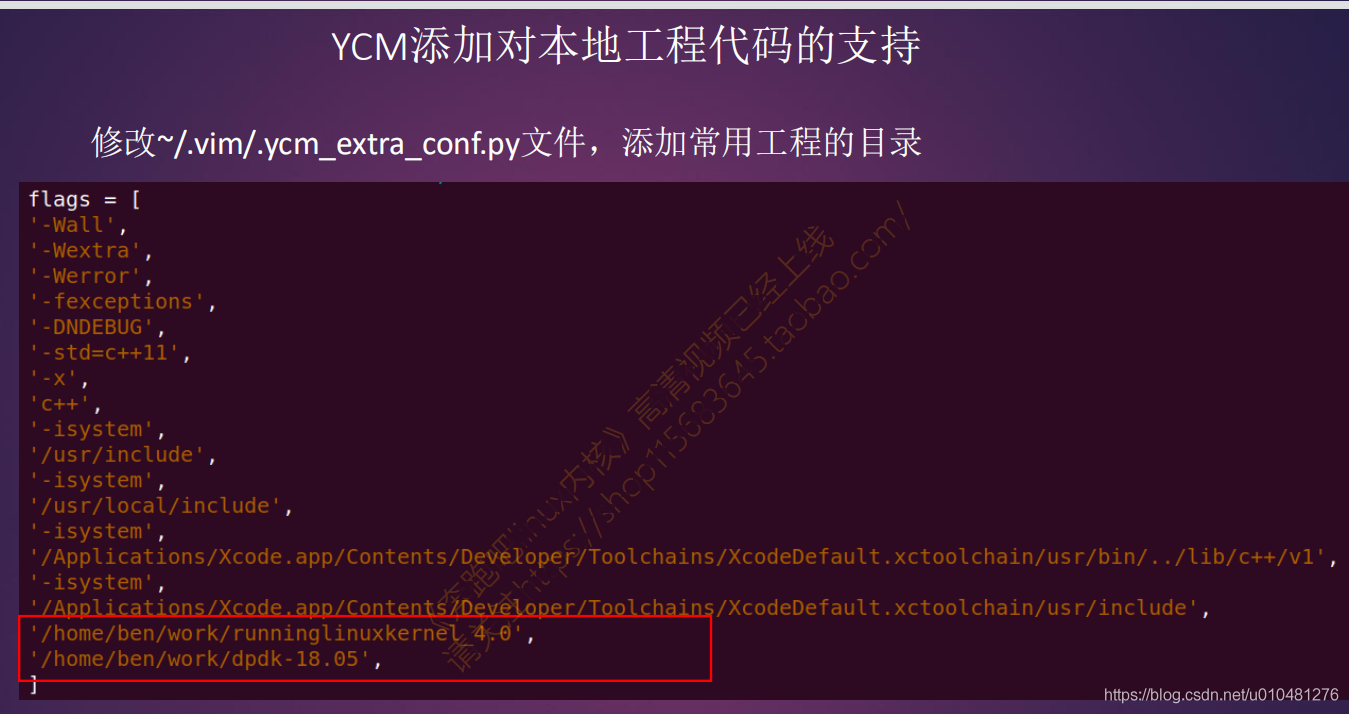
在.ycm_extra_conf.py添加对本地工程的代码支持
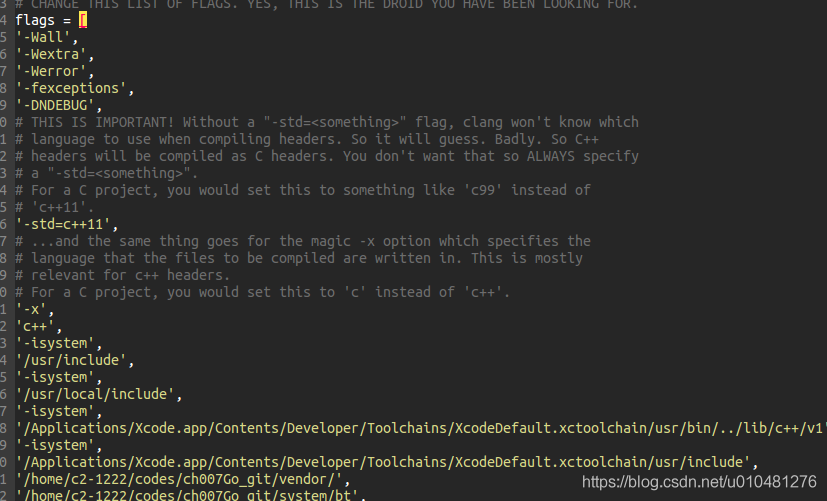
可以用
$ sudo apt install clang exuberant-ctags
$ git clone https://github.com/rdnetto/YCM-Generator.git
$ cd YCM-Generator
$ ./config_gen.py /home/rlk/rlk/runninglinuxkernel_5.0
有时出错时,发现配置文件要用python3

let g:ycm_server_python_interpreter='/usr/bin/python'
改成
let g:ycm_server_python_interpreter='/usr/bin/python3'
即可以正常使用
动态语法检测
Plugin 'w0rp/ale'
ctags自动索引
Plugin 'ludovicchabant/vim-gutentags'
使用鼠标功能
set mouse=nv
鼠标复制粘贴
按住shiftt,鼠标选中要复制的内容再再放开shift,鼠标右键选中复制,
显示路径
"相对f
"set statusline+=%f
"绝对F
set statusline+=%F
set laststatus=2
高亮搜索为黄色,其他颜色:hi可以查看
hi Search term=standout ctermfg=0 ctermbg=11
高亮光标所在行
set cursorline
高亮匹配括号
hi MatchParen ctermbg=Yellow guibg=lightblue
打开当前文件所在目录文件列表
:E
安装 LeaderF糢糊查找
Plugin 'Yggdroot/LeaderF', { 'do': ' ./install.sh' }
nmap <silent> <F12> :LeaderfFile <C-R>=expand("<cword>")<CR><CR>
加入F12为LeaderfFile的快捷键
LeaderF
map <F12> :LeaderfFile<CR>
map <F10> :LeaderfFunction<CR>
map <F9> :LeaderfBuffer<CR>
map <F11> :LeaderfMru<CR>
map <F7> :LeaderfLine<CR>
遇到提示缺少python支持,但发现系统中已经安装了其所要求的python版本。经搜索,原因应该是所安装的vim版本不支持python,但我并不想用源码安装,最后找到一个方案,运行如下命令:
sudo apt-get install vim-nox
遇到一个问题:
fatal: Not a git repository (or any parent up to mount point /home)
Stopping at filesystem boundary (GIT_DISCOVERY_ACROSS_FILESYSTEM not set).
git init
.vimrc
set hlsearch
set nu
let Tlist_Use_Right_Window=0
"let Tlist_Auto_Open=1
let Tlist_WinWidth=40

set nocompatible              " be iMproved, required
filetype on                  " required

" set the runtime path to include Vundle and initialize
set rtp+=~/.vim/bundle/Vundle.vim
call vundle#begin()
" 01.1alternatively, pass a path where Vundle should install plugins
"call vundle#begin('~/some/path/here')

" let Vundle manage Vundle, required
Plugin 'gmarik/Vundle.vim'

" plugin from http://vim-scripts.org/vim/scripts.html
Plugin 'L9'
" Git plugin not hosted on GitHub
" Plugin 'git://git.wincent.com/command-t.git'
" git repos on your local machine (i.e. when working on your own plugin)
" Plugin 'file:///home/gmarik/path/to/plugin'
" The sparkup vim script is in a subdirectory of this repo called vim.
" Pass the path to set the runtimepath properly.
" Plugin 'rstacruz/sparkup', {'rtp': 'vim/'}
" Avoid a name conflict with L9
" Plugin 'user/L9', {'name': 'newL9'}

" All of your Plugins must be added before the following line
call vundle#end()            " required
filetype plugin indent on    " required
" To ignore plugin indent changes, instead use:
"filetype plugin on
"
" Brief help
" :PluginList          - list configured plugins
" :PluginInstall(!)    - install (update) plugins
" :PluginSearch(!) foo - search (or refresh cache first) for foo
" :PluginClean(!)      - confirm (or auto-approve) removal of unused plugins
"
" see :h vundle for more details or wiki for FAQ
" Put your non-Plugin stuff after this line
Plugin 'Yggdroot/LeaderF', {'do': './install.sh' }
let g:Lf_ReverseOrder = 1
colorscheme monokai
syntax enable
syntax on
Plugin 'majutsushi/tagbar' "  Tag bar"
autocmd BufReadPost *.cpp,*.c,*.h,*.cc,*.cxx,*.java,*.py,*.aidl,*.h,*.sh call tagbar#autoopen ()
let g:tagbar_autopreview = 1
let g:tagbar_left = 1
let g:tagbar_ctags_bin = 'ctags'
"let g:tagbar_width = 30
Plugin 'scrooloose/nerdtree'
" NetRedTree
"autocmd StdinReadPre * let s:std_in=1
"autocmd VimEnter * NERDTree
"let NERDTreeWinSize=15
"let NERDTreeShowLineNumbers=1
"let NERDTreeAutoCenter=1
"let NERDTreeShowBookmarks=1
"let NERDTreeWinPos="right"
map :silent! NERDTreeToggle
set cursorline
hi MatchParen ctermbg=Yellow guibg=lightblue
hi Search term=standout ctermfg=0 ctermbg=11
set mouse=nv
map <F8> m`*``
"if has( 'mouse' )
"     set mouse-=a
"endif
let g:netrw_winsize = 25

Plugin 'Valloric/YouCompleteMe'
let g:ycm_server_python_interpreter='/usr/bin/python'
let g:ycm_global_ycm_extra_conf='~/.vim/.ycm_extra_conf.py'


" cscope:建立数据库:cscope -Rbq;F5 查找c符号; F6 查找字符串;F7 查找函数定节ao义; F8 查找函数谁调用了,
"-----------------------------------------------------------
if has("cscope")
set csprg=/usr/bin/cscope
set csto=1
set cst
set nocsverb
" add any database in current directory
if filereadable("cscope.out")
cs add cscope.out
cw
endif
set csverb
endif
set cscopequickfix=s-,c-,d-,i-,t-,e-
nmap <silent>  <F5> :cs find s <C-R>=expand("<cword>")<CR><CR>
nmap <silent>  <F6> :cs find t <C-R>=expand("<cword>")<CR><CR>
nmap <silent>  <F7> :cs find c <C-R>=expand("<cword>")<CR><CR>
nmap <silent>  <F9> :cs find e <C-R>=expand("<cword>")<CR><CR>
map <F4> :cw<CR>
map <F12> :LeaderfFile<CR>
https://www.cnblogs.com/panlangen/p/8728577.html
sudo apt-get install fcitx-table-wubi
高亮ubuntu终端
在 ~/.bashrc
后面加如下内容,重启电脑生效
PS1='${debian_chroot:+($debian_chroot)}\[\033[01;35;40m\]\u\[\033[00;00;40m\]@\[\033[01;35;40m\]\h\[\033[00;31;40m\]:\[\033[00;00;40m\]\w \[\033[01;32;40m\]\$ \[\033[01;36;40m\]'
效果如下:

set cursorline (设置光标行,效果相当棒,光标移到哪一行,哪一行的行号就变成了浅黄色,相当的动感)
解决cscope相对路径的问题
find ~/myproject –type f > cscope.files
将所有要查看的文件放入cscope.files中
cscope -bkq -i cscope.files
WinManager
WinManager
将解压后的文件分别放到:~/.vim/doc/ ~/.vim/plugin 目录下
将插件显示在右侧
打开winmanager.vim,在function! StartWindowsManager()函数中修改:
将:wincmd H 修改为wincmd L:
" for now assume that the explorer windows always stay on the left.

" TODO: make this optional later

" make the explorers window always stay on the right ---by chenyong

"        wincmd H

wincmd L
显示的类别与热键
let g:winManagerWindowLayout='FileExplorer'
nmap wm :WMToggle<cr>
在winmanager.vim中修改:就可以让winmanager自动打开,但会影响quickfix的显示,窗口在winmanager下面了,所以默认关掉,用热键打开,如果需要用的时候
在**.vimrc中添加**
let g:AutoOpenWinManager = 1
"set auto open Winmanager

if g:AutoOpenWinManager

autocmd VimEnter * nested call s:StartWindowsManager()|1wincmd w

endif
将vim升级到vim82
将之前的删除掉:
sudo apt-get remove vim

sudo apt-get remove vim-runtime

sudo apt-get remove vim -tiny

sudo apt-get remove vim-common

sudo apt-get remove vim-doc

sudo apt-get remove vim-scripts
下载vim82
git clone https://github.com/vim/vim.git
cd vim
ubuntu env
nux 下源码编译安装 vim 8.1
sudo apt install libncurses5-dev libgnome2-dev libgnomeui-dev libgtk2.0-dev libatk1.0-dev libbonoboui2-dev libcairo2-dev libx11-dev libxpm-dev libxt-dev python-dev python3-dev ruby-dev lua5.1 liblua5.1-dev libperl-dev git python python3
配置:
./configure --with-features=huge --enable-gui=gtk2 --enable-cscope --prefix=/usr
添加leadf python支持,否则有此插件检测到没有python时会报requires Vim compiled with Python (2.6+ or 3.3+) support之类的错误
./configure --with-features=huge --enable-gui=gtk2 --enable-cscope --prefix=/usr --enable-multibyte --enable-pythoninterp=yes
编译:
sudo make VIMRUNTIMEDIR=/usr/share/vim/vim82
若升级为vim90
sudo make VIMRUNTIMEDIR=/usr/share/vim/vim90 -B
安装:
sudo make install
Gtags
wget https://ftp.gnu.org/pub/gnu/global/global-6.6.tar.gz
./configure
make
sudo make install
cp gtags-cscope.vim ~/.vim/plugin/
cp gtags.vim ~/.vim/plugin/
Ubuntu 安裝 GNU Global(gtags) 阅读Linux内核源码
gtags -v #解析
gtags -iv #增量更新
用vim打开解析过的任意源文件,
vim build/ALPHA/base/misc.hh
查找函数fatal的定义
输入 :Gtags fatal
查找引用fatal函数的地方
输入 :Gtags -r fatal
:cn 切换到下一个引用的地方
:cp 切换到前一个引用的地方
输入 :GTagsCursor ,光标会跳至引用它的地方
:GTagsCursor,光标会跳至其定义的地方
.vimrc中添加快捷键
map <C-g> :Gtags<CR>
map <C-j> :GtagsCursor<CR>
map <C-n> :cn<CR>
map <C-p> :cp<CR>
在ssh连接服务器,客户端上vim 鼠标不能用
关于ssh中的Vim鼠标不好用的问题
只要在.vimrc里面,加上
set ttymouse=xterm2
就可以了……
基本上就是让那边的vim知道,这边发的对应于鼠标动作的转义序列是什么格式的,就可以了…
ctags用法
生成 tags
使用
ctags -R –c++-kinds=+px –fields=+iaS –extra=+q .
ctags -R --languages=c++,c,java,Make,Sh, --c++-kinds=+px --fields=+aiKSz --extra=+q
可以将当前目录下的所有文件内容进行处理生成 ./tags 文件, 这些选项的作用如下:
-R: ctags 循环生成子目录的 tags
--c++-kinds=+pxl: ctags 记录 c++ 文件中的函数声明和各种外部和前向声明 (l 表示记录局部变量, 可以认为是 local 的缩写)
--fields=+iaS: ctags 要求描述的信息, 其中 i 表示如果有继承, 则标识出父类; a 表示如果元素是类成员的话, 要标明其调用权限 (即是 public 还是 private); S 表示如果是函数, 则标识函数的 signature.
extra=+q: 强制要求 ctags 做如下操作: 如果某个语法元素是类的一个成员, ctags 默认会给其记录一行, 可以要求 ctags 对同一个语法元素再记一行, 这样可以保证在 VIM 中多个同名函数可以通过路径不同来区分.
配置 tags 路径
生成了 tags 文件后, 我们要让 vim 找的到当前浏览的文件所对应的是哪个 tags 文件, 我们在 ~/.vimrc 中应该加上这样的配置
set tags=./tags;,tags
前半部分 ./.tags; 代表在文件的所在目录下查找名字为 .tags 的符号文件, 后面一个分号代表查找不到的话向上递归到父目录, 直到找到 tags 文件或者递归到了根目录还没找到; 逗号分隔的后半部分 tags 是指同时在 vim 的当前目录 (:pwd 命令返回的目录, 可以用 :cd … 命令改变) 下面查找 tags 文件.
使用 tags
tags 的使用非常简单, 把光标移动到某个元素上, CTRL+] 就会跳转到对应的定义, CTRL+o 可以回退到原来的地方.
另外也有一些其他的 tags 相关命令可以使用:
:tag func: 跳转到 func 函数实现的地方
:tnext: 下一个标签匹配处
:tprev: 上一个标签匹配处
:tfirst: 第一个标签匹配处
:tlast: 最后一个标签匹配处
:tags: 所有匹配的标签
:tselect: 显示所有匹配的标签并让你选择指定的
GUN Global + Vim及其插件 打造Android源码阅读器
看代码时,将行数对齐代码的方法
vim ~/.vimrc
set cursorline #设置显示这一横杠
set nocursorline #设置不显示这一横杠
vim快捷键使用方法 :

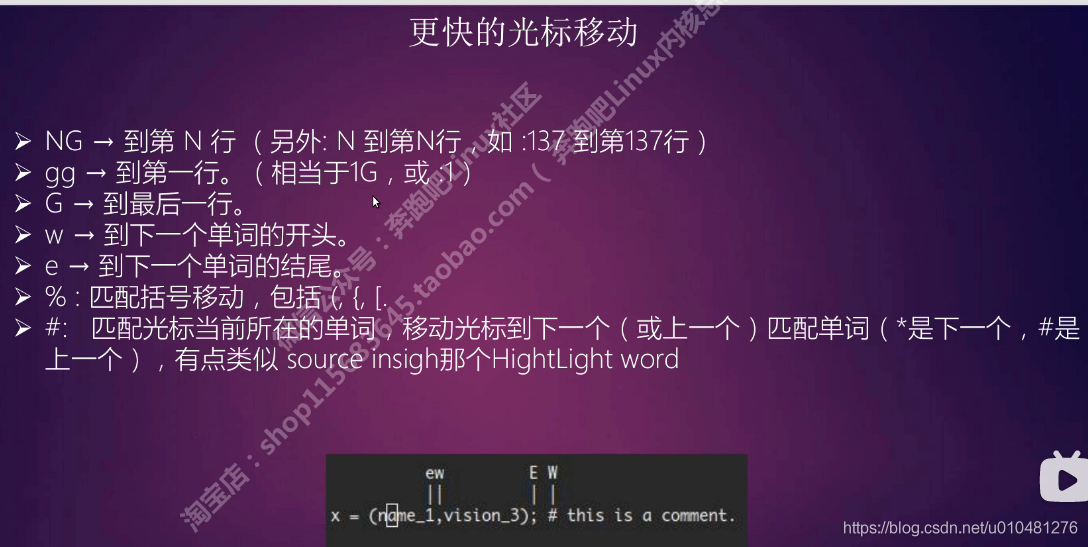
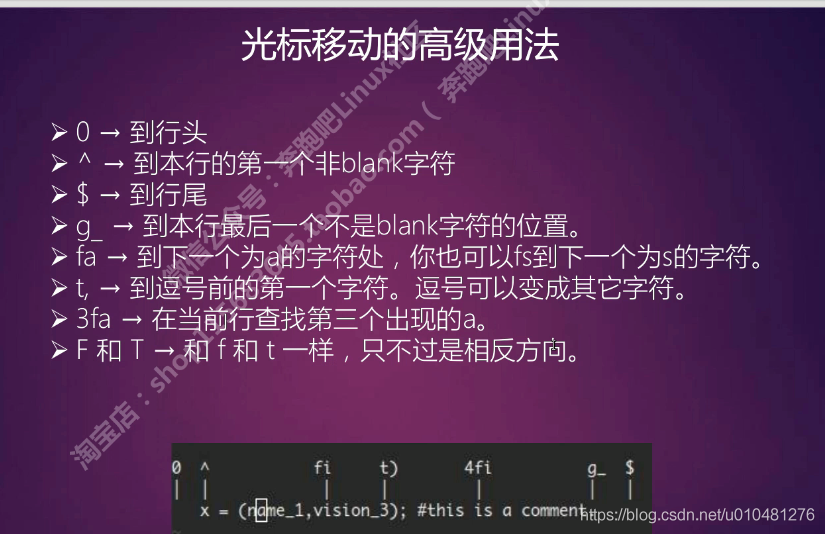
可视化操作
小写v按字符选择
大写V按行选择
ctrl+v按块选择
如下,选住#include
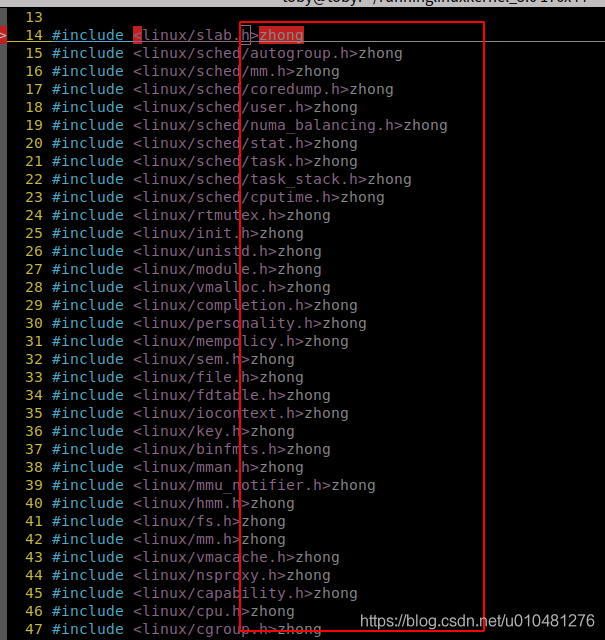
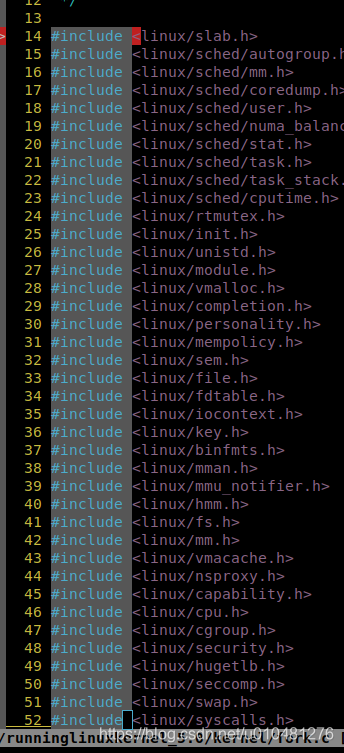 (选完后若加上美元符号$则表示一直选到所有选中行的整行)
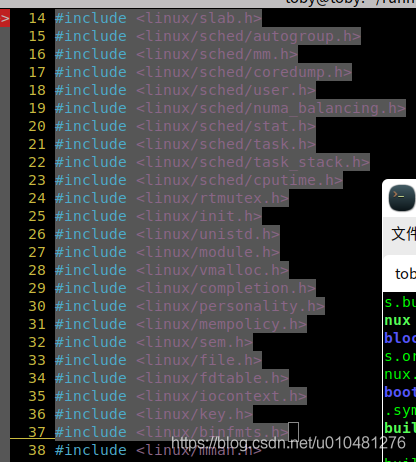
输入大写的i(shift +i),再输入//
按esc按键,这样就将全部#include注释掉了
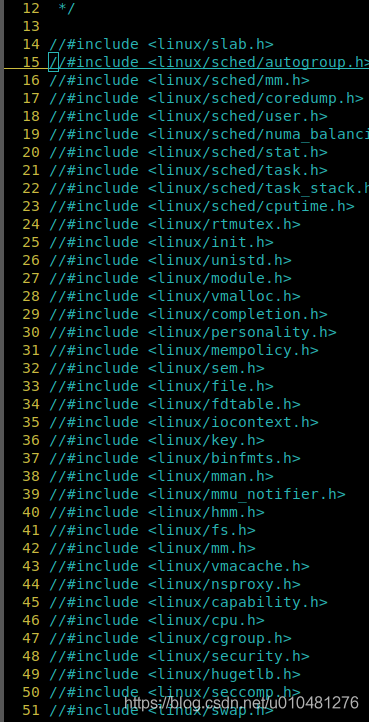
若在上面美元符号的操作中,再按下大写的A(shift+a) 输入字符zhong,按esc就会在最后面加入字符,如下
分屏操作

