完整恢复Linux误删数据
Linux恢复误删文件
关键时刻可以用来保命,如果这篇文章真的帮到了你,请务必点赞关注!
如果你没有按照建议管理数据并且已经删除完毕了,想要找救命稻草,听我的,赶紧跑路吧!
1、服务器数据管理建议遵循的几项规则
- 1、系统设备和数据设备分开,重要数据不要放在系统分区,方便卸载恢复系统和数据,底层硬件一定要使用raid0之外的磁盘阵列
- 2、数据修改和删除前,如有必要必须备份,小文件直接使用mv命令将[filename|dirname]改为[filename|dirname].back或.orig
- 3、rm前保存文件路径和md5值,方便数据恢复之后的文件名和路径恢复
2、Linux误删除文件的恢复
安装testdisk磁盘恢复工具
yum install epel-release -y
yum install testdisk -y
testdisk工具的help
# testdisk --help
TestDisk 7.1, Data Recovery Utility, July 2019
Christophe GRENIER <grenier@cgsecurity.org>
https://www.cgsecurity.org

Usage: testdisk [/log] [/debug] [file.dd|file.e01|device]
       testdisk /list  [/log]   [file.dd|file.e01|device]
       testdisk /version

/log          : create a testdisk.log file
/debug        : add debug information
/list         : display current partitions

TestDisk checks and recovers lost partitions
It works with :
- BeFS (BeOS)                           - BSD disklabel (Free/Open/Net BSD)
- CramFS, Compressed File System        - DOS/Windows FAT12, FAT16 and FAT32
- XBox FATX                             - Windows exFAT
- HFS, HFS+, Hierarchical File System   - JFS, IBM's Journaled File System
- Linux btrfs                           - Linux ext2, ext3 and ext4
- Linux GFS2                            - Linux LUKS
- Linux Raid                            - Linux Swap
- LVM, LVM2, Logical Volume Manager     - Netware NSS
- Windows NTFS                          - ReiserFS 3.5, 3.6 and 4
- Sun Solaris i386 disklabel            - UFS and UFS2 (Sun/BSD/...)
- XFS, SGI's Journaled File System      - Wii WBFS
- Sun ZFS

# photorec --help
PhotoRec 7.1, Data Recovery Utility, July 2019
Christophe GRENIER <grenier@cgsecurity.org>
https://www.cgsecurity.org

Usage: photorec [/log] [/debug] [/d recup_dir] [file.dd|file.e01|device]
       photorec /version

/log          : create a photorec.log file
/debug        : add debug information

PhotoRec searches for various file formats (JPEG, Office...). It stores files
in the recup_dir directory.
格式化和挂载数据磁盘
新加一块/dev/sdb
]# fdisk -l

Disk /dev/sda: 21.5 GB, 21474836480 bytes, 41943040 sectors
Units = sectors of 1 * 512 = 512 bytes
Sector size (logical/physical): 512 bytes / 512 bytes
I/O size (minimum/optimal): 512 bytes / 512 bytes
Disk label type: dos
Disk identifier: 0x000b5698

   Device Boot      Start         End      Blocks   Id  System
/dev/sda1   *        2048     2099199     1048576   83  Linux
/dev/sda2         2099200    41943039    19921920   8e  Linux LVM

Disk /dev/sdb: 2147 MB, 2147483648 bytes, 4194304 sectors
Units = sectors of 1 * 512 = 512 bytes
Sector size (logical/physical): 512 bytes / 512 bytes
I/O size (minimum/optimal): 512 bytes / 512 bytes


Disk /dev/mapper/centos-root: 18.2 GB, 18249416704 bytes, 35643392 sectors
Units = sectors of 1 * 512 = 512 bytes
Sector size (logical/physical): 512 bytes / 512 bytes
I/O size (minimum/optimal): 512 bytes / 512 bytes


Disk /dev/mapper/centos-swap: 2147 MB, 2147483648 bytes, 4194304 sectors
Units = sectors of 1 * 512 = 512 bytes
Sector size (logical/physical): 512 bytes / 512 bytes
I/O size (minimum/optimal): 512 bytes / 512 bytes
格式化和挂载
# 创建挂载文件夹
mkdir /data
# 数据盘格式化为xfs,testdisk支持主流的ext4和xfs
mkfs.xfs /dev/sdb
# 挂载文件修改
# vim /etc/fstab
/dev/sdb        /data   xfs     defaults 0 0
# 挂载
mount -a
查看
df -h
# /dev/sdb                 2.0G   33M  2.0G   2% /data
保存文件路径和MD5值
已创建好的测试文件目录
# tree test
test
├── a
│   ├── b
│   │   └── checkpoint-signature
│   └── nohup.out
└── anaconda-ks.cfg

2 directories, 3 files
保存路径和md5值
# 注意md5文件不要放在待删除文件的设备上
#find ./test -type f -exec md5sum {} \;>/root/test.md5

8851bbff09a554c36f72d64fc7873f57  ./test/anaconda-ks.cfg
39464899f947047a2f967c67479ca7ed  ./test/a/nohup.out
b72d710e1f15b5a88b4a3ea73ff2a923  ./test/a/b/checkpoint-signature
模拟删除文件
cp -a test /data/
rm -rf /data/test
发现误删之后要立即卸载数据盘,防止inode被覆盖,导致无法恢复
umount /data/
或
umount /dev/sdb
# 或者挂载为只读
mount -o ro,remount /data
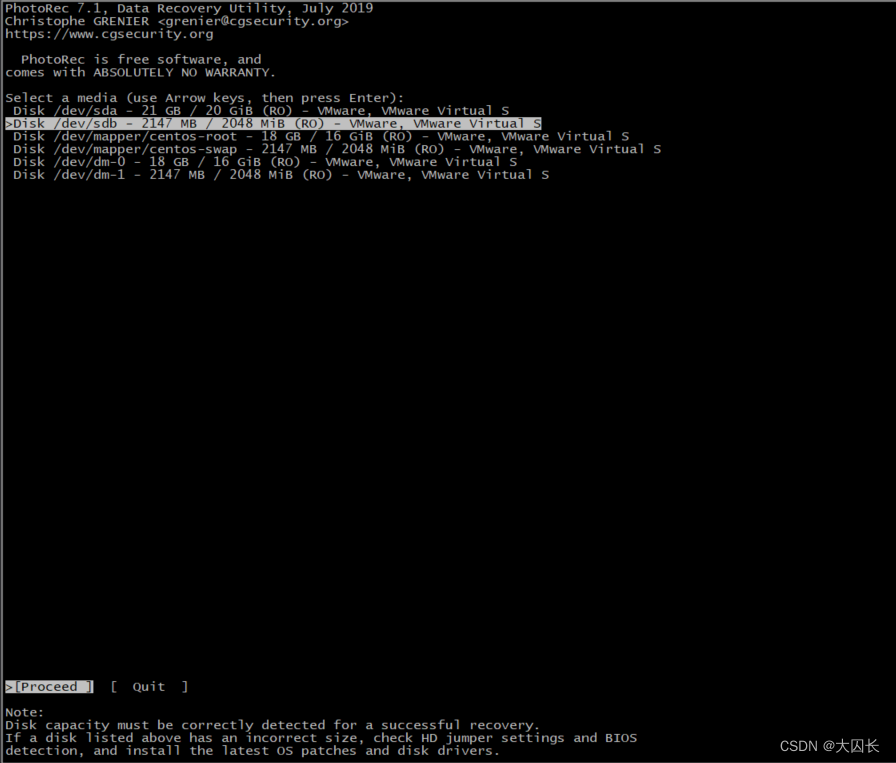
使用testdisk恢复文件
photorec
选择恢复设备/dev/sdb
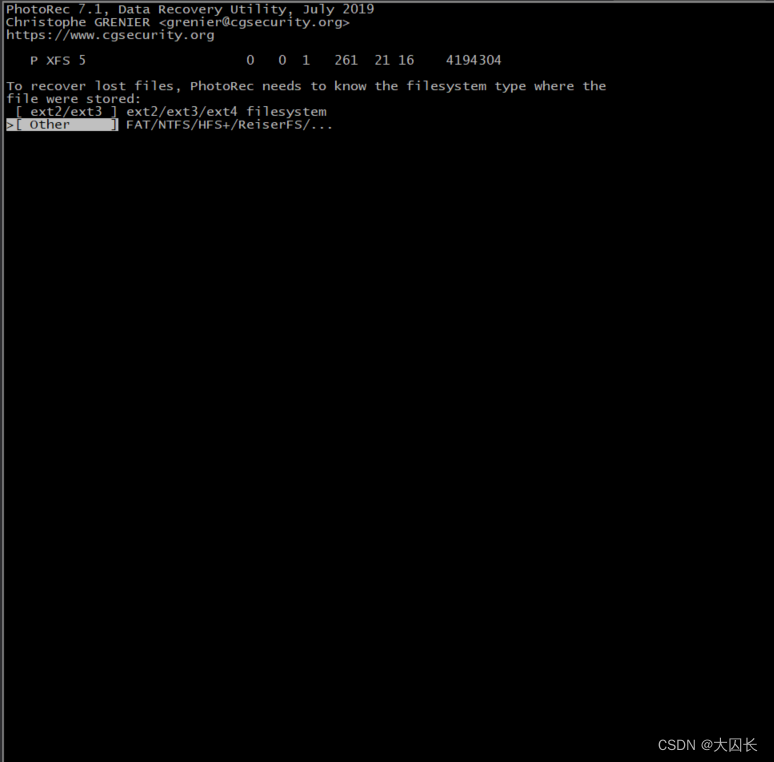
选择磁盘格式

选择文件系统
按c确认文件恢复
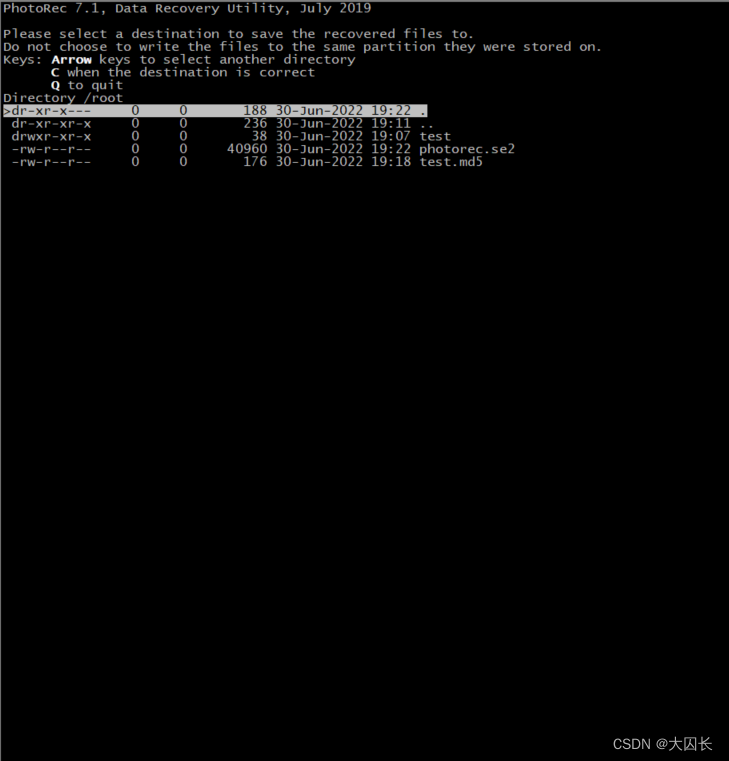
恢复文件提示
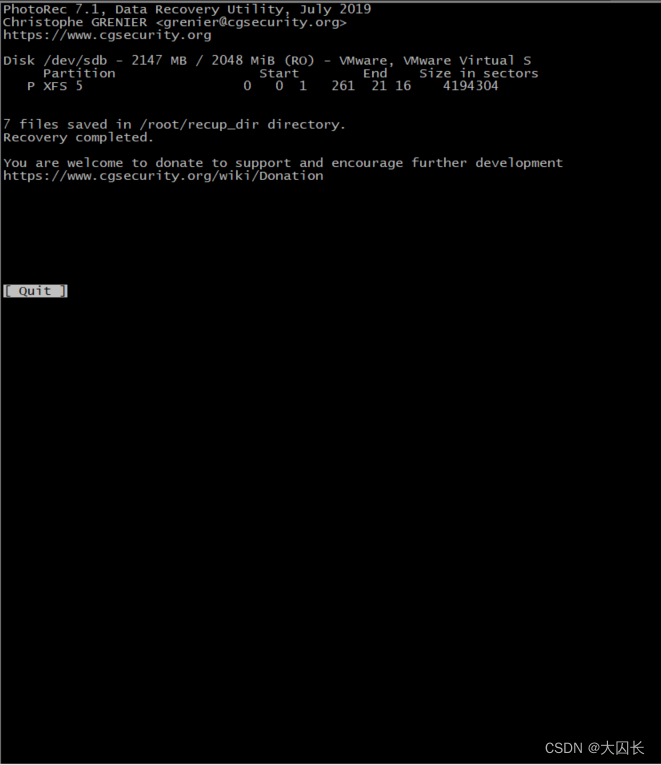
查看恢复文件
#  ls recup_dir.1
f0000000.xfs  f0000128.txt  f1048576.xfs  f1048704.txt  f2097152.xfs  f2117760.txt  f3145728.xfs  report.xml
查看md5
# md5sum *

6984a42a1082a06e7684a2e862d4ce4e  f0000000.xfs
8851bbff09a554c36f72d64fc7873f57  f0000128.txt
13c41c25f09fe0c26a3cbde3f4f5bb5e  f1048576.xfs
39464899f947047a2f967c67479ca7ed  f1048704.txt
6fa9b8a5393f4b81b9c061edafb12863  f2097152.xfs
b72d710e1f15b5a88b4a3ea73ff2a923  f2117760.txt
cd7004a443887193e98b27cbc73e8a7d  f3145728.xfs
0b066c672613bb83c853c4faa38d8a46  report.xml
根据MD5文件恢复路径和文件名
python脚本
#!/usr/bin/python
# -*- coding:utf8 -*-

import os
import hashlib
import shutil


# 根据保存得MD5验证文件重建目录结构,并返回md5列表
def rebuild_path(md5file):
    md5list = []
    with open(md5file) as f:
        for line in f.readlines():
            line = line.strip()
            if line != '':
                md5list.append(line)
                fullpath = line.split('  ')[1].split('/')[0:-1]
                try:
                    os.makedirs(os.path.join(*fullpath))
                except  Exception as e:
                    print('Error rebuilding paths! Reason: {}'.format(str(e)))
    return md5list


# 获取文件MD5值
def FileMD5(file):
    m = hashlib.md5()
    with open(file, 'rb') as f:
        m.update(f.read())
    return m.hexdigest()


# 列出所有文件,返回文件列表和目录列表
def walkFile(target_dir):
    file_list = []
    dir_list = []
    for root, dirs, files in os.walk(target_dir):
        # 遍历所有文件
        for f in files:
            file_list.append(os.path.join(root, f))
        # 遍历所有文件夹
        for d in dirs:
            dir_list.append(os.path.join(root, d))
    return file_list, dir_list


def main():
    # 删除文件之前创建的MD5验证文件
    original_md5_file = '/root/test.md5'
    # 恢复文件目录
    recoverd_files_path = '/root/recup_dir.1'
    # 当前文件夹下重建目录并返回MD5验证文件list
    md5list = rebuild_path(original_md5_file)
    # 获取恢复文件列表
    file_list = walkFile(recoverd_files_path)[0]
    # 比对恢复文件MD5并拷贝到相应的重建目录
    for file in file_list:
        file_md5 = FileMD5(file)
        for line in md5list:
            if file_md5 == line.split('  ')[0]:
                shutil.copy(file, line.split('  ')[1])


if __name__ == '__main__':
    main()
/tmp下恢复文件
python recover_files.py
验证
将/root/test.md5拷贝恢复文件夹验证
# 查看目录结构
#tree test/
test/
├── a
│   ├── b
│   │   └── checkpoint-signature
│   └── nohup.out
└── anaconda-ks.cfg

2 directories, 3 files
# 拷贝md5验证文件
cp /root/test.md5 /tmp/
# 验证
# md5sum -c test.md5
./test/anaconda-ks.cfg: OK
./test/a/nohup.out: OK
./test/a/b/checkpoint-signature: OK