ansible 命令执行模块和其他常见模块
ansible 命令执行模块和其他常见模块
Ad-hoc
简介
Ad-Hoc 是指ansible下临时执行的一条命令,并且不需要保存的命令,对于复杂的命令会使用playbook。Ad-hoc的执行依赖于模块,ansible官方提供了大量的模块。 如:command、raw、shell、file、cron等,具体可以通过ansible-doc -l 进行查看 。可以使用ansible-doc -s module来查看某个模块的参数,也可以使用ansible-doc help module来查看该模块更详细的信息。
命令说明
一个ad-hoc命令的执行,需要按以下格式进行执行:
ansible 主机或组 -m 模块名 -a '模块参数' ansible参数- 主机和组,是在/etc/ansible/hosts 里进行指定的部分,当然动态Inventory 使用的是脚本从外部应用里获取的主机;
- 模块名,可以通过ansible-doc -l 查看目前安装的模块,默认不指定时,使用的是command模块,具体可以查看/etc/ansible/ansible.cfg 的“#module_name = command ” 部分,默认模块可以在该配置文件中进行修改;
- 模块参数,可以通过 “ansible-doc -s 模块名” 查看具体的用法及后面的参数;
- ansible参数,可以通过ansible命令的帮助信息里查看到,这里有很多参数可以供选择,如是否需要输入密码、是否sudo等。
用户说明
ansible在执行ad-hoc的时候,需要使用远程管理机上的一个用户身份,默认这个用户是root,而在实际生产环境中,不建议直接使用root,而推荐使用一个普通用户,需要配置该普通用户可通过sudo提权。
需要说明的是,通过上面的操作,需要为ansible用户先创建密码,在实际生产当中,不建议为该用户设置密码。可在安装系统时,提前将管理端公钥直接写入到被管理节点的ansible用户下
命令执行模块
命令执行模块包含如下 四个模块:
- command模块:该模块通过-a跟上要执行的命令可以直接执行,不过命令里如果有带有如下字符部分则执行不成功 “ "<", ">", "|", "&" ;
- shell 模块:用法基本和command一样,不过其是通过/bin/sh进行执行,所以shell 模块可以执行任何命令,就像在本机执行一样;
- raw模块:用法和shell模块一样,也可以执行任意命令,就像在本机执行一样;
- script模块:将管理端的shell 在被管理主机上执行,其原理是先将shell 复制到远程主机,再在远程主机上执行,原理类似于raw模块。
raw模块和comand、shell 模块不同的是其没有chdir、creates、removes参数,chdir参数的作用就是先切到chdir指定的目录后,再执行后面的命令,这在后面很多模块里都会有该参数 。
shell模块
root@node1 ansible]# ansible web -m shell -a "df -hT"
但是-a不能下达交互式的指令,例如top命令
command模块
command模块包含如下选项:
- creates:一个文件名,当该文件存在,则该命令不执行
- free_dom:要执行的linux指令
- chdir:在执行指令之前,先切换到该指定的目录
- removes:一个文件名,当该文件不存在,则该选项不执行
- executable:切换shell来执行指令,该执行路径必须是一个绝对路径
普通示例
[root@node1 ansible]# ansible all -m command -a "hostname"
但是command不支持管道
[root@node1 ansible]# ansible all -m command -a 'cat /etc/fstab |grep -Ev "^$|[;#]"'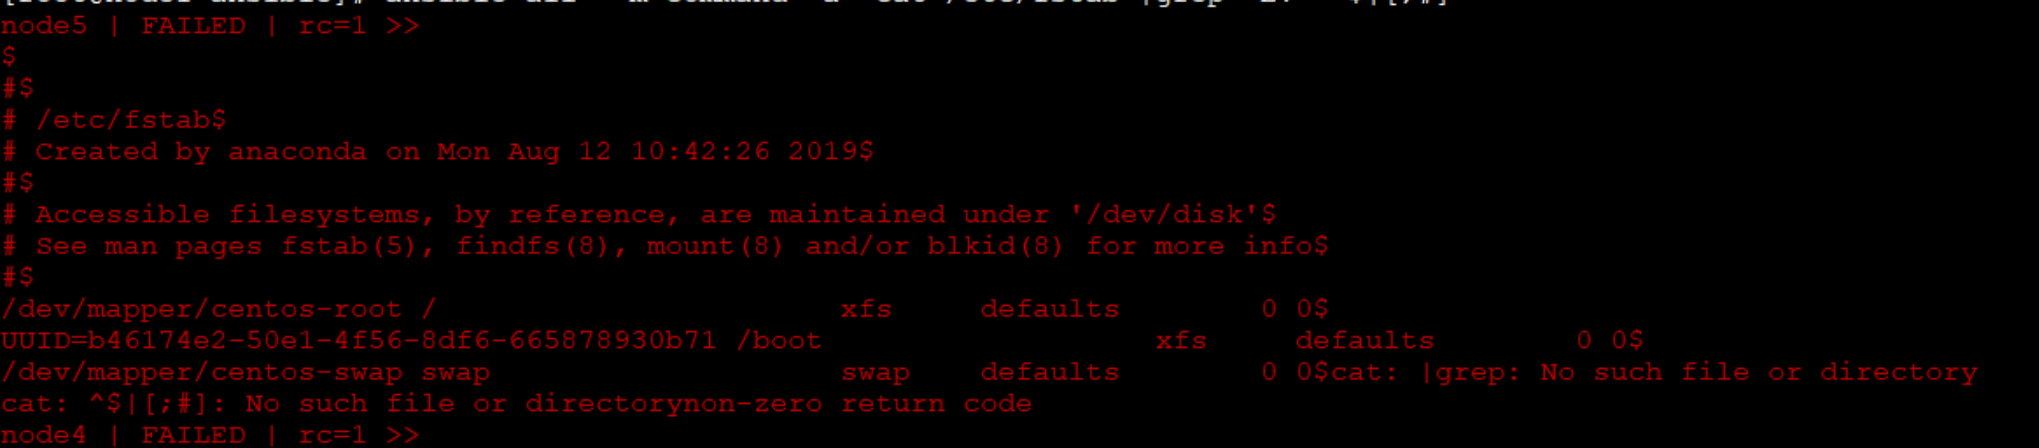
使用shell
[root@node1 ansible]# ansible all  -m shell -a 'cat /etc/fstab |grep -Ev "^$|[;#]"'
node5 | CHANGED | rc=0 >>
/dev/mapper/centos-root /                       xfs     defaults        0 0
UUID=b46174e2-50e1-4f56-8df6-665878930b71 /boot                   xfs     defaults        0 0
/dev/mapper/centos-swap swap                    swap    defaults        0 0
node1 | CHANGED | rc=0 >>
/dev/mapper/centos-root /                       xfs     defaults        0 0
UUID=e792ce5a-c008-4849-98d2-dacfa848f2a0 /boot                   xfs     defaults        0 0
/dev/mapper/centos-swap swap                    swap    defaults        0 0
node3 | CHANGED | rc=0 >>
/dev/mapper/centos-root /                       xfs     defaults        0 0
UUID=465d33f1-61c9-48c9-9fe2-288be655cfe8 /boot                   xfs     defaults        0 0
/dev/mapper/centos-swap swap                    swap    defaults        0 0
node2 | CHANGED | rc=0 >>
/dev/mapper/centos-root /                       xfs     defaults        0 0
UUID=2c23c58e-cec4-4606-8210-ae4e5ec62133 /boot                   xfs     defaults        0 0
/dev/mapper/centos-swap swap                    swap    defaults        0 0
node4 | CHANGED | rc=0 >>
/dev/mapper/centos-root /                       xfs     defaults        0 0
UUID=7fee092c-368f-4572-8e60-eb5c33e4202e /boot                   xfs     defaults        0 0
/dev/mapper/centos-swap swap
raw模块
[root@node1 ansible]# ansible web  -m raw -a 'cat /etc/fstab |grep -Ev "^$|[;#]"'
node1 | CHANGED | rc=0 >>
/dev/mapper/centos-root /                       xfs     defaults        0 0
UUID=e792ce5a-c008-4849-98d2-dacfa848f2a0 /boot                   xfs     defaults        0 0
/dev/mapper/centos-swap swap                    swap    defaults        0 0
Shared connection to node1 closed.

node2 | CHANGED | rc=0 >>
/dev/mapper/centos-root /                       xfs     defaults        0 0
UUID=2c23c58e-cec4-4606-8210-ae4e5ec62133 /boot                   xfs     defaults        0 0
/dev/mapper/centos-swap swap                    swap    defaults        0 0
Shared connection to node2 closed.
chdir示例:
# 三个命令都会返回执行成功的状态。不过实际上只有前两个文件会被创建成功。使用raw模块的执行的结果文件事实上也被正常创建了,不过不是在chdir指定的目录,而是在当前执行用户的家目录
ansible 192.168.1.1 -m command -a 'chdir=/tmp/test.txt touch test.file'
ansible 192.168.1.1 -m shell -a 'chdir=/tmp/test.txt touch test2.file'
ansible 192.168.1.1 -m raw -a 'chdir=/tmp/text.txt touch test3.file'
可以指定在哪一个目录下执行文件
[root@node1 ansible]# ansible 192.168.132.132 -m shell -a "tar czf xxx.tar.gz /usr/local/bin"

压缩内容在
[root@node1 ansible]# ansible 192.168.132.132 -m shell -a "ls -l /home/ansible"
使用chdir修改执行目录
[root@node1 ansible]# ansible 192.168.132.132 -m shell -a "chdir=/usr/local/src tar czf xxx.tar.gz /usr/local/bin"
[root@node1 ansible]# ansible 192.168.132.132 -m shell -a "ls -l /usr/local/src"
creates与removes示例:
ansible 192.168.1.1 -a 'creates=/tmp/server.txt uptime' #当/tmp/server.txt文件存在时,则不执行uptime指令
ansible 192.168.1.1 -a 'removes=/tmp/server.txt uptime' #当/tmp/server.txt文件不存在时,则不执行uptime指令
当/tmp/server.txt文件存在时,则不执行uptime指令
[root@node1 ansible]# ansible 192.168.132.132 -a 'creates=/tmp/server.txt uptime'
当/tmp/server.txt文件不存在时,则不执行uptime指令
[root@node1 ansible]# ansible 192.168.132.132 -a 'removes=/tmp/server.txt uptime'
Ansible常用模块
script模块
示例:
[root@node1 ansible]# vim /tmp/script.sh
#要执行的脚本文件script.sh内容如下:

#/bin/bash
ifconfig
df -hT
执行ansible指令: ansible 192.168.132.132 -m script -a 'script.sh'
使用shell模块
[root@node1 ansible]# ansible 192.168.132.132 -m copy -a 'src=/tmp/script.sh dest=/tmp/test.sh'
192.168.132.132 | CHANGED => {
    "ansible_facts": {
        "discovered_interpreter_python": "/usr/bin/python"
    },
    "changed": true,
    "checksum": "0d6cc4bb5907b96e0cffec802818182be9eab6f8",
    "dest": "/tmp/test.sh",
    "gid": 0,
    "group": "root",
    "md5sum": "5f208870c2e4484e634ac45ef616e23d",
    "mode": "0644",
    "owner": "root",
    "size": 28,
    "src": "/home/ansible/.ansible/tmp/ansible-tmp-1588061768.02-71923112122657/source",
    "state": "file",
    "uid": 0
}
[root@node1 ansible]# ansible 192.168.132.132 -m shell -a 'sh /tmp/test.sh;rm -rf /tmp/test.sh'
192.168.132.132 | CHANGED | rc=0 >>
ens33: flags=4163<UP,BROADCAST,RUNNING,MULTICAST>  mtu 1500
        inet 192.168.132.132  netmask 255.255.255.0  broadcast 192.168.132.255
        inet6 fe80::6a92:62ba:1b33:c93d  prefixlen 64  scopeid 0x20<link>
        ether 00:0c:29:63:fd:11  txqueuelen 1000  (Ethernet)
        RX packets 474817  bytes 470323234 (448.5 MiB)
        RX errors 0  dropped 0  overruns 0  frame 0
        TX packets 203981  bytes 12986229 (12.3 MiB)
        TX errors 0  dropped 0 overruns 0  carrier 0  collisions 0

lo: flags=73<UP,LOOPBACK,RUNNING>  mtu 65536
        inet 127.0.0.1  netmask 255.0.0.0
        inet6 ::1  prefixlen 128  scopeid 0x10<host>
        loop  txqueuelen 1000  (Local Loopback)
        RX packets 48  bytes 3864 (3.7 KiB)
        RX errors 0  dropped 0  overruns 0  frame 0
        TX packets 48  bytes 3864 (3.7 KiB)
        TX errors 0  dropped 0 overruns 0  carrier 0  collisions 0

Filesystem              Type      Size  Used Avail Use% Mounted on
devtmpfs                devtmpfs  899M     0  899M   0% /dev
tmpfs                   tmpfs     910M     0  910M   0% /dev/shm
tmpfs                   tmpfs     910M   18M  893M   2% /run
tmpfs                   tmpfs     910M     0  910M   0% /sys/fs/cgroup
/dev/mapper/centos-root xfs        47G  2.2G   45G   5% /
/dev/sda1               xfs      1014M  212M  803M  21% /boot
tmpfs                   tmpfs     182M     0  182M   0% /run/user/0
tmpfs                   tmpfs     182M     0  182M   0% /run/user/1001
使用script模块
[root@node1 ansible]# ansible 192.168.132.132 -m script -a "/tmp/script.sh"
输出结果
192.168.132.132 | CHANGED => {
    "changed": true,
    "rc": 0,
    "stderr": "Shared connection to 192.168.132.132 closed.\r\n",
    "stderr_lines": [
        "Shared connection to 192.168.132.132 closed."
    ],
    "stdout": "ens33: flags=4163<UP,BROADCAST,RUNNING,MULTICAST>  mtu 1500\r\n        inet 192.168.132.132  netmask 255.255.255.0  broadcast 192.168.132.255\r\n        inet6 fe80::6a92:62ba:1b33:c93d  prefixlen 64  scopeid 0x20<link>\r\n        ether 00:0c:29:63:fd:11  txqueuelen 1000  (Ethernet)\r\n        RX packets 475100  bytes 470349987 (448.5 MiB)\r\n        RX errors 0  dropped 0  overruns 0  frame 0\r\n        TX packets 204224  bytes 13007458 (12.4 MiB)\r\n        TX errors 0  dropped 0 overruns 0  carrier 0  collisions 0\r\n\r\nlo: flags=73<UP,LOOPBACK,RUNNING>  mtu 65536\r\n        inet 127.0.0.1  netmask 255.0.0.0\r\n        inet6 ::1  prefixlen 128  scopeid 0x10<host>\r\n        loop  txqueuelen 1000  (Local Loopback)\r\n        RX packets 48  bytes 3864 (3.7 KiB)\r\n        RX errors 0  dropped 0  overruns 0  frame 0\r\n        TX packets 48  bytes 3864 (3.7 KiB)\r\n        TX errors 0  dropped 0 overruns 0  carrier 0  collisions 0\r\n\r\nFilesystem              Type      Size  Used Avail Use% Mounted on\r\ndevtmpfs                devtmpfs  899M     0  899M   0% /dev\r\ntmpfs                   tmpfs     910M     0  910M   0% /dev/shm\r\ntmpfs                   tmpfs     910M   18M  893M   2% /run\r\ntmpfs                   tmpfs     910M     0  910M   0% /sys/fs/cgroup\r\n/dev/mapper/centos-root xfs        47G  2.2G   45G   5% /\r\n/dev/sda1               xfs      1014M  212M  803M  21% /boot\r\ntmpfs                   tmpfs     182M     0  182M   0% /run/user/0\r\ntmpfs                   tmpfs     182M     0  182M   0% /run/user/1001\r\n",
    "stdout_lines": [
        "ens33: flags=4163<UP,BROADCAST,RUNNING,MULTICAST>  mtu 1500",
        "        inet 192.168.132.132  netmask 255.255.255.0  broadcast 192.168.132.255",
        "        inet6 fe80::6a92:62ba:1b33:c93d  prefixlen 64  scopeid 0x20<link>",
        "        ether 00:0c:29:63:fd:11  txqueuelen 1000  (Ethernet)",
        "        RX packets 475100  bytes 470349987 (448.5 MiB)",
        "        RX errors 0  dropped 0  overruns 0  frame 0",
        "        TX packets 204224  bytes 13007458 (12.4 MiB)",
        "        TX errors 0  dropped 0 overruns 0  carrier 0  collisions 0",
        "",
        "lo: flags=73<UP,LOOPBACK,RUNNING>  mtu 65536",
        "        inet 127.0.0.1  netmask 255.0.0.0",
        "        inet6 ::1  prefixlen 128  scopeid 0x10<host>",
        "        loop  txqueuelen 1000  (Local Loopback)",
        "        RX packets 48  bytes 3864 (3.7 KiB)",
        "        RX errors 0  dropped 0  overruns 0  frame 0",
        "        TX packets 48  bytes 3864 (3.7 KiB)",
        "        TX errors 0  dropped 0 overruns 0  carrier 0  collisions 0",
        "",
        "Filesystem              Type      Size  Used Avail Use% Mounted on",
        "devtmpfs                devtmpfs  899M     0  899M   0% /dev",
        "tmpfs                   tmpfs     910M     0  910M   0% /dev/shm",
        "tmpfs                   tmpfs     910M   18M  893M   2% /run",
        "tmpfs                   tmpfs     910M     0  910M   0% /sys/fs/cgroup",
        "/dev/mapper/centos-root xfs        47G  2.2G   45G   5% /",
        "/dev/sda1               xfs      1014M  212M  803M  21% /boot",
        "tmpfs                   tmpfs     182M     0  182M   0% /run/user/0",
        "tmpfs                   tmpfs     182M     0  182M   0% /run/user/1001"
    ]
}
file模块
file模块主要用于远程主机上的文件操作,file模块包含如下选项:
- force:需要在两种情况下强制创建软链接,一种是源文件不存在但之后会建立的情况下;另一种是目标软链接已存在,需要先取消之前的软链,然后创建新的软链,有两个选项:yes|no
- group:定义文件/目录的属组
- mode:定义文件/目录的权限
- owner:定义文件/目录的属主
- path:必选项,定义文件/目录的路径
- src:要被链接的源文件的路径,只应用于state=link的情况
- dest:被链接到的路径,只应用于state=link的情况
- state:
- directory:如果目录不存在,创建目录
- file:即使文件不存在,也不会被创建
- link:创建软链接
- hard:创建硬链接
- touch:如果文件不存在,则会创建一个新的文件,如果文件或目录已存在,则更新其最后修改时间
- absent:删除目录、文件或者取消链接文件
创建文件
[root@node1 ansible]# ansible 192.168.132.132 -m file -a "path=/tmp/text.txt state=touch owner=root group=ansible mode=644"
创建软连接
[root@node1 ansible]# ansible 192.168.132.132 -m file -a "src=/tmp/text.txt dest=/root/test.txt state=link"
验证
创建目录
[root@node1 ansible]# ansible 192.168.132.132 -m file -a "path=/tmp/test state=directory owner=root group=ansible mode=755"
state=file就是查看文件状态
[root@node1 ansible]# ansible 192.168.132.132 -m file -a "path=/tmp/text.txt state=file"
目录可以递归创建
[root@node1 ansible]# ansible 192.168.132.132 -m file -a "path=/tmp/test2/aaa/bbb/ccc state=directory owner=root group=ansible mode=755"
删除
[root@node1 ansible]# ansible 192.168.132.132 -m file -a "path=/tmp/test2 state=absent"
copy模块
复制文件到远程主机,copy模块包含如下选项:
- backup:在覆盖之前将原文件备份,备份文件包含时间信息。有两个选项:yes|no
- content:用于替代"src",可以直接设定指定文件的值
- dest:必选项。要将源文件复制到的远程主机的绝对路径,如果源文件是一个目录,那么该路径也必须是个目录
- force:如果目标主机包含该文件,但内容不同,如果设置为yes,则强制覆盖,如果为no,则只有当目标主机的目标位置不存在该文件时,才复制。默认为yes
- others:所有的file模块里的相关文件属性选项都可以在这里使用
- src:要复制到远程主机的文件在本地的地址,可以是绝对路径,也可以是相对路径。如果路径是一个目录,它将递归复制。在这种情况下,如果路径使用"/"来结尾,则只复制目录里的内容,如果没有使用"/"来结尾,则包含目录在内的整个内容全部复制,类似于rsync。
ansible 192.168.132.132 -m copy -a 'src=/etc/ansible/ansible.cfg dest=/usr/local/src/ owner=root group=root mode=644'
ansible 192.168.132.132 -m copy -a 'backup=yes src=/etc/fstab dest=/usr/local/src/ansible.cfg owner=root group=root mode=644'
ansible 192.168.132.132 -m copy -a 'content="just a test!" dest=/usr/local/src/test.txt'
ansible 192.168.132.132 -m copy -a 'src=/data dest=/usr/local/src/'
ansible 192.168.132.132 -m copy -a 'src=/data/ dest=/usr/local/src/'
ansible 192.168.132.132 -m copy -a "src=/mine/sudoers dest=/etc/sudoers validate='visudo -cf %s'"
[root@node1 ansible]# ansible 192.168.132.132 -m copy -a 'src=/etc/ansible/ansible.cfg dest=/usr/local/src/ owner=root group=root mode=644'
[root@node1 ansible]# ansible 192.168.132.132 -m copy -a 'backup=yes src=/etc/fstab dest=/usr/local/src/ansible.cfg owner=root group=root mode=644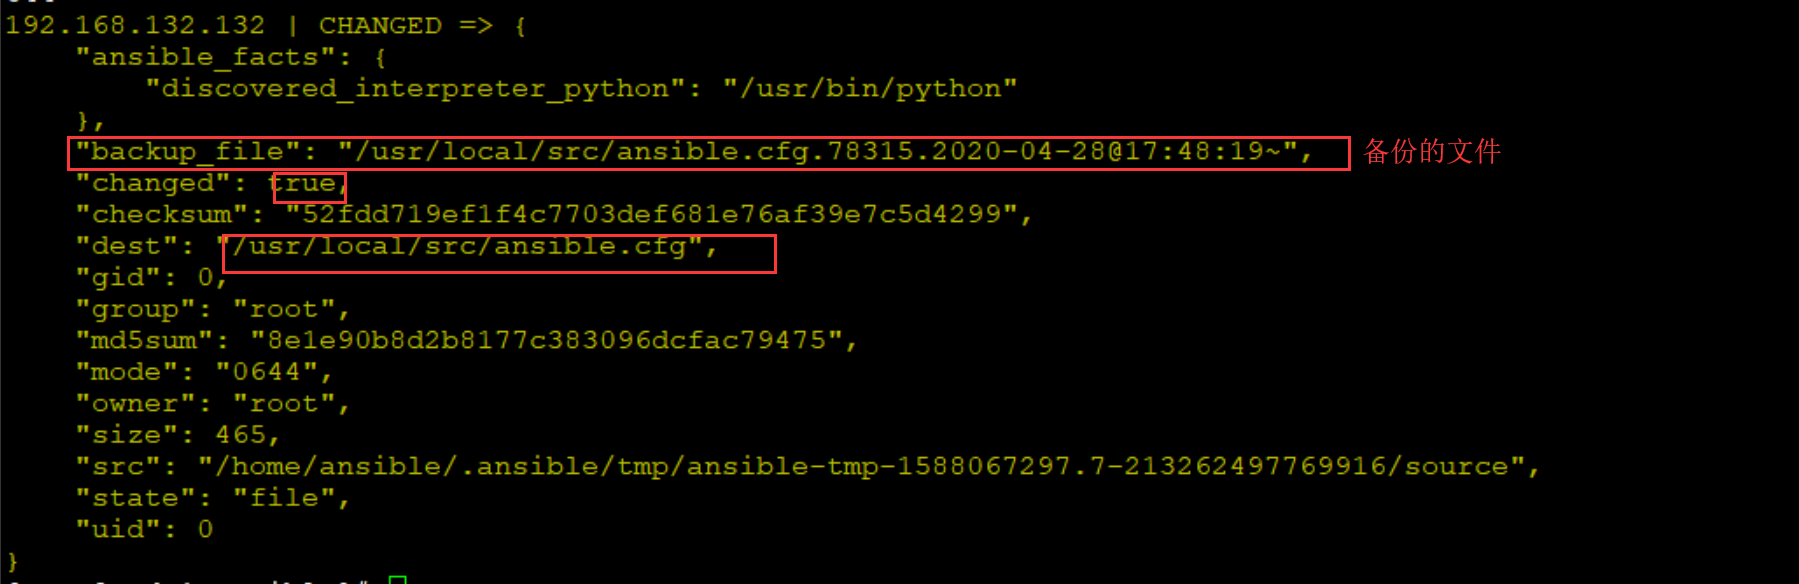
[root@node1 ansible]# ansible 192.168.132.132 -m copy -a 'content="just a test!" dest=/usr/local/src/test.txt'
[root@node1 ansible]# ansible 192.168.132.132 -m shell -a "cat /usr/local/src/test.txt"
yum模块
使用yum包管理器来管理软件包,其选项有:
- name:要进行操作的软件包的名字,也可以传递一个url或者一个本地的rpm包的路径
- state:状态(present,absent,latest)
示例如下:
ansible web -m yum -a 'name=httpd state=latest'
ansible web -m yum -a 'name="@Development tools" state=present'
ansible web -m yum -a 'name=http://nginx.org/packages/centos/6/noarch/RPMS/nginx-release-centos-6-0.el6.ngx.noarch.rpm state=present'
可以使用package,方式和yum一样,但是可以适用多个系统
[root@node1 ansible]# ansible web -m package -a 'name=httpd state=latest'
查看是否安装
[root@node1 ansible]# ansible web -m yum -a 'list=httpd'
管理服务模块
service模块
用于管理服务
该模块包含如下选项:
- arguments:给命令行提供一些选项
- enabled:是否开机启动 yes|no
- name:必选项,服务名称
- pattern:定义一个模式,如果通过status指令来查看服务的状态时,没有响应,就会通过ps指令在进程中根据该模式进行查找,如果匹配到,则认为该服务依然在运行
- runlevel:运行级别
- sleep:如果执行了restarted,在则stop和start之间沉睡几秒钟
- state:对当前服务执行启动,停止、重启、重新加载等操作(started,stopped,restarted,reloaded)
- daemon_reload:针对使用systemd的系统,重新加载systemd配置,yes/no
[root@node1 ansible]# ansible 192.168.132.132 -m service -a 'name=httpd state=started enabled=yes'
systemd模块
daemon_reexec:         # Run daemon_reexec command before doing any other operations, the systemd manager will serialize the managerstate.
      daemon_reload:         # Run daemon-reload before doing any other operations, to make sure systemd has read any changes. When set to `yes', runs daemon-reload even if the module does not start or stop anything.
      enabled:               # Whether the service should start on boot. *At least one of state and enabled are required.*
      force:                 # Whether to override existing symlinks.
      masked:                # Whether the unit should be masked or not, a masked unit is impossible to start.
      name:                  # Name of the service. This parameter takes the name of exactly one service to work with. When using in a chrootenvironment you always need to specify the full name i.e. (crond.service).
      no_block:              # Do not synchronously wait for the requested operation to finish. Enqueued job will continue without Ansible
                               blocking on its completion.
      scope:                 # run systemctl within a given service manager scope, either as the default system scope (system), the current
                               user's scope (user), or the scope of all users (global). For systemd to work
                               with 'user', the executing user must have its own instance of dbus started
                               (systemd requirement). The user dbus process is normally started during normal
                               login, but not during the run of Ansible tasks. Otherwise you will probably get
                               a 'Failed to connect to bus: no such file or directory' error.
      state:                 # `started'/`stopped' are idempotent actions that will not run commands unless necessary. `restarted' will always
                               bounce the service. `reloaded' will always reload.
      user:                  # (deprecated) run ``systemctl`` talking to the service manager of the calling user, rather than the service
                               manager of the system. This option is deprecated and will eventually be removed
                               in 2.11. The ``scope`` option should be used instead
基本使用service一样
[root@node1 ansible]# ansible 192.168.132.132 -m systemd -a 'name=httpd state=stopped enabled=no'
fetch模块:将远程服务器文件拷贝到本机
- dest:本地的目录位置
-src:远程主机的文件位置。必须是一个文件
user模块与group模块
user模块是请求的是useradd, userdel, usermod三个指令,goup模块请求的是groupadd, groupdel, groupmod 三个指令。
user模块
- home:指定用户的家目录,需要与createhome配合使用
- groups:指定用户的属组
- uid:指定用的uid
- password:指定用户的密码
- name:指定用户名
- createhome:是否创建家目录 yes|no
- system:是否为系统用户
- remove:当state=absent时,remove=yes则表示连同家目录一起删除,等价于userdel -r
- state:是创建还是删除
- shell:指定用户的shell环境
使用示例:
user: name=johnd comment="John Doe" uid=1040 group=admin
user: name=james shell=/bin/bash groups=admins,developers append=yes user: name=johnd state=absent remove=yes
user: name=james18 shell=/bin/zsh groups=developers expires=1422403387
#生成密钥时,只会生成公钥文件和私钥文件,和直接使用ssh-keygen指令效果相同,不会生成authorized_keys文件
user: name=test generate_ssh_key=yes ssh_key_bits=2048 ssh_key_file=.ssh/id_rsa
group示例
group: name=somegroup state=present[root@node1 ansible]# ansible web -m group -a 'name=www gid=600 state=present'
创建一个用户
[root@node1 ansible]# ansible web -m user -a 'name=www group=www shell=/sbin/nologin uid=600'
远端验证
创建一个密码用户
在指定password参数时,不能使用明文密码,因为后面这一串密码会被直接传送到被管理主机的/etc/shadow文件中,所以需要先将密码字符串进行加密处理。然后将得到的字符串放到password中即可。
[root@node1 ansible]# echo "123456" | openssl passwd -1 -salt $(< /dev/urandom tr -dc '[:alnum:]' | head -c 32) -stdin
$1$Pf1bEbqp$oURj27XrtLfbC3K12Sq3h1[root@node1 ansible]# ansible web -m user -a 'name=user1 createhome=yes home=/home/user1 password="$1$Pf1bEbqp$oURj27XrtLfbC3K12Sq3h1"'

验证
[root@node1 ansible]# ssh user1@192.168.132.132
user1@192.168.132.132's password:
[user1@node2 ~]$ whoami
user1
cron模块
用于管理计划任务
包含如下选项:
- backup:对远程主机上的原任务计划内容修改之前做备份
- cron_file:如果指定该选项,则用该文件替换远程主机上的cron.d目录下的用户的任务计划
- day:日(1-31,,/2,……)
- hour:小时(0-23,,/2,……)
- minute:分钟(0-59,,/2,……)
- month:月(1-12,,/2,……)
- weekday:周(0-7,*,……)
- job:要执行的任务,依赖于state=present
- name:该任务的描述
- special_time:指定什么时候执行,参数:reboot,yearly,annually,monthly,weekly,daily,hourly
- state:确认该任务计划是创建还是删除
- user:以哪个用户的身份执行
示例:
ansible web -m cron -a 'name="a job for reboot" special_time=reboot job="/some/job.sh"'
ansible web -m cron -a 'name="yum autoupdate" weekday="2" minute=0 hour=12 user="root"'
ansible web -m cron  -a 'backup="True" name="test" minute="0" hour="5,2" job="ls -alh > /dev/null"'
ansilbe web -m cron -a 'cron_file=ansible_yum-autoupdate state=absent'
[root@node1 ansible]# ansible web -m cron -a 'name=tectcron minute="*" job="echo date >> /tmp/test.txt"'
[root@node1 ansible]# ansible web -m shell -a 'crontab -l'
root@node1 ansible]# ansible 192.168.132.132 -m cron -a 'name="backup mysql" minute="00" hour="00" job="echo mysqldump >> /tmp/test.txt"'
[root@node1 ansible]# ansible 192.168.132.132 -m shell -a 'crontab -l'
[root@node1 ansible]# ansible 192.168.132.132 -m cron -a 'name="backup mysql" state=absent'
[root@node1 ansible]# ansible 192.168.132.132 -m shell -a 'crontab -l'
synchronize模块
使用rsync同步文件,其参数如下:
- archive: 归档,相当于同时开启recursive(递归)、links、perms、times、owner、group、-D选项都为yes ,默认该项为开启
- checksum: 跳过检测sum值,默认关闭
- compress:是否开启压缩
- copy_links:复制链接文件,默认为no ,注意后面还有一个links参数
- delete: 删除不存在的文件,默认no
- dest:目录路径
- dest_port:默认目录主机上的端口 ,默认是22,走的ssh协议
- dirs:传输目录不进行递归,默认为no,即进行目录递归
- rsync_opts:rsync参数部分
- set_remote_user:主要用于/etc/ansible/hosts中定义或默认使用的用户与rsync使用的用户不同的情况
- mode: push或pull 模块,push模的话,一般用于从本机向远程主机上传文件,pull 模式用于从远程主机上取文件
使用示例:
src=some/relative/path dest=/some/absolute/path rsync_path="sudo rsync"
src=some/relative/path dest=/some/absolute/path archive=no links=yes
src=some/relative/path dest=/some/absolute/path checksum=yes times=no
src=/tmp/helloworld dest=/var/www/helloword rsync_opts=--no-motd,--exclude=.git mode=pull
filesystem模块
在块设备上创建文件系统
常用选项:
- dev:目标块设备
- force:在一个已有文件系统 的设备上强制创建
- fstype:文件系统的类型
- opts:传递给mkfs命令的选项
示例:
ansible web -m filesystem -a 'fstype=ext2 dev=/dev/sdb1 force=yes'
ansible web -m filesystem -a 'fstype=ext4 dev=/dev/sdb1 opts="-cc"'
mount模块
配置挂载点
选项:
- dump
- fstype:必选项,挂载文件的类型
- name:必选项,挂载点
- opts:传递给mount命令的参数
- src:必选项,要挂载的文件
- state:必选项
- present:只处理fstab中的配置
- absent:删除挂载点
- mounted:自动创建挂载点并挂载之
- umounted:卸载
name=/mnt/dvd src=/dev/sr0 fstype=iso9660 opts=ro state=present
name=/srv/disk src='LABEL=SOME_LABEL' state=present
name=/home src='UUID=b3e48f45-f933-4c8e-a700-22a159ec9077' opts=noatime state=present

ansible test -a 'dd if=/dev/zero of=/disk.img bs=4k count=1024'
ansible test -a 'losetup /dev/loop0 /disk.img'
ansible test -m filesystem 'fstype=ext4 force=yes opts=-F dev=/dev/loop0'
ansible test -m mount 'name=/mnt src=/dev/loop0 fstype=ext4 state=mounted opts=rw'
get_url 模块
该模块主要用于从http、ftp、https服务器上下载文件(类似于wget),主要有如下选项:
- sha256sum:下载完成后进行sha256 check;
- timeout:下载超时时间,默认10s
- url:下载的URL
- url_password、url_username:主要用于需要用户名密码进行验证的情况
- use_proxy:是事使用代理,代理需事先在环境变更中定义
示例:
get_url: url=http://example.com/path/file.conf dest=/etc/foo.conf mode=0440
get_url: url=http://example.com/path/file.conf dest=/etc/foo.conf sha256sum=b5bb9d8014a0f9b1d61e21e796d78dccdf1352f23cd32812f4850b878ae4944c
unarchive模块
用于解压文件,模块包含如下选项:
- copy:在解压文件之前,是否先将文件复制到远程主机,默认为yes。若为no,则要求目标主机上压缩包必须存在。
- creates:指定一个文件名,当该文件存在时,则解压指令不执行
- dest:远程主机上的一个路径,即文件解压的路径
- group:解压后的目录或文件的属组
- list_files:如果为yes,则会列出压缩包里的文件,默认为no,2.0版本新增的选项
- mode:解决后文件的权限
- src:如果copy为yes,则需要指定压缩文件的源路径
- owner:解压后文件或目录的属主
示例如下:
- unarchive: src=foo.tgz dest=/var/lib/foo
- unarchive: src=/tmp/foo.zip dest=/usr/local/bin copy=no
- unarchive: src=https://example.com/example.zip dest=/usr/local/bin copy=no
更多模块请参考官方文档或者使用命令:ansinle-doc -l和ansinle-doc -s modle