three.js之几何体-自定义二维图形ShapeGeometry(vue中使用three.js23)
ShapeGeometry几何体介绍和使用
1.ShapeGeometry几何体介绍
ShapeGeometry可以用来创建自定义的二维图形,实际上ShapeGeometry创建图形必须要用到基类Shape,我们先来看看它的原型链:
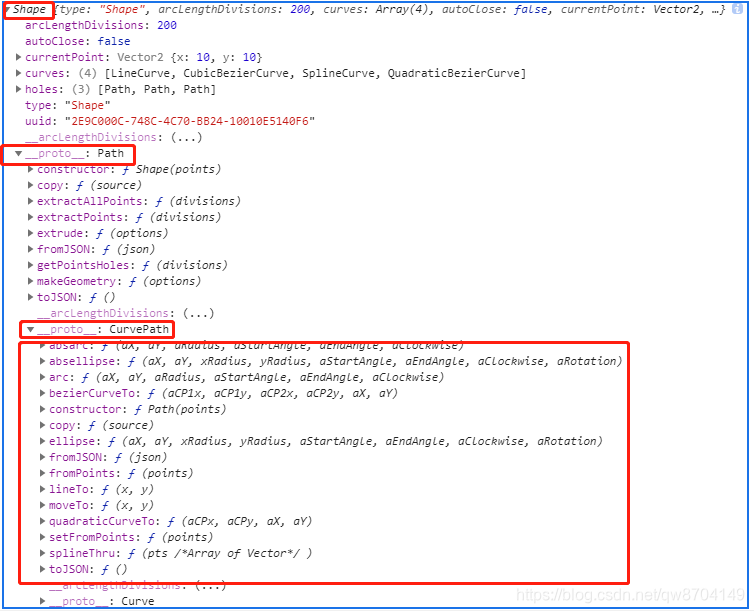
没错,Shape类继承自Path类,Path类由继承自CurvePath类,我们用来画图的方法实际都是从CurvePath继承来的,现在我们介绍一下这些方法:
| 函数名 | 描述 |
|---|---|
| moveTo(x,y) | 将函数绘图点移动到指定的坐标 |
| lineTo(x,y) | 从moveTo指定的位置开始画一条线到(x,y)指定的坐标 |
| quadricCurveTo(aCPx,aCPy,x,y)(二次曲线) | 你可以用两种方法来定义曲线,用quadricCurveTo或bezierCurveTo函数,这两种方法的不同是一个通过一个点控制曲线的曲率,一个用两个点,下图是二者的示意图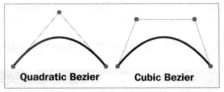 对于二次曲线,需要额外指定一个点(使用aCPx和aCPy参数),还需要指定端点(x和y)。对于三次曲线需要用bezierCurveTo函数绘制,需要多指定两个点才能绘制, 对于二次曲线,需要额外指定一个点(使用aCPx和aCPy参数),还需要指定端点(x和y)。对于三次曲线需要用bezierCurveTo函数绘制,需要多指定两个点才能绘制, 起点都是路径的当前点 |
| bezierCurveTo(aCPx1,aCPy1,aCPx2,aCPy2,x,y) | 根据提供的参数画一条曲线,相关说明参考前一行内容,该曲线绘制需要四个点:起点是路径的当前点,连个点用来控制曲率,最后一个点是端点 |
| splineThru(pts) | 该函数沿着提供的坐标集合绘制一条光滑的曲线,这个参数是一个THREE.Vector2对象数组,起点是路径的当前位置 |
| arc(ax,ay,aRadius,aStartAngle,aEndAngle,aClockwise) | 画圆(或者一段弧),起始于路径的当前位置,ax和ay用来指定圆心与当前位置的偏移量,aRadius设置圆的大小,aStartAngle和aEndAngle用来定义弧的长度,布尔属性aClockwise决定这段弧是顺时针还是逆时针 |
| absArc(ax,ay,aRadius,aStartAngle,aEndAngle,aClockwise) | 参考arc的描述,该方法绘制的弧是绝对位置,而不是相对位置 |
| ellipse(ax,ay,xRadius,yRadius,aStartAngle,aEndAngle,aClockwise) | 画椭圆参考arc的描述,可以通过xRadius指定x轴半径,通过yRadius指定y轴半径 |
| absEllipse(ax,ay,xRadius,yRadius,aStartAngle,aEndAngle,aClockwise) | 参考ellipse的描述,该方法绘制的椭圆是绝对位置,而不是相对位置 |
继续往下看:
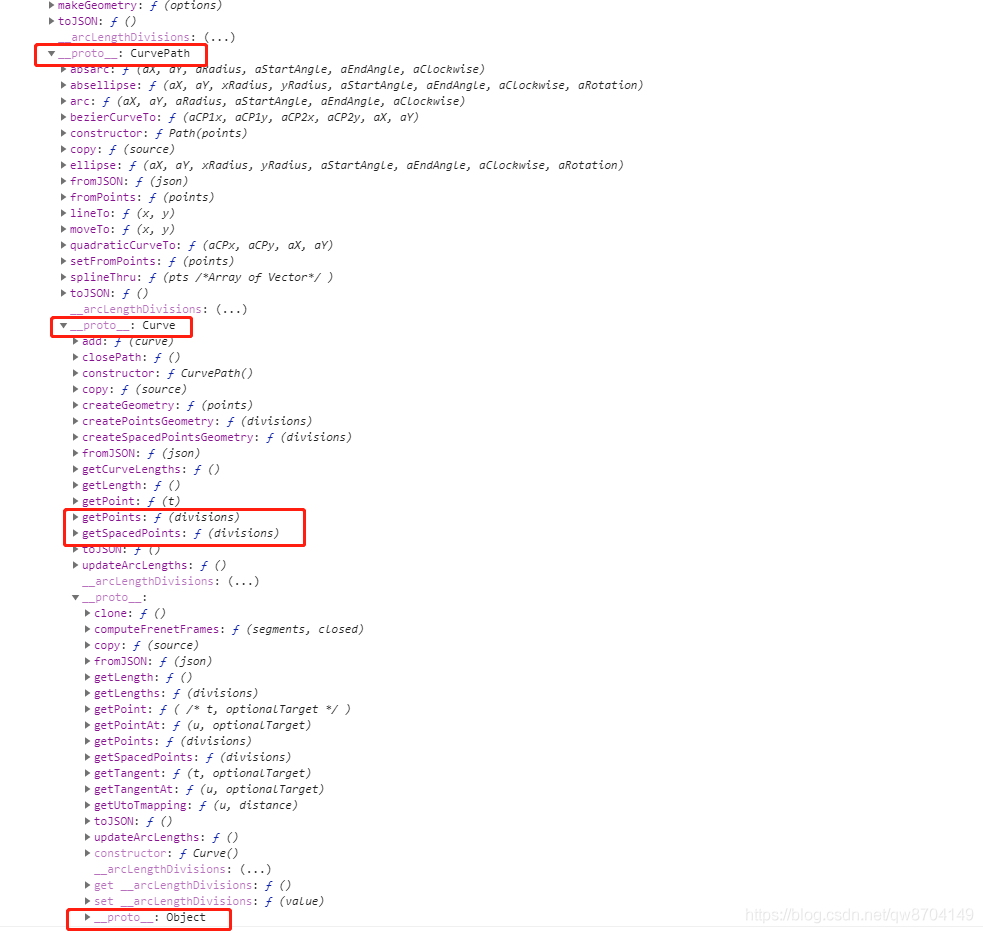
CurvePath继承自Curve类,Curve类又继承自Object类,果然一切皆对象啊,随后我们要介绍一下继承自Curve类的getPoints和getSpacedPoints方法
| 函数名 | 描述 |
|---|---|
| getPoints(n) | 从路径的每一个部分返回n个点 |
| getSpacedPoints(n) | 从整个路径返回n个点 |
2.demo说明
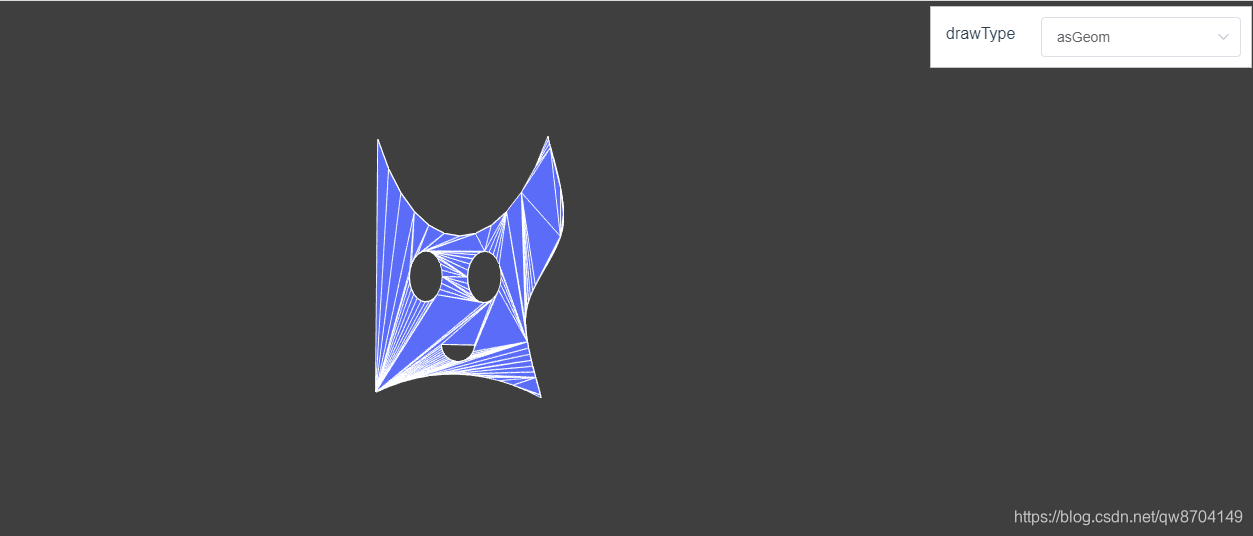
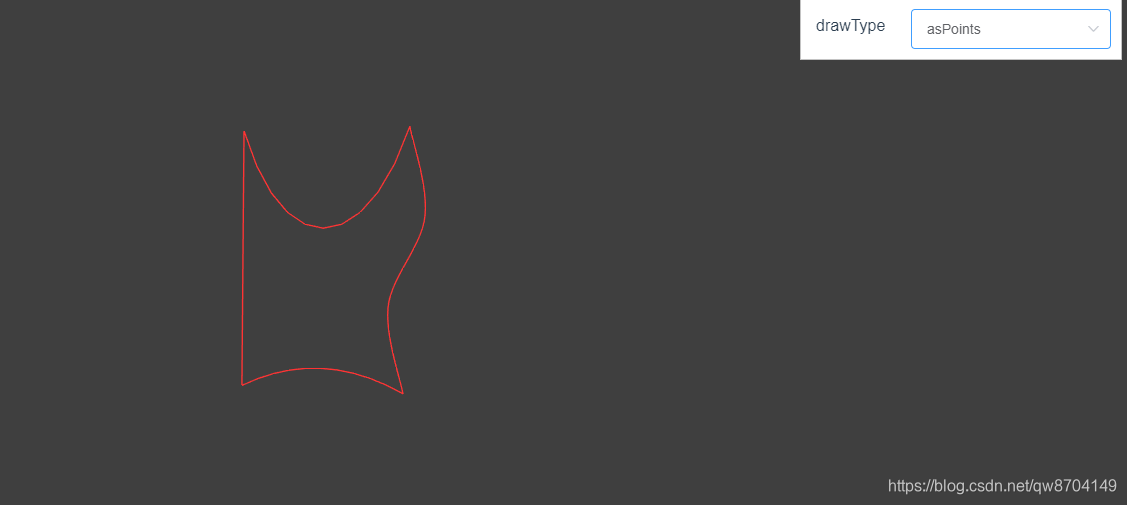
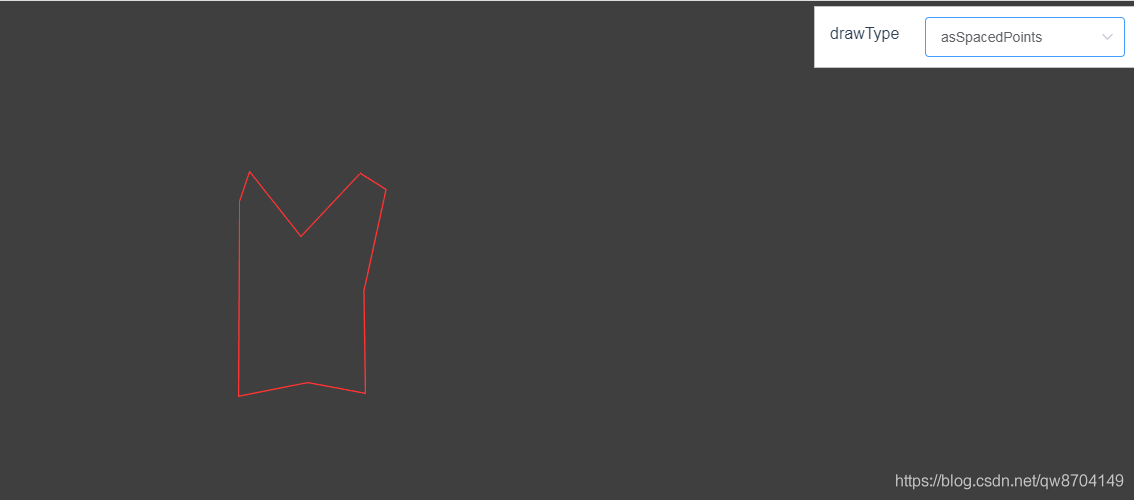
该示例可以通过drawType属性切换不同的绘图方式,绘出上面三种不同的图形,
3.demo代码
<template>
  <div>
    <div id="container"></div>
    <div class="controls-box">
      <section>
        <el-row>
          <el-col :span="8" class="label-col"><label>drawType</label></el-col>
          <el-col :span="16">
            <el-select v-model="drawType" placeholder="请选择">
              <el-option v-for="item in options" :key="item.value" :label="item.label" :value="item.value">
              </el-option>
            </el-select>
          </el-col>
        </el-row>
      </section>
    </div>
  </div>
</template>

<script>
import * as THREE from 'three'
import { OrbitControls } from 'three/examples/jsm/controls/OrbitControls.js'
import { SceneUtils } from 'three/examples/jsm/utils/SceneUtils.js'
export default {
  data() {
    return {
      options: [
        {
          value: 'asGeom',
          label: 'asGeom'
        },
        {
          value: 'asPoints',
          label: 'asPoints'
        },
        {
          value: 'asSpacedPoints',
          label: 'asSpacedPoints'
        }
      ],
      drawType: 'asGeom',
      activeShapeMesh: null,
      camera: null,
      scene: null,
      renderer: null,
      controls: null
    }
  },
  mounted() {
    this.init()
  },
  methods: {
    formatTooltip(val) {
      return val
    },
    // 初始化
    init() {
      this.createScene() // 创建场景
      this.createMesh() // 创建网格模型
      this.createLight() // 创建光源
      this.createCamera() // 创建相机
      this.createRender() // 创建渲染器
      this.createControls() // 创建控件对象
      this.render() // 渲染
      console.log(this.drawShape())
    },
    // 创建场景
    createScene() {
      this.scene = new THREE.Scene()
    },
    drawShape() {
      // 创建基础形状
      const shape = new THREE.Shape()

      // 设置起始点
      shape.moveTo(10, 10)

      // 画线到新坐标
      shape.lineTo(10, 40)

      // 贝塞尔曲线
      shape.bezierCurveTo(15, 25, 25, 25, 30, 40)

      // 样条曲线
      shape.splineThru([
        new THREE.Vector2(32, 30),
        new THREE.Vector2(28, 20),
        new THREE.Vector2(30, 10)
      ])

      // 底部二次曲线
      shape.quadraticCurveTo(20, 15, 10, 10)

      // 左眼
      const hole1 = new THREE.Path()
      hole1.absellipse(16, 24, 2, 3, 0, Math.PI * 2, true)
      shape.holes.push(hole1)

      // 右眼
      const hole2 = new THREE.Path()
      hole2.absellipse(23, 24, 2, 3, 0, Math.PI * 2, true)
      shape.holes.push(hole2)

      // 嘴巴
      const hole3 = new THREE.Path()
      hole3.absarc(20, 16, 2, 0, Math.PI, true)
      shape.holes.push(hole3)
      return shape
    },
    // 创建网格模型
    createMesh() {
      // 创建二维几何体
      const geom = new THREE.ShapeGeometry(this.drawShape())

      // 创建材质
      const meshMaterial = new THREE.MeshNormalMaterial({
        side: THREE.DoubleSide
      })
      const wireFrameMat = new THREE.MeshBasicMaterial({ wireframe: true })

      // 平面添加组合材质
      this.activeShapeMesh = SceneUtils.createMultiMaterialObject(geom, [
        meshMaterial,
        wireFrameMat
      ])

      // 平面对象添加到场景中
      this.scene.add(this.activeShapeMesh)
    },

    // 创建光源
    createLight() {
      // 环境光
      const ambientLight = new THREE.AmbientLight(0xffffff, 0.1) // 创建环境光
      this.scene.add(ambientLight) // 将环境光添加到场景

      const spotLight = new THREE.SpotLight(0xffffff) // 创建聚光灯
      spotLight.position.set(-40, 60, -10)
      spotLight.castShadow = true
      this.scene.add(spotLight)
    },
    // 创建相机
    createCamera() {
      const element = document.getElementById('container')
      const width = element.clientWidth // 窗口宽度
      const height = element.clientHeight // 窗口高度
      const k = width / height // 窗口宽高比
      // PerspectiveCamera( fov, aspect, near, far )
      this.camera = new THREE.PerspectiveCamera(35, k, 0.1, 1000)
      this.camera.position.set(-30, 30, 180) // 设置相机位置

      this.camera.lookAt(new THREE.Vector3(10, 0, 0)) // 设置相机方向
      this.scene.add(this.camera)
    },
    // 创建渲染器
    createRender() {
      const element = document.getElementById('container')
      this.renderer = new THREE.WebGLRenderer({ antialias: true, alpha: true })
      this.renderer.setSize(element.clientWidth, element.clientHeight) // 设置渲染区域尺寸
      this.renderer.shadowMap.enabled = true // 显示阴影
      this.renderer.shadowMap.type = THREE.PCFSoftShadowMap
      this.renderer.setClearColor(0x3f3f3f, 1) // 设置背景颜色
      element.appendChild(this.renderer.domElement)
    },

    // 更新属性
    updateFun() {
      const tempRotationY = this.activeShapeMesh.rotation.y
      this.scene.remove(this.activeShapeMesh)

      if (this.drawType === 'asGeom') {
        this.createMesh()
      } else {
        let points = []
        // 创建用来画线的几何体的三种方式:
        // 1.创建Geometry对象,把每个点设置到Geometry对象的vertices属性中-shapeGeometry0
        // 2.创建BufferGeometry对象,通过setFromPoints()设置点-shapeGeometry1
        // 3.创建Geometry对象,通过setFromPoints()设置点-shapeGeometry2

        // const shapeGeometry0 = new THREE.Geometry()
        if (this.drawType === 'asPoints') {
          points = this.drawShape().getPoints(10) // 从shape路径的每一个部分返回10个点
        } else if (this.drawType === 'asSpacedPoints') {
          points = this.drawShape().getSpacedPoints(10) // 从整个shape路径返回10个点
        }
        /* points.forEach(pointItem => {
          shapeGeometry0.vertices.push(
            new THREE.Vector3(pointItem.x, pointItem.y, 0)
          )
        }) */
        // const shapeGeometry1 = new THREE.BufferGeometry().setFromPoints(points)
        const shapeGeometry2 = new THREE.Geometry().setFromPoints(points)
        // new THREE.Line 同new THREE.Mesh一样创建的是网格对象 需要两个参数:geometry几何对象和material材质对象
        this.activeShapeMesh = new THREE.Line(
          // shapeGeometry0,
          // shapeGeometry1,
          shapeGeometry2,
          new THREE.LineBasicMaterial({
            color: 0xff3333,
            linewidth: 2
          })
        )
        this.scene.add(this.activeShapeMesh)
      }
      this.activeShapeMesh.rotation.y += tempRotationY + 0.01
    },
    render() {
      this.updateFun()
      this.renderer.render(this.scene, this.camera)
      requestAnimationFrame(this.render)
    },
    // 创建控件对象
    createControls() {
      this.controls = new OrbitControls(this.camera, this.renderer.domElement)
    }
  }
}
</script>
<style>
#container {
  position: absolute;
  width: 100%;
  height: 100%;
}
.controls-box {
  position: absolute;
  right: 5px;
  top: 5px;
  width: 300px;
  padding: 10px;
  background-color: #fff;
  border: 1px solid #c3c3c3;
}
.label-col {
  padding: 8px 5px;
}
</style>