【rl-agents代码学习】01——总体框架
学习一下rl-agents的项目结构以及代码实现思路。
source: https://github.com/eleurent/rl-agents
rl-agent Get start
Installation
pip install --user git+https://github.com/eleurent/rl-agents
Usage
rl-agents中的大部分例子可以通过cd到scripts文件夹 cd scripts,执行 python experiments.py命令实现。
Usage:
  experiments evaluate <environment> <agent> (--train|--test)
                                             [--episodes <count>]
                                             [--seed <str>]
                                             [--analyze]
  experiments benchmark <benchmark> (--train|--test)
                                    [--processes <count>]
                                    [--episodes <count>]
                                    [--seed <str>]
  experiments -h | --help

Options:
  -h --help            Show this screen.
  --analyze            Automatically analyze the experiment results.
  --episodes <count>   Number of episodes [default: 5].
  --processes <count>  Number of running processes [default: 4].
  --seed <str>         Seed the environments and agents.
  --train              Train the agent.
  --test               Test the agent.
evaluate命令允许在给定的环境中评估给定的agent。例如,
# Train a DQN agent on the CartPole-v0 environment
$ python3 experiments.py evaluate configs/CartPoleEnv/env.json configs/CartPoleEnv/DQNAgent.json --train --episodes=200
每个agent都按照标准接口与环境交互:
action = agent.act(state)
next_state, reward, done, info = env.step(action)
agent.record(state, action, reward, next_state, done, info)
环境的配置文件
{
    "id": "intersection-v0",
    "import_module": "highway_env",
    "observation": {
        "type": "Kinematics",
        "vehicles_count": 15,
        "features": ["presence", "x", "y", "vx", "vy", "cos_h", "sin_h"],
        "features_range": {
            "x": [-100, 100],
            "y": [-100, 100],
            "vx": [-20, 20],
            "vy": [-20, 20]
        },
        "absolute": true,
        "order": "shuffled"
    },
    "destination": "o1"
}
agent的配置文件,核心就是"__class__": "<class 'rl_agents.agents.deep_q_network.pytorch.DQNAgent'>",利用agent_factory进行agent的创建。
{
    "__class__": "<class 'rl_agents.agents.deep_q_network.pytorch.DQNAgent'>",
    "model": {
        "type": "MultiLayerPerceptron",
        "layers": [128, 128]
    },
    "gamma": 0.95,
    "n_steps": 1,
    "batch_size": 64,
    "memory_capacity": 15000,
    "target_update": 512,
    "exploration": {
        "method": "EpsilonGreedy",
        "tau": 15000,
        "temperature": 1.0,
        "final_temperature": 0.05
    }
}
如果部分key缺失的话,会使用默认的值agent.default_config()。
最后,可以在基准(baseline)测试中安排一批实验。然后在几个进程上并行执行所有实验。
# Run a benchmark of several agents interacting with environments
$ python3 experiments.py benchmark cartpole_benchmark.json --test --processes=4
基准配置文件包含环境配置列表和agent配置列表。
{
    "environments": ["configs/CartPoleEnv/env.json"],
    "agents": [
        "configs/CartPoleEnv/DQNAgent.json",
        "configs/CartPoleEnv/LinearAgent.json",
        "configs/CartPoleEnv/MCTSAgent.json"
    ]
}
Monitoring
有几种工具可用于监控agent性能:
- Run metadata:为了可重复性,将运行所用的环境和agent配置合并,并保存到
metadata.*.json文件中。 - Gym Monitor:每次运行的主要统计数据(episode rewards, lengths, seeds)都会记录到
episode_batch.*.stats.json文件中。可以通过运行scripts/analyze.py来自动可视化这些数据。 - Logging:agent可以通过标准的Python日志记录库发送消息。默认情况下,所有日志级别为INFO的消息都会保存到
logging.*.lo文件中。要保存日志级别为DEBUG的消息,请添加选项scripts/experiments.py --verbose。 - Tensorboard:默认情况下,一个tensoboard writer会记录有关有用标量、图像和模型图的信息到运行目录。可以通过运行以下命令来进行可视化:
tensorboard --logdir <path-to-runs-dir>。
具体代码
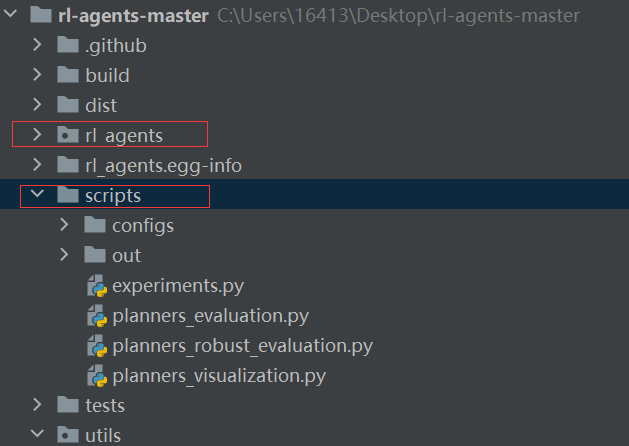
rl-agents核心代码集中在rl-agents文件夹和scripts文件夹中,其中,rl-agents主要实现相关的算法,scripts为相应的配置文件。

experiments.py为入口程序,先从它看起,其相应的用法如下:

Usage:
  experiments evaluate <environment> <agent> (--train|--test) [options]
  experiments benchmark <benchmark> (--train|--test) [options]
  experiments -h | --help

Options:
  -h --help              Show this screen.
  --episodes <count>     Number of episodes [default: 5].
  --no-display           Disable environment, agent, and rewards rendering.
  --name-from-config     Name the output folder from the corresponding config files
  --processes <count>    Number of running processes [default: 4].
  --recover              Load model from the latest checkpoint.
  --recover-from <file>  Load model from a given checkpoint.
  --seed <str>           Seed the environments and agents.
  --train                Train the agent.
  --test                 Test the agent.
  --verbose              Set log level to debug instead of info.
  --repeat <times>       Repeat several times [default: 1].
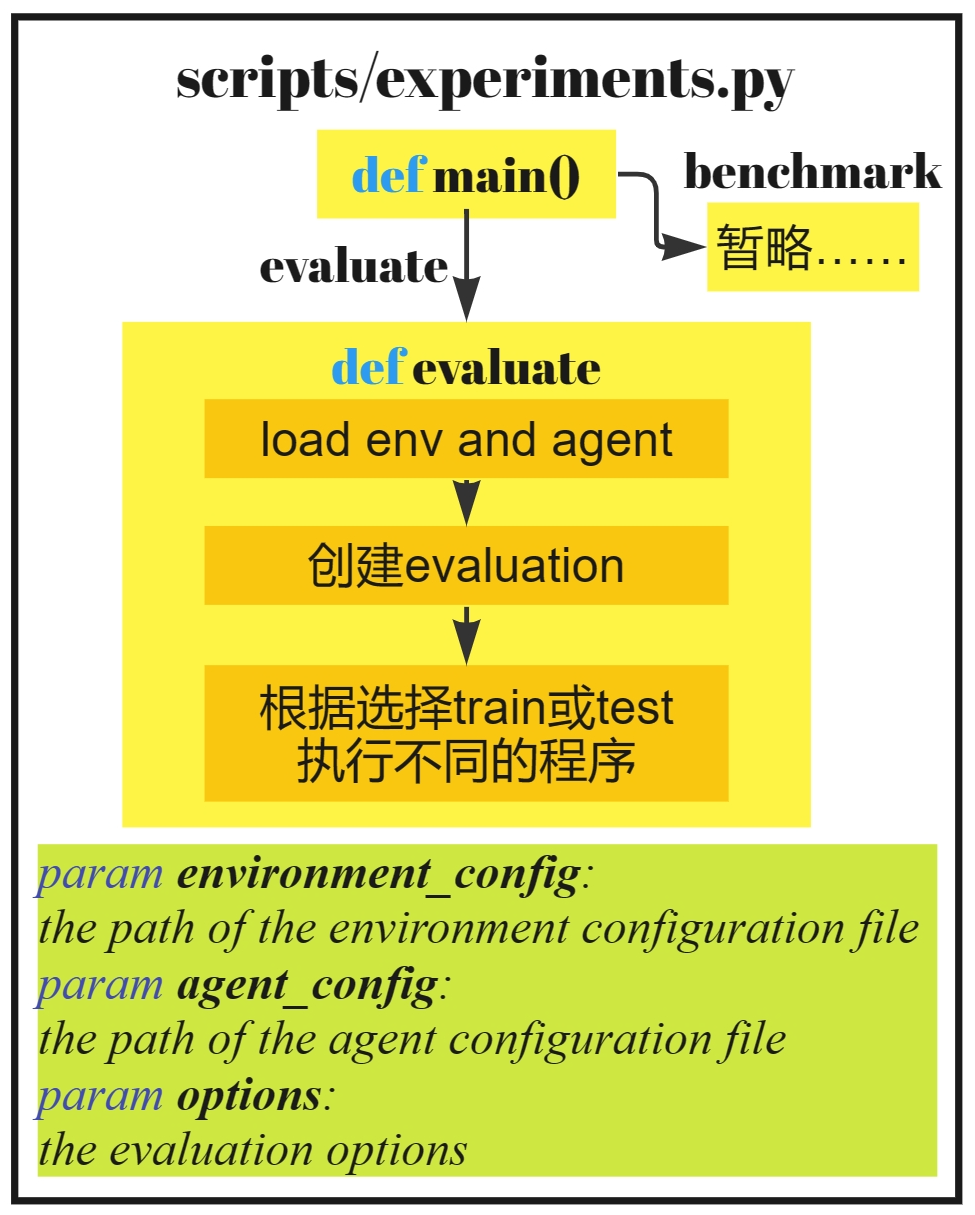
首先从main函数开始,根据evaluate或者benchmark执行相应的任务。暂且先从evaluate入手。
def main():
    opts = docopt(__doc__)
    if opts['evaluate']:
        for _ in range(int(opts['--repeat'])):
            evaluate(opts['<environment>'], opts['<agent>'], opts)
    elif opts['benchmark']:
        benchmark(opts)
evaluate主要完成env、agent的创建以及evaluation 对象的创建,再根据选择train或test执行不同的程序。
def evaluate(environment_config, agent_config, options):
    """
        Evaluate an agent interacting with an environment.

    :param environment_config: the path of the environment configuration file
    :param agent_config: the path of the agent configuration file
    :param options: the evaluation options
    """
    logger.configure(LOGGING_CONFIG)
    if options['--verbose']:
        logger.configure(VERBOSE_CONFIG)
    env = load_environment(environment_config)
    agent = load_agent(agent_config, env)
    run_directory = None
    if options['--name-from-config']:
        run_directory = "{}_{}_{}".format(Path(agent_config).with_suffix('').name,
                                  datetime.datetime.now().strftime('%Y%m%d-%H%M%S'),
                                  os.getpid())
    options['--seed'] = int(options['--seed']) if options['--seed'] is not None else None
    evaluation = Evaluation(env,
                            agent,
                            run_directory=run_directory,
                            num_episodes=int(options['--episodes']),
                            sim_seed=options['--seed'],
                            recover=options['--recover'] or options['--recover-from'],
                            display_env=not options['--no-display'],
                            display_agent=not options['--no-display'],
                            display_rewards=not options['--no-display'])
    if options['--train']:
        evaluation.train()
    elif options['--test']:
        evaluation.test()
    else:
        evaluation.close()
    return os.path.relpath(evaluation.run_directory)
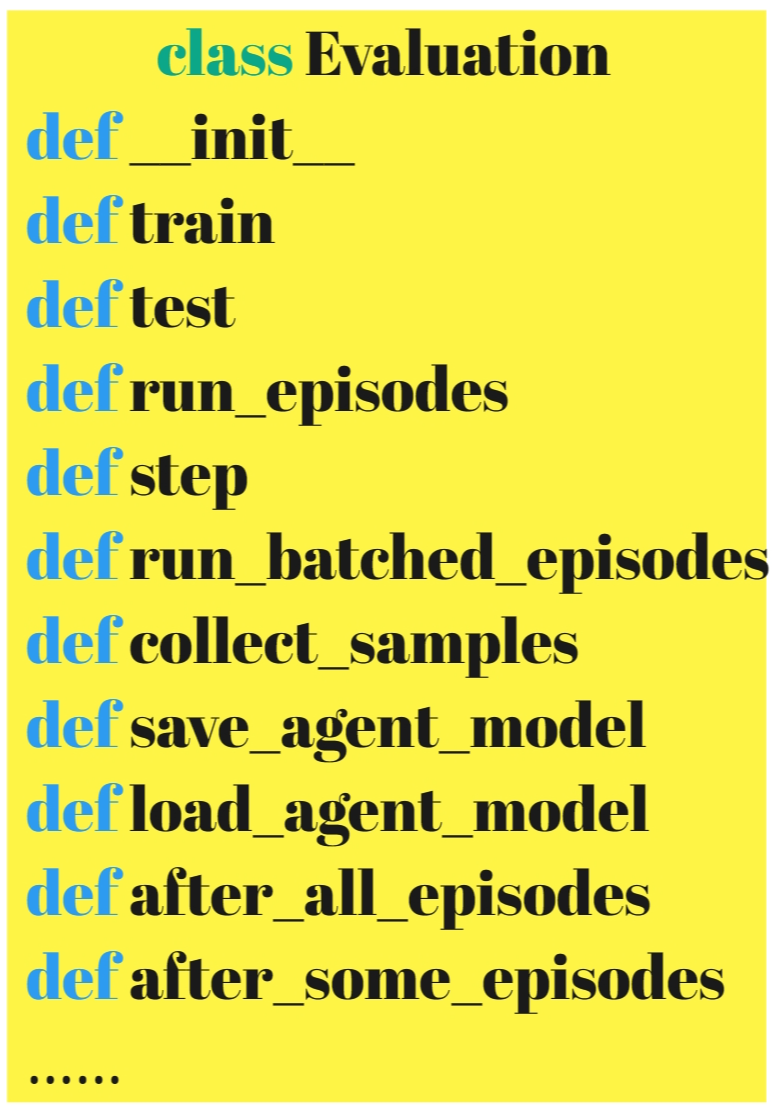
Evaluation类中主要包含以下函数:

__init__的一些参数说明
| 参数 | 描述 |
|---|---|
| env | 要解决的环境,可能是包装了AbstractEnv的环境 |
| agent | 解决环境的AbstractAgent agent |
| directory | 工作空间目录路径 |
| run_directory | 运行目录路径 |
| num_episodes | 运行的episode数 |
| training | agent是处于训练模式还是测试模式 |
| sim_seed | 环境/agent随机性源的种子 |
| recover | 从文件中恢复agent参数。如果为True,则使用默认的最新保存。如果为字符串,则将其用作路径。 |
| display_env | 渲染环境,并有一个监视器录制其视频 |
| display_agent | 如果支持,将agent图形添加到环境查看器中 |
| display_rewards | 通过episodes显示agent的性能 |
| close_env | 当评估结束时,是否应该关闭环境 |
| step_callback_fn | 在每个环境步骤之后调用的回调函数。它接受以下参数:(episode, env, agent, transition, writer)。 |
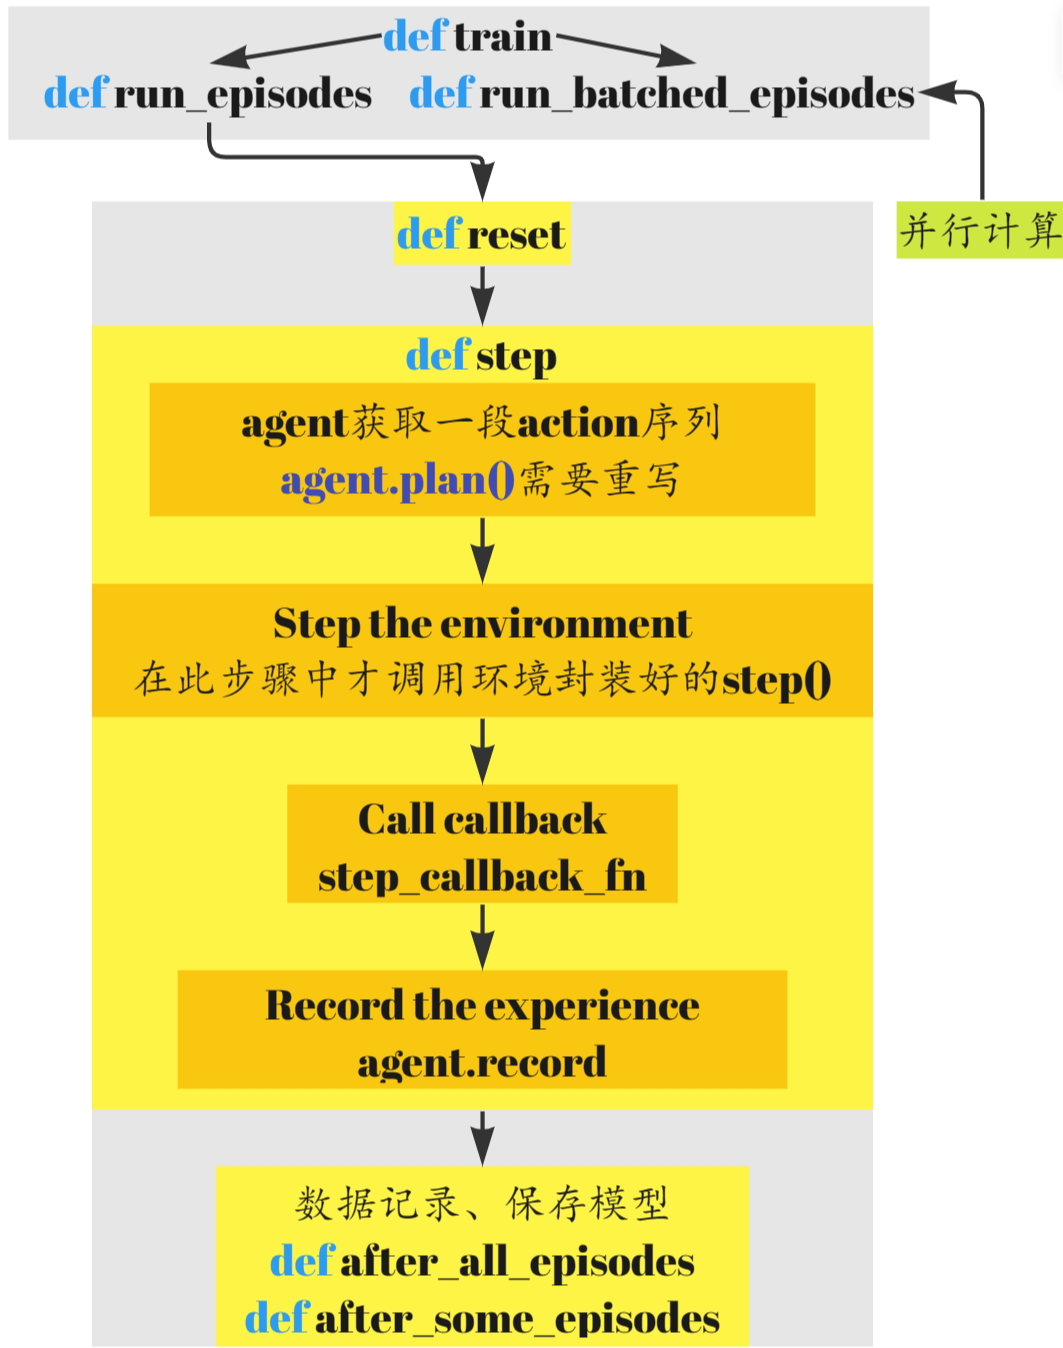
首先看一下train,根据agent是否有batched属性,分为run_batched_episodes和run_episodes
    def train(self):
        self.training = True
        if getattr(self.agent, "batched", False):
            self.run_batched_episodes()
        else:
            self.run_episodes()
        self.close()
run_episodes就是一般强化学习的基本过程,注意其中的reset step 等函数都是经过封装的。实现自己的算法时需要注意。run_batched_episodes则主要实现一些并行计算的任务,这一部分等之后再详细介绍。

    def run_episodes(self):
        for self.episode in range(self.num_episodes):
            # Run episode
            terminal = False
            self.reset(seed=self.episode)
            rewards = []
            start_time = time.time()
            while not terminal:
                # Step until a terminal step is reached
                reward, terminal = self.step()
                rewards.append(reward)

                # Catch interruptions
                try:
                    if self.env.unwrapped.done:
                        break
                except AttributeError:
                    pass

            # End of episode
            duration = time.time() - start_time
            self.after_all_episodes(self.episode, rewards, duration)
            self.after_some_episodes(self.episode, rewards)
test为模型测试部分
    def test(self):
        """
        Test the agent.

        If applicable, the agent model should be loaded before using the recover option.
        """
        self.training = False
        if self.display_env:
            self.wrapped_env.episode_trigger = lambda e: True
        try:
            self.agent.eval()
        except AttributeError:
            pass
        self.run_episodes()
        self.close()
其中eval也需要进行重写。
    def eval(self):
        """
            Set to testing mode. Disable any unnecessary exploration.
        """
        pass