【pytest】(详解)@pytest.mark.parametrize: 参数化测试函数
目录
跟着官网学习的,记录记录笔记.
1.快速入门
1.1介绍
以前使用unittest的时候,我们参数化是用@ddt,但是使用pytest之后,pytest内置了pytest.mark.parametrize装饰器来对测试函数的参数进行参数化
1.2代码示例
文件名: test_demo.py
import pytest


@pytest.mark.parametrize("test_input,expected", [("3+5", 8), ("2+4", 6), ("6*9", 42)])
def test_eval(test_input, expected):
    assert eval(test_input) == expected
1.3运行结果

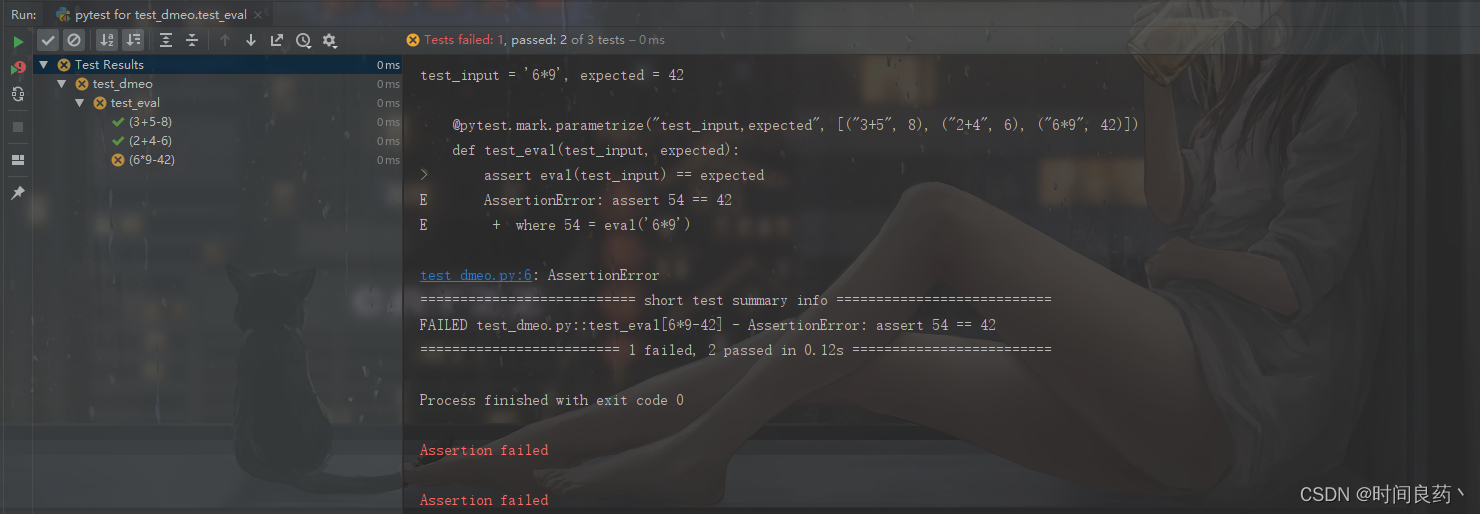
1.4结果分析
我们通过@parametrize装饰器定义了三个不同的(test_input,expected)的元祖,然后test_eval函数就依次使用了他们三次.这就是一个简单的参数化使用案例.
2.装饰测试类
2.1介绍
我们可以对类进行参数化,但这限制比较高,比如你类下面的所有函数,参数名称和个数都要和你写的参数名称个数一致,否则就会报错.
2.2示例代码
文件名: test_demo.py
import pytest


@pytest.mark.parametrize("name,age,sex", [("微光", 18, "男"), ("杨过", 20, "男"), ("小龙女", 27, "女")])
class TestDemo:
    def test_demo01(self, name, age, sex):
        print(name, age, sex)

    # def test_demo02(self, sex):
    #     print(sex)

    # def test_demo03(self):
    #     print("我没有参数,我会执行几次")

    def test_demo04(self, name, age, sex):
        print(name, age, sex)
2.3.运行结果

2.4结果分析
可以看到,我们装饰在类上,下面的所有测试用例,只要符合要求的,都会进行参数化,有多少个参数就会执行多少次
3.全局变量方式进行参数化
3.1介绍
我们可以通过将参数化的值赋值给全局变量,然后也能实现装饰类的效果
3.2示例代码
文件名: test_demo.py
import pytest

pytestmark = pytest.mark.parametrize("name, age", [("杨过", 18), ("小龙女", 27)])


class TestDemo:
    def test_demo01(self, name, age):
        print(name, age)

    def test_demo02(self, name, age):
        print(name, age)


def test_demo03(name, age):
    print(name, age)
3.3运行结果

3.4结果分析
通过全局变量的方式来进行参数化,它相较于在类上进行装饰器的范围更广,可以针对当前模块进行参数化,但同样的也要受到局限,如test_demo03必须要接收参数且参数名和个数都要和参数化的一模一样.
4.标记参数化
4.1介绍
我们可以在参数化中标记单个测试实例,例如使用内置mark.xfail
4.2示例代码
文件名: test_demo.py
import pytest


# pytest.param("6*9", 42, marks=pytest.mark.xfail):如果6*9不等于42,此用例就会标记忽略
@pytest.mark.parametrize(
    "test_input,expected",
    [("3+5", 8), ("2+4", 7), pytest.param("6*9", 42, marks=pytest.mark.xfail)],
)
def test_eval(test_input, expected):
    assert eval(test_input) == expected
4.3运行结果

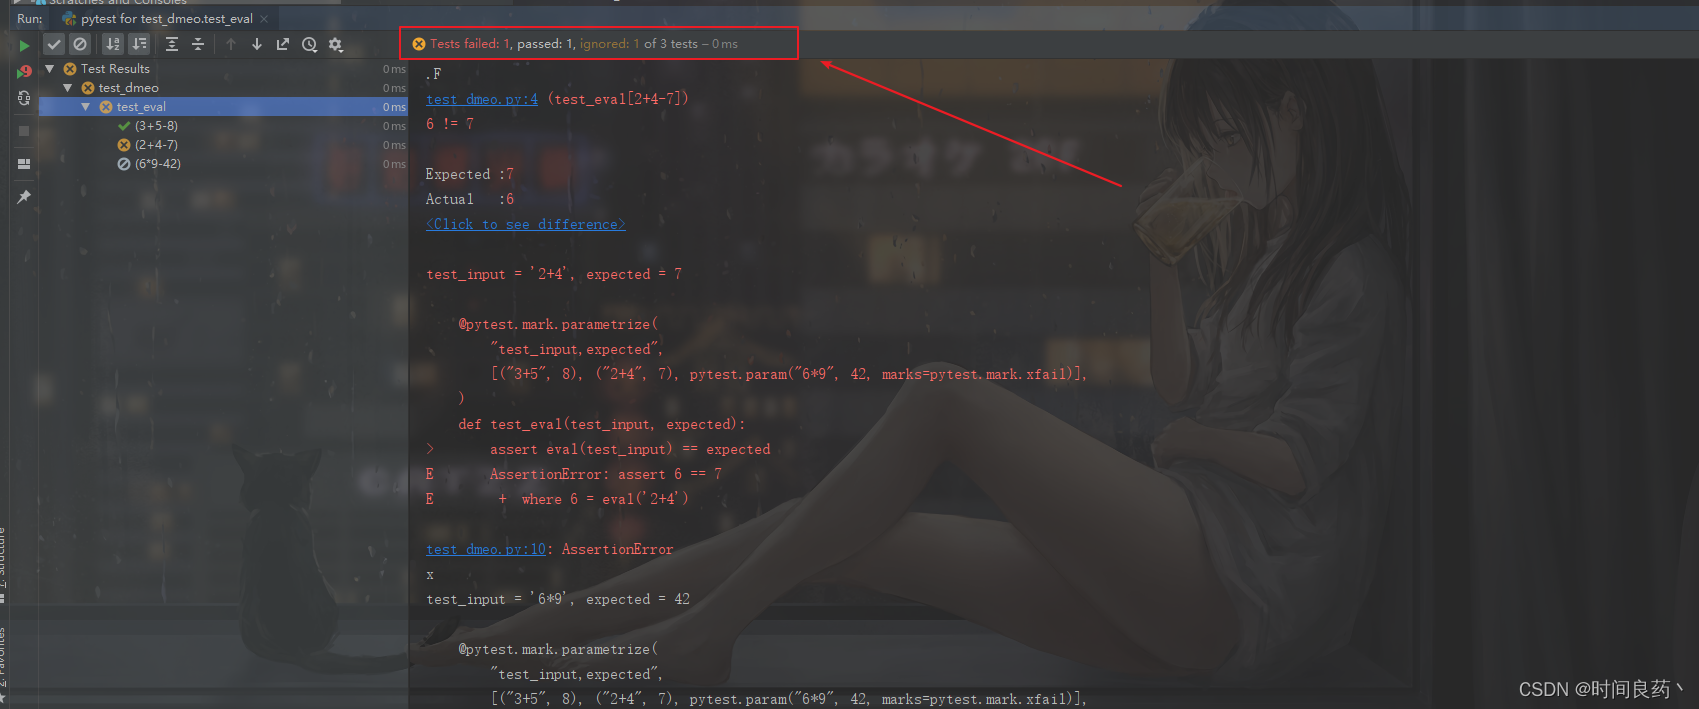
4.4结果分析
可以发现,第一个断言成功,第二个断言失败,第三个虽然也是断言失败,但是我们标记了如果断言失败就忽略,上图箭头指向的就是1失败,1通过,1忽略.所以我们可以在参数化的时候对参数haul进行标记.
5.堆叠parametrize装饰器
5.1介绍
我们可以在测试函数或者测试类进行堆叠parametrize装饰器,实现一些特殊效果.
5.2示例代码
文件名: test_demo.py
import pytest


@pytest.mark.parametrize("x", [0, 1])
@pytest.mark.parametrize("y", [2, 3])
def test_demo(x, y):
    print(x, y)
5.3运行结果

5.4结果分析
查看打印的结果,可以看到它们的执行顺序是x=0/y=2、x=1/y=2、 x=0/y=3、x=1/y=3.
这里我格外注意,堆叠的方式,不会是执行两次测试用例,分别传值,而是执行4次,然后顺序就是从下面的y开始2,一次将上面的x执行一轮,然后又从y的3开始,在执行一次x一轮才算结束.
6.参数为字典的方式
6.1介绍
我们在传递参数的时候有时候也希望传递一个字典,这样会更加省事一些.下面就来具体使用一下.
6.2示例代码
文件名: test_demo.py
import pytest

dict1 = [{
    "name": "杨过",
    "age": 18
}, {
    "name": "小龙女",
    "age": 27
}, {
    "name": "黄蓉",
    "age": 29
}]


@pytest.mark.parametrize("dict1", dict1)
def test_demo(dict1):
    print(dict1)
6.3运行结果

6.4结果分析
通过字段的方式来进行传值的话,我们的参数将更灵活,不用局限于必须传递里面的参数名和参数个数一样,我们只需要保证外面接收的参数一样就可以了.例如我们有两个测试函数test1,test2,test1需要的参数有name和age,test2只需要sex,如果我们用直接列表套元祖是无法完成的,会报参数错误,但是我们用字段的形式就能完全解决这个问题,如我们传递的参数是dict,我们要用name和age就,dict.name,dict.age,同理取sex就是dict.sex,所以这种方式也是我们常用的方式.
7.ids参数用例描述
7.1介绍
我们可以通过ids对参数用例进行描述,如果不设置ids,就默认参数值表示.
7.2示例代码
文件名: test_demo.py
import pytest


# 没有传ids的,默认用参数值
@pytest.mark.parametrize("x, y", [(0, 1), (2, 3), (4, 5)])
def test_demo01(x, y):
    pass


# 传入了ids的,使用ids中的名称
@pytest.mark.parametrize("x, y", [(0, 1), (2, 3), (4, 5)], ids=("第一次", "第二次", "第三次"))
def test_demo02(x, y):
    pass
7.3运行结果

7.4结果分析
我们可以看到,没有设置ids的就是默认用的参数值,看左侧列表.设置了ids的就是我们设置的内容,只不过pytest会转义unicode字符串中用于参数化的任何非ascii字符.
8.解决unicode编码问题
8.1问题描述

如上图中右侧,我们可以看到我们设置的ids为中文时,它出现了乱码,因为pytest会转义unicode字符串中用于参数化的任何非ascii字符,我们下面就来解决这个问题.
8.2解决方法一:通过配置pytest.ini处理
- 介绍
我们在根目录下的pytest.ini文件中添加如下代码:
- 示例代码
文件名: pytest.ini(没有就新建)
[pytest]
disable_test_id_escaping_and_forfeit_all_rights_to_community_support = True
- 重新运行第七个示例
import pytest


# 没有传ids的,默认用参数值
@pytest.mark.parametrize("x, y", [(0, 1), (2, 3), (4, 5)])
def test_demo01(x, y):
    pass


# 传入了ids的,使用ids中的名称
@pytest.mark.parametrize("x, y", [(0, 1), (2, 3), (4, 5)], ids=("第一次", "第二次", "第三次"))
def test_demo02(x, y):
    pass
- 运行结果

可以看到左侧已经正常显示了我们的中文.
但是请记住,根据使用的操作系统和当前安装的插件,这可能会导致不必要的副作用甚至错误,因此使用它需要您自担风险。
8.3解决方法二:通过钩子函数pytest_collection_modifyitems解决
- 介绍
通过pytest_collection_modifyitems钩子函数来解决问题
pytest_collection_modifyitems:pytest在收集完所有测试项后调用的钩子。pytest_collection_modifyitems(session, config, items),当我们pytest_collection_modifyitems在插件中实现一个函数时,pytest 将在注册期间验证您使用的参数名称是否与规范匹配,如果不匹配则退出。
- 示例代码
在根或者当前目录下新建conftest.py,并添加如下代码
# 通过钩子函数,pytest在收集完所有测试项后调用这个钩子,items就是所有的用例合集
def pytest_collection_modifyitems(session, config, items):
    for item in items:
        item.name = item.name.encode("utf-8").decode("unicode_escape")
        # print(item.nodeid)
        item._nodeid = item.nodeid.encode("utf-8").decode("unicode_escape")
- 重新运行第七个示例
import pytest


# 没有传ids的,默认用参数值
@pytest.mark.parametrize("x, y", [(0, 1), (2, 3), (4, 5)])
def test_demo01(x, y):
    pass


# 传入了ids的,使用ids中的名称
@pytest.mark.parametrize("x, y", [(0, 1), (2, 3), (4, 5)], ids=("第一次", "第二次", "第三次"))
def test_demo02(x, y):
    pass
- 运行结果

可以看到我们通过钩子函数,也成功了,所以这两种方法都可以,但更建议使用这种方法.
9.基于pytest_generate_tests钩子函数的参数化
9.1介绍
有时您可能想要实现自己的参数化方案或实现一些动态来确定夹具的参数或范围。为此,您可以使用pytest_generate_tests在收集测试函数时调用的钩子。通过传入的 metafunc对象,您可以检查请求的测试上下文,最重要的是,您可以调用metafunc.parametrize()以进行参数化。
9.2示例代码
例如,假设我们要运行一个测试,接受我们想通过一个新的pytest命令行选项设置的字符串输入。让我们首先编写一个接受stringinput夹具函数参数的简单测试:
文件名: test_strings.py
def test_valid_string(stringinput):
    assert stringinput.isalpha()
文件名: conftest.py
# 具体作用可参考:https://docs.pytest.org/en/latest/reference/reference.html#_pytest.hookspec.pytest_addhooks
def pytest_addoption(parser):
    parser.addoption(
        "--stringinput",
        action="append",
        default=[],
        help="list of stringinputs to pass to test functions",
    )


# 具体参考:https://docs.pytest.org/en/latest/how-to/parametrize.html#pytest-generate-tests
def pytest_generate_tests(metafunc):
    if "stringinput" in metafunc.fixturenames:
        metafunc.parametrize("stringinput", metafunc.config.getoption("stringinput"))
9.3运行结果
- 我们现在传递两个字符串输入值,我们的测试将运行两次:

- 让我们也运行一个会导致测试失败的字符串输入:

- 如果您没有指定字符串输入,它将被跳过,因为 metafunc.parametrize()将使用空参数列表调用:

注意:metafunc.parametrize使用不同的参数集多次调用时,这些参数集之间的所有参数名称不能重复,否则会引发错误。