Python 爬虫入门
文章目录
Python 爬虫入门
Python 的爬虫功能使得程序员可以快速抓取并分析网页中的信息,它实质上是模拟浏览器访问网页。本章主要常用的两个爬虫相关的库requests,beautifulsoup4。若要模拟鼠标点击等,要用到selenium 库,限于篇幅限制,本章不再介绍,具体可以查阅相关资料。
requests 库
每个网页都有源代码,可以通过鼠标单击右键查看网页源代码。网页中的很多信息都在源代码里面,requests 是一个访问网页源代码的库。一般通过 get 函数访问网页,另外一个常用来访问网页的函数是 post,与 get 函数的区别在于 post 能够传递表格或文件到网页所在服务器上。
| get(url, [timeout], [headers], [proxies], **kwargs) | |
|---|---|
| url | 网页链接 |
| timeout | 可选参数,请求网页的最大时长,单位为秒 |
| headers | 可选参数,模拟浏览器设置 |
| proxies | 可选参数,代理服务器设置 |
| **kwargs | 其他参数 |
get 或 post 函数返回一个 Resoponse 对象,该对象包括以下常用的属性或函数。
| 属性或函数 | 描述 |
|---|---|
| status_code | 网页请求的返回状态,200 表示连接成功,404 表示连接失败 |
| text | 响应网页的字符串内容 |
| encoding | 响应网页的编码方式,可以更改 |
| content | 相应网页的字节形式内容,例如图片或 pdf 文件等 |
| raise_for_status() | 如果网页访问不成功,抛出异常,一般结合 try-except 语句使用 |
| json() | 该函数可以解析网页内容中 JSON 格式的数据 |
import requests

r = requests.get('http://www.baidu.com')
r.status_code
200
r.text # 结果省略
r.encoding # 若为 ISO-8859-1 则中文为乱码
'ISO-8859-1'
r.encoding = 'utf-8' # 无论网页原内容是什么编码,都改成 utf-8 编码
beautifulsoup4库
使用requests获取的网页源代码一般非常复杂,不仅包括常规内容,还包括很多定义页面格式的代码。
:class: tip
- 网页中的内容一般在网页源代码的各个标签里
例如有下面的 html 代码:
html_doc = """
<html>
    <body>
        <h1>Hello, BeautifulSoup!</h1>
        <ul>
            <li><a class = "c1" href="http://example1.com">Link 1</a></li>
            <li><a class = "c2" href="http://example2.org">Link 2</a></li>
        </ul>
        <div>
        <p>text1</p> <p>text2</p>
        </div>
    </body>
</html>
"""
beautifulsoup4库提供了大量的属性或函数,能够方便地将网页(html)不同标签(tag)中的内容提取出来。常用的属性有下面几个:
| 属性 | 描述 |
|---|---|
| head | 网页源代码中的 <head> 标签内容 |
| title | 网页源代码中的 <title> 标签内容 |
| body | 网页源代码中的 <body> 标签内容 |
| p | 网页源代码中的第一个 <p> 标签内容 |
| a | 网页源代码中的第一个 <a> 标签内容 |
| div | 网页源代码中的第一个 <div> 标签内容 |
| script | 网页源代码中的第一个 <script> 标签内容 |
from bs4 import BeautifulSoup

r = requests.get('http://www.baidu.com')
r.encoding = 'utf-8'
soup = BeautifulSoup(r.text) # 将网页内容传递给 BeautifulSoup 提取
soup.title
<title>百度一下,你就知道</title>
soup.p # html 语言中 p 标签表示一个文本段落
<p id="lh"> <a href="http://home.baidu.com">关于百度</a> <a href="http://ir.baidu.com">About Baidu</a> </p>
上面的这些标签对象还有自己的属性可以访问更具体的内容。
| 标签属性 | 描述 |
|---|---|
| name | 标签名字,例如 a,p,div等 |
| attrs | 标签的具体属性 |
| contents | 第一个该标签下的所有内容,为列表形式 |
| string | 第一个该标签或子标签下的文本内容,若标签中没有内容或者超过一层的子标签,则返回 None |
| text | 第一个该标签下(包括子标签)的所有文本内容,若没有内容则返回空文本 |
soup.p.name
'p'
soup.p.attrs
{'id': 'lh'}
soup.p.contents
[' ',
 <a href="http://home.baidu.com">关于百度</a>,
 ' ',
 <a href="http://ir.baidu.com">About Baidu</a>,
 ' ']
soup.p.string
soup.p.text
' 关于百度 About Baidu '
将挖网页内容传递给 BeautifulSoup 提取时,还可以指定解析器,例如 ‘html.parser’, ‘lxml’, ‘xml’, ‘html5lib’。这些解析器各有利弊,其中 ‘lxml’ 解析速度最快。将上面的 html_doc 的网页文件传递给 BeautifulSoup:
soup2 = BeautifulSoup(html_doc, 'lxml') # 或者 soup2 = BeautifulSoup(html_doc, features = 'lxml')
soup2.ul.text
'\nLink 1\nLink 2\n'
type(soup2.ul.string) # 文本内容嵌套超过一层,返回 None
NoneType
soup2.li.contents # html 语言中 a 标签是超链接,ul 与 li 标签表示一个无序列表
[<a class="c1" href="http://example1.com">Link 1</a>]
soup2.ul.li.text # 标签通过逗点套子标签
'Link 1'
函数findall(),find()
当需要列出同一类标签对应的所有内容时,需要用到 BeautifulSoup 中的 findall() 函数。
| find_all([name], [attrs], [string], [limit], **kwargs) | |
|---|---|
| name | 标签名字 |
| attrs | 按照标签的具体属性检索, 采用 class_= 形式或 JSON 格式等 |
| string | 按照关键字检索,采用 string= 形式,返回与关键字完全匹配的字符串 |
| limit | 返回结果的个数,默认返回所有结果 |
| **kwargs | 其他参数 |
还有一个函数find(),与findall()的区别在于find()只寻找第一个对应标签的内容。还有一个函数find_next(),可以查找标签的下一个标签。类似的检索函数还有select,本书不再赘述。
soup2.find_all('a') # 检索出网页中所有的 a 标签
[<a class="c1" href="http://example1.com">Link 1</a>,
 <a class="c2" href="http://example2.org">Link 2</a>]
soup2.find_all('a', class_ = 'c1')
[<a class="c1" href="http://example1.com">Link 1</a>]
soup2.find_all(class_ = 'c1') # 参数中可以没有标签名字
[<a class="c1" href="http://example1.com">Link 1</a>]
soup2.find_all(string = 'Link') # 关键词检索
[]
函数get()
通过函数get可以访问标签的具体属性,例如 class 类型,具体超链接等。
soup2.a.get('class')
['c1']
soup2.a.get('href')
'http://example1.com'
import re # 导入正则表达式库

soup2.find_all(string = re.compile('Link')) # 通过正则表达式将所有包含 Link 的字符串都检索出来
['Link 1', 'Link 2']
正则表达式是计算机科学中用来描述字符串的一种表达式。正则表达式定义一个字符串表达规则,只要字符串满足这个规则,就算则匹配。可以通过字符串结合符号 .*?<=()[]{}dw 等定义多种表达规则,具体可以进一步查阅相关资料。
BeautifulSoup 另外一个常用的获取文本内容的函数为get_text。与直接使用标签的属性 text 相比,get_text 更加灵活,能够方便地实现文本换行。它的一般用法为:
| get_text([separator=''], [strip=False], **kwargs) | |
|---|---|
| separator | 各标签下文本的分隔符 |
| strip | 是否去掉各标签文本的前后空格 |
| **kwargs | 其他参数 |
soup2.div.text # html 语言中 div 标签表示网页中的一个区域
'\ntext1 text2\n'
soup2.div.get_text()
'\ntext1 text2\n'
soup2.div.get_text(separator = '\n')
'\n\ntext1\n \ntext2\n\n'
soup2.div.get_text(separator = '**')
'\n**text1** **text2**\n'
soup2.div.get_text(strip = True)
'text1text2'
爬虫实例 1:抓小说
下面,我们举例如何用爬虫抓取网上的《三国演义》小说,并将每回的内容下载到电脑里。
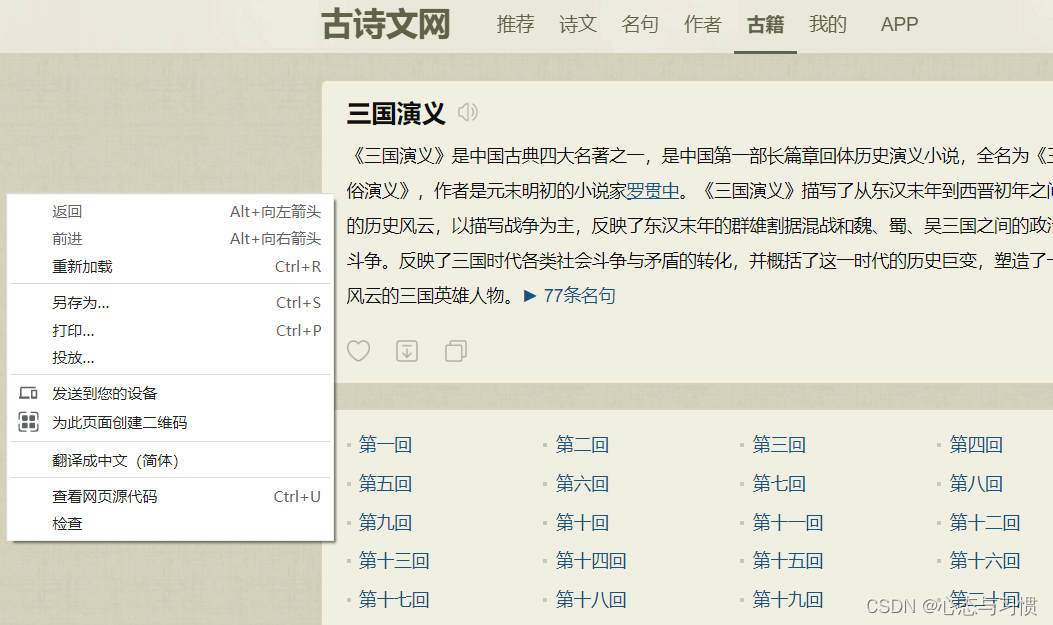
首先,找到一个包含《三国演义》小说的网站,本例中,使用了古诗文网:https://so.gushiwen.cn/guwen/book_46653FD803893E4F7F702BCF1F7CCE17.aspx
然后,在网页的空白处,单击鼠标右键,查看网页源代码:
网页的源代码大致如下:
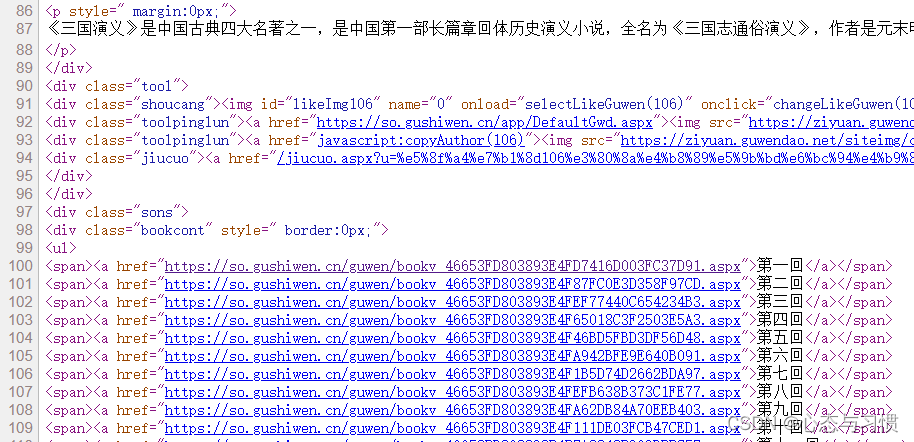
- 我们发现每一回的链接在网页中的标签 ul 里面,具体在其每个子标签 span 中的子标签 a 里面。
打开其中任一回的链接,在网页空白处单击右键,查看网页源代码:

- 我们发现每一回的内容在具体属性为 class=‘contson’ 的 div 标签里,其中第一句为每一回的标题,而之后的内容为正文。
根据网页的以上两个特点,设计 Python 的爬虫代码如下。
import requests  # 联系网络的包,a package for requesting from websites
from bs4 import BeautifulSoup  # 分析网页数据的包,a package for webstie data analysis
import time
import random
import os


# 获取单个网页信息
def get_url_content(url):
    # headers = {
    #     'user-agent': 'Mozilla/5.0 (Windows NT 10.0; Win64; x64) AppleWebKit/537.36 (KHTML, like Gecko) Chrome/74.0.3729.108 Safari/537.36'
    # }  # 主要是模拟浏览器登录,防止反爬,一般的网站没有这个也行,谷歌浏览器 按 F12 能够找到网站支持的 headers
    r = requests.get(url, timeout=30)  # 获取网页的内容,并返回给r变量,timeout 为超时时间
    # r.raise_for_status()  # 检查返回网页的内容的状态码,200表示成功
    # r.encoding = r.apparent_encoding  # 统一编码方式
    return r.text  # 返回网页中的文本内容,数据内容为 r.content


# 解析出网页中想要的信息,爬虫的关键步骤
def filter_info(chapter_num, url_text):
    soup = BeautifulSoup(url_text, "lxml")  # 解析网页返回内容,lxml 是一个解码方式,效率比较快,被推荐使用
    contents = soup.find('div', class_='contson')
    # 使用 get_text 可以实现网页里面 p 标签中文本内容的换行,而 text 不能
    chapter_title = contents.find('p').get_text()  # 第一句话是本回的标题
    chapter_title = '第' + str(chapter_num) + '回 ' + chapter_title.lstrip()
    # chapter_content = contents.get_text(separator="\n")  # find 返回的不是列表,不用跟 [0]
    chapter_content = contents.text
    chapter_content = chapter_content.lstrip() # 去掉字符串左边的空字符
    this_chapter = [chapter_title, chapter_content]
    return this_chapter

# 从网页中找到每一回的链接
def get_url_links(url_head_content):
    soup = BeautifulSoup(url_head_content, "lxml")  # 解析网页返回内容,lxml 是一个解码方式,效率比较快,被推荐使用
    # links = soup.find('div', class_='bookcont')  # 每一回的链接都在类 span 里面
    links = soup.find('ul')  # 每一回的链接都在类 ul 里面
    links = links.findAll('span')
    link_list = []
    for each in links:
        link_list.append(each.a.get('href'))  # 获取每一回的链接,存储到列表里
    return link_list

# 将每章内容输出到 txt 文档里
def write_txt(string_array):
    file_address = 'E:/三国演义/'  # txt 存放地址
    if not os.path.exists(file_address):       #用os库判断对应文件夹是否存在
        os.makedirs(file_address)              #如果没有对应文件夹则自动生成
    file_name = string_array[0]
    with open(file_address + file_name + '.txt', 'w', encoding='utf-8') as f: # 必须跟解码形式,不然有的网页中文内容写不到txt里
        f.write(string_array[1])

# 主函数
def main():
    url = 'https://so.gushiwen.cn/gushi/tangshi.aspx'  # 古诗文网三国演义网址
    url_head_content = get_url_content(url)  # 获取网页
    links = get_url_links(url_head_content)  # 获取每一回的链接地址
    # enumerate() 函数用于将一个可遍历的数据对象(如列表、元组或字符串)组合为一个索引序列
    # 同时列出数据下标和数据
    for index, each in enumerate(links):
        url_link_content = get_url_content(each)  # 获取每一回的网页内容
        chapter_content = filter_info(index + 1, url_link_content)  # 解析每一回的网页内容,获取小说文本
        write_txt(chapter_content)  # 输出小说内容到 txt
        time.sleep(random.random() * 1)  # 每抓一个网页休息0~1秒,防止被反爬措施封锁 IP

# 运行函数
main()
其中,使用 requests 库时,有的网站需要设置 headers 参数才能正确模拟浏览器登录。headers 参数可以在打开网页时,按键盘F12 打开, 然后刷新一下网页,单击F12弹出窗口的任何一个文件,就能查看网站的所有 headers 信息,有 cookie,user-agent 等信息。如下图所示:
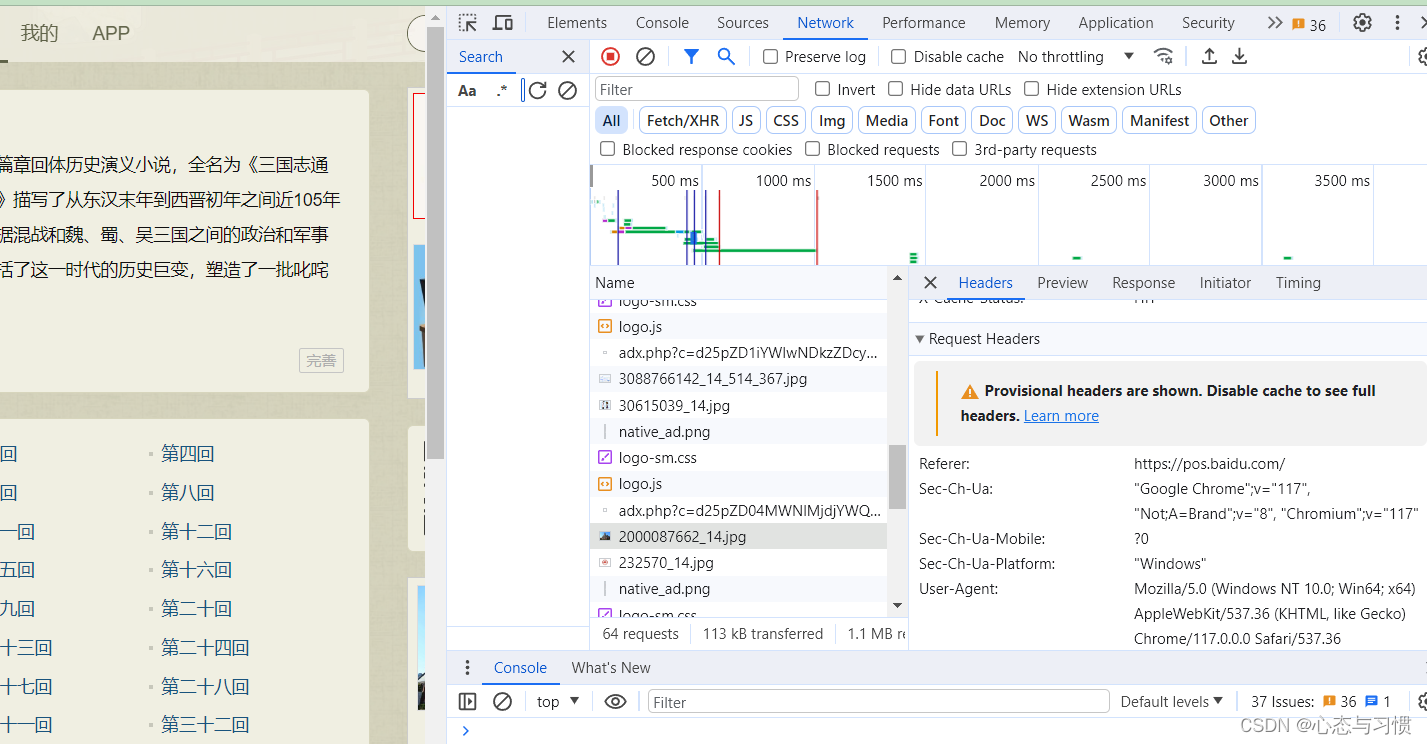
我们可以复制一部分信息或全部信息,放到 request 函数的 headers 参数里面。
爬虫实例 2:抓豆瓣 top 250 的电影信息
我们想获取豆瓣高分评价的 250 部电影的信息:电影名字,导演,上映年代,评分,评分人数等。打开豆瓣 top 250 的网页链接 https://movie.douban.com/top250?start= ,发现每个网页显示 25 部电影,一共有 10 个挖网页,网页地址与链接中的 start = 后面的数字有关。例如第 3 个子网页的链接地址是 'https://movie.douban.com/top250?start=50 ,根据这个规律,我们可以用一个 for 循环,将 10 个网页分别打开抓取信息。
打开一个网页,单击右键查看网页源代码,如下图所示:
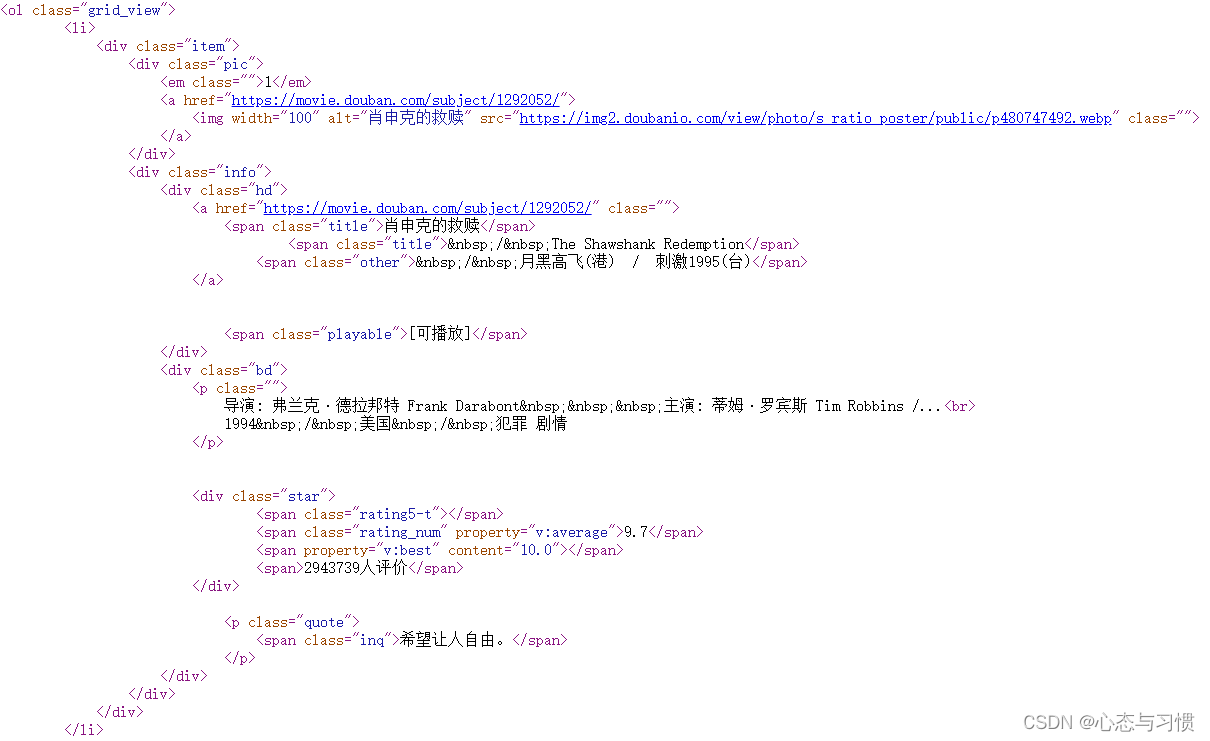
通过源代码发现以下几个特点:
-
每部电影的信息都在标签 <div class=‘item’> 里面。据此,我们可以用一个 for 循环,将每个网页的 <div class=‘item’> 标签都检索出来
-
电影的中英文名字都在标签 <div class=‘title’> 里,而其他名字在标签 <div class=‘other’> 里。我们可以使用函数
find()以及find_next()检索出来。 -
导演,主演,上映年代,电影产地,电影类型信息在标签 <p class=‘’> 里。我们可以使用函数
find()检索,然后利用正则表达式将里面对应文本信息分别提取出来。 -
评分信息在标签 <div class=‘rating_num’> 里。我们可以使用函数
find()检索出来。 -
评分人数信息在标签 <span> 里。我们可以通过函数
find()结合关键字’评价’检索出来。(网页中的 < span > 提供了一种将文本的一部分或者文档的一部分独立出来的方式) -
代表性评价信息在标签 <div class=‘quote’> 里。我们可以使用函数
find()检索出来。
根据以上的特点,设计出以下的 python 代码。其中中文分词库jieba,词云库WordCloud库等,若没有安装,需要提前安装(使用 pip 或 conda 安装)到电脑上。
在画图时,使用 matplotlib 画出饼图,使用 WordCloud 生成词云图,因为 matplotlib 不能自动将不同柱子分配不同的颜色,使用 seaborn 画出柱状图。
import requests  # 联系网络的包,a package for requesting from websites
import pandas as pd
from bs4 import BeautifulSoup # 分析网页数据的包,a package for webstie data analysis
import matplotlib.pyplot as plt # 画图的包
import time
import random
import jieba # 中文分词包
from wordcloud import WordCloud # 词云包
import re  # 正则表达式包
import seaborn as sns # 用 seaborn 画柱状图

plt.rcParams['font.sans-serif'] = ['SimHei']

# 主要是模拟浏览器登录,防止反爬
headers = {
    'user-agent':'Mozilla/5.0 (Windows NT 10.0; Win64; x64) AppleWebKit/537.36 (KHTML, like Gecko) Chrome/74.0.3729.108 Safari/537.36'
    }

## store the information
rank_list = []
name_list = [] # 用来存储电影名字的一个二维列表
director_list = [] # 用来存储导演名字的一个列表,下面几个变量类似
actor_list = []
year_list = []
rating_list = []
ratingNum_list = []
quote_list = []
place_list = []
category_list = []

num = 0
for i in range(0, 10):
    link = 'https://movie.douban.com/top250?start=' + str(i*25) # 250部电影一共 10个网页, 10 pages for total 250 movies
    res = requests.get(link, headers = headers, timeout = 10)
    time.sleep(random.random()*3) # 每抓一个网页休息2~3秒,防止被反爬措施封锁 IP,avoid being blocked of the IP address

    # res.text is the content of the crawler
    soup = BeautifulSoup(res.text, "lxml")  # lxml 是一个解码方式,lxml is one decoding model for Beautifulsoup
    movie_list = soup.find_all('div', class_ = 'item') # 检索所有类型为 item 的 div 标签

    for each in movie_list:
        # 排名在 em 标签里
        rank = each.em.text
        rank_list.append(rank)

        # 电影名字在标签 <span class="title"> 与 <span class="other"> 里
        other_name = each.find('span', class_ = 'other').get_text()
        other_name = other_name.replace(' ', '') # 去掉空格
        other_name = other_name.replace('\xa0/\xa0', '') # 去掉多余字符 \xa0/\xa0
        cn_name = each.find('span', class_ = 'title').get_text()
        eg_name = each.find('span', class_ = 'title').find_next().get_text() # find_next() 查找满足条件的下一个标签
        eg_name = eg_name.replace('\xa0/\xa0', '') # 去掉多余字符 \xa0/\xa0
        name_list.append([cn_name, eg_name, other_name])

        # 评分信息在标签  <span class="rating_num"> 里
        rating =  each.find('span', class_ = 'rating_num').get_text()
        rating_list.append(float(rating))

        # 评价人数通过关键词'评价'检索
        rating_num = each.find(string = re.compile('评价')).get_text()
        rating_num = rating_num.replace('人评价', '')
        ratingNum_list.append(int(rating_num))

        # 代表性评价在  <p class="quote"> 里
        try:
            quote =  each.find('p', class_ = 'quote').get_text()
        except Exception: # 有的电影代表性评价没有显示
            quote =  ''
        quote_list.append(quote)

        info = each.p.get_text(strip = True)
        # 定义正则表达式提取出导演,主演,上映时间,地点,电影类型信息
        try:
            # (?<=导演: ) match any character begins after character '导演: '
            # .*? match any character (.), zero or more times (*) but as less as possible (?)
            # (?=主) match any character before character '主'
            director = re.compile('(?<=导演: ).*?(?=主)').findall(info)[0]
            actor = re.compile('(?<=主演: ).*?(?=/)').findall(info)[0]
        except Exception: # 有的电影导演名字太长,主演没有显示出来
            director = re.compile('(?<=导演: ).*?(?=\xa0)').findall(info)[0]
            actor = ''
        director_list.append(director)
        actor_list.append(actor)

        # \d{4} is a four digit number
        year = re.compile('(?<=...)\d{4}').findall(info)[0]
        year_list.append(year)
        place_category = re.compile('(?<=\xa0/\xa0).*').findall(info)[0]
        place_category = place_category.replace('\xa0', '')
        place_category = place_category.split('/')
        place = place_category[0]
        category = place_category[1]
        place_list.append(place)
        category_list.append(category)

# 将数据存到 pandas 里
df = pd.DataFrame(rank_list, columns = ['排名'])
df['电影名字'] = [i[0] for i in name_list]
df['外文名字'] = [i[1] for i in name_list]
df['其他名字'] = [i[2] for i in name_list]
df['评分'] = rating_list
df['评价人数'] = ratingNum_list
df['导演'] = director_list
df['主演'] = actor_list
df['上映日期'] = year_list
df['地区'] = place_list
df['类型'] = category_list
df['代表性评论'] = quote_list

# 导出到 xls 文件里,save to xls file
df.to_csv('豆瓣 top 250 电影爬虫抓取.csv')

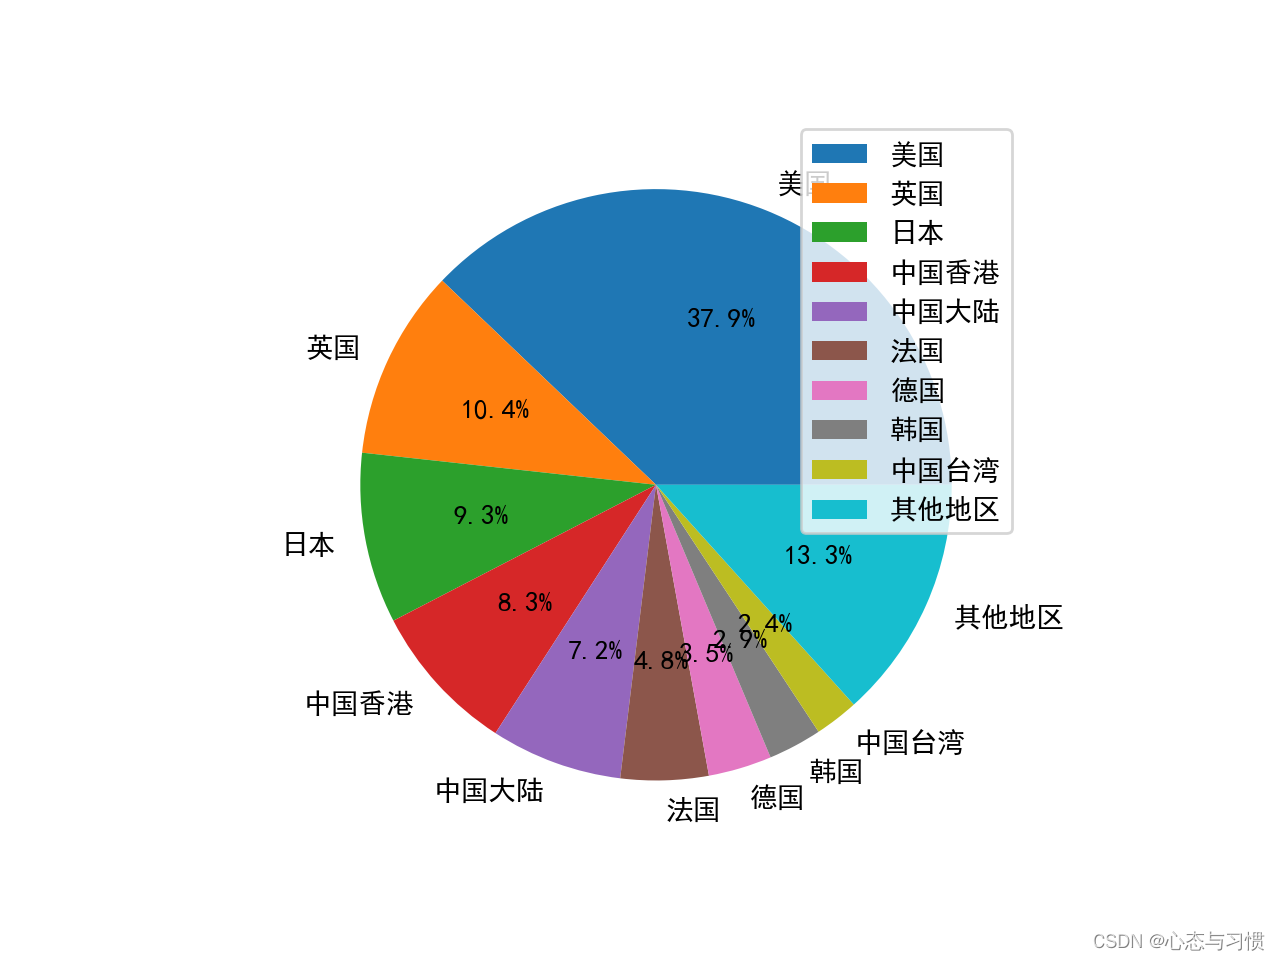
# 分析电影来源地并画饼图
locations = []
for i in range(len(place_list)):
    nations = place_list[i].split(' ')
    for j in range(len(nations)):
        if nations[j] == '西德':
            nations[j] = '德国'
        locations.append(nations[j])

df_location = pd.DataFrame(locations, columns = ['地区'])
# 按照出现次数排序, size() 可以查数,生成一个 Series 类型
# 然后用 reset_index 重新命名,参数为 name
# DataFrame 类型的 reset_index 参数为 names
df2 = df_location.groupby('地区').size().reset_index(name='counts') # df2 = df2['地区'].value_counts(ascending = False).reset_index()
df2.sort_values(by = 'counts', ascending = False, inplace = True, ignore_index = True)
# 画饼状图
values = []
labels = []
other_count = 0
for i in range(9):
    values.append(df2['counts'][i])
    labels.append(df2['地区'][i])
for i in range(9, df2.shape[0]):
    other_count += int(df2['counts'][i])
values.append(other_count)
labels.append('其他地区')
plt.figure(1)
plt.pie(values, labels=labels, autopct='%.2f%%')
plt.legend()  # 显示标签
plt.show()


# 分析电影类型并画饼图
categories = []
for i in range(len(category_list)):
    category = category_list[i].split(' ')
    for j in range(len(category)):
        categories.append(category[j])

df_category = pd.DataFrame(categories, columns = ['类型'])
df3 = df_category.groupby('类型').size().reset_index(name='counts')
df3.sort_values(by = 'counts', ascending = False, inplace = True, ignore_index = True)

values = []
labels = []
other_count = 0
for i in range(15):
    values.append(df3['counts'][i])
    labels.append(df3['类型'][i])
for i in range(15, df3.shape[0]):
    other_count += int(df3['counts'][i])
values.append(other_count)
labels.append('其他类型')
plt.figure(2)
plt.pie(values, labels=labels, autopct='%.2f%%')
plt.legend()
plt.show()

# 画词云图
jieba.add_word('久石让')
jieba.add_word('谢耳朵')
# 一些语气词和没有意义的词
del_words = [ '就是', '一个', '被', '电影', '我们',
              '不是', '每个',  '不会',  '没有',
              '这样', '那么', '不要', '如果',
              '不能',  '一种', '不过', '只有', '不得不',
              '不得不', '一部']
all_quotes = ''.join(quote_list) # 将所有代表性评论拼接为一个文本
# 去掉标点符号
all_quotes = re.sub(r"[0-9\s+\.\!\/_,$%^*()?;;:-【】+\"\']+|[+——!,;:。?、~@#¥%……&*()]+", " ", all_quotes)
words = jieba.lcut(all_quotes)
words_final = []
for i in range(len(words)):
    if len(words[i]) > 1 and  words[i] not in del_words: # 去掉一些语气词,单字词
        words_final.append(words[i])
text_result = Counter(words_final)
cloud = WordCloud(
    font_path = 'C:\Windows\Fonts\FZSTK.TTF', # 中文字体地址 C:\Windows\Fonts\FZSTK.TTF,提前下载字体或指定,否则中文无法显示
    # mask = '' 通过 mask 参数指定一个图片地址作为词云的背景图像
    background_color = 'white',
    width = 1000,
    height = 860,
    max_words = 25
  )
#wc = cloud.generate(words) # 这种方法对中文支持不太好,this mehtod is better for only english string
wc = cloud.generate_from_frequencies(text_result)
wc.to_file("豆瓣 TOP 250 词云.jpg")
plt.figure(3)
plt.imshow(wc)
plt.axis('off')
plt.title('豆瓣 TOP 250 电影代表性评论的词云分析')
plt.show()

# 评分最高的 15 部电影
# 用 seaborn 画柱状图,因为自动将不同柱子分配不同的颜色
df_star = df.sort_values(by = '评分', ascending = False, ignore_index = True)
number = 15
df_star_top = df_star.head(number)
plt.figure(4)
sns.barplot(data = df_star_top, y = '电影名字', x = '评分', orient = 'h')
plt.title('评分最高的 ' + str(number) + ' 部电影')
plt.show()

# 评分人数最多的 15 部电影
df_num = df.sort_values(by = '评价人数', ascending = False, ignore_index = True)
df_num_top = df_num.head(number)
plt.figure(5)
sns.barplot(data = df_num_top, y = '电影名字', x = '评价人数', orient = 'h')
plt.title('评分人数最多的 ' + str(number) + ' 部电影')
plt.show()

# 电影年代画图
df_year = df.groupby('上映日期').size().reset_index(name = '部数')
df_year.sort_values('部数', ascending = False, inplace = True)
df_year_top = df_year.head(20)
df_year_top.sort_values('上映日期', inplace = True)
plt.figure(6)
sns.barplot(data = df_year_top, x = '上映日期', y = '部数')
plt.title('电影上映年代')
plt.show()
生成的图形如下:
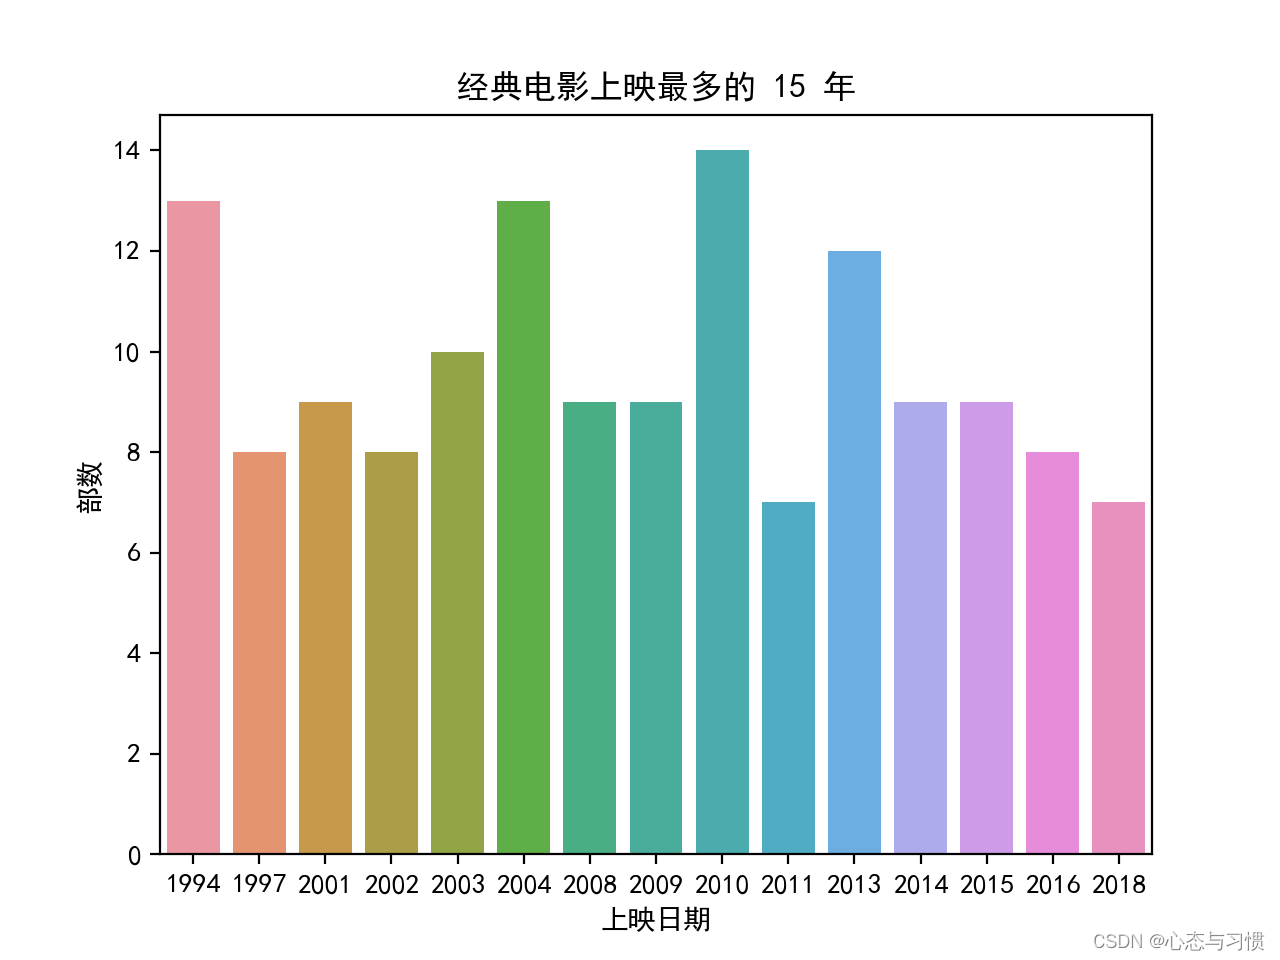
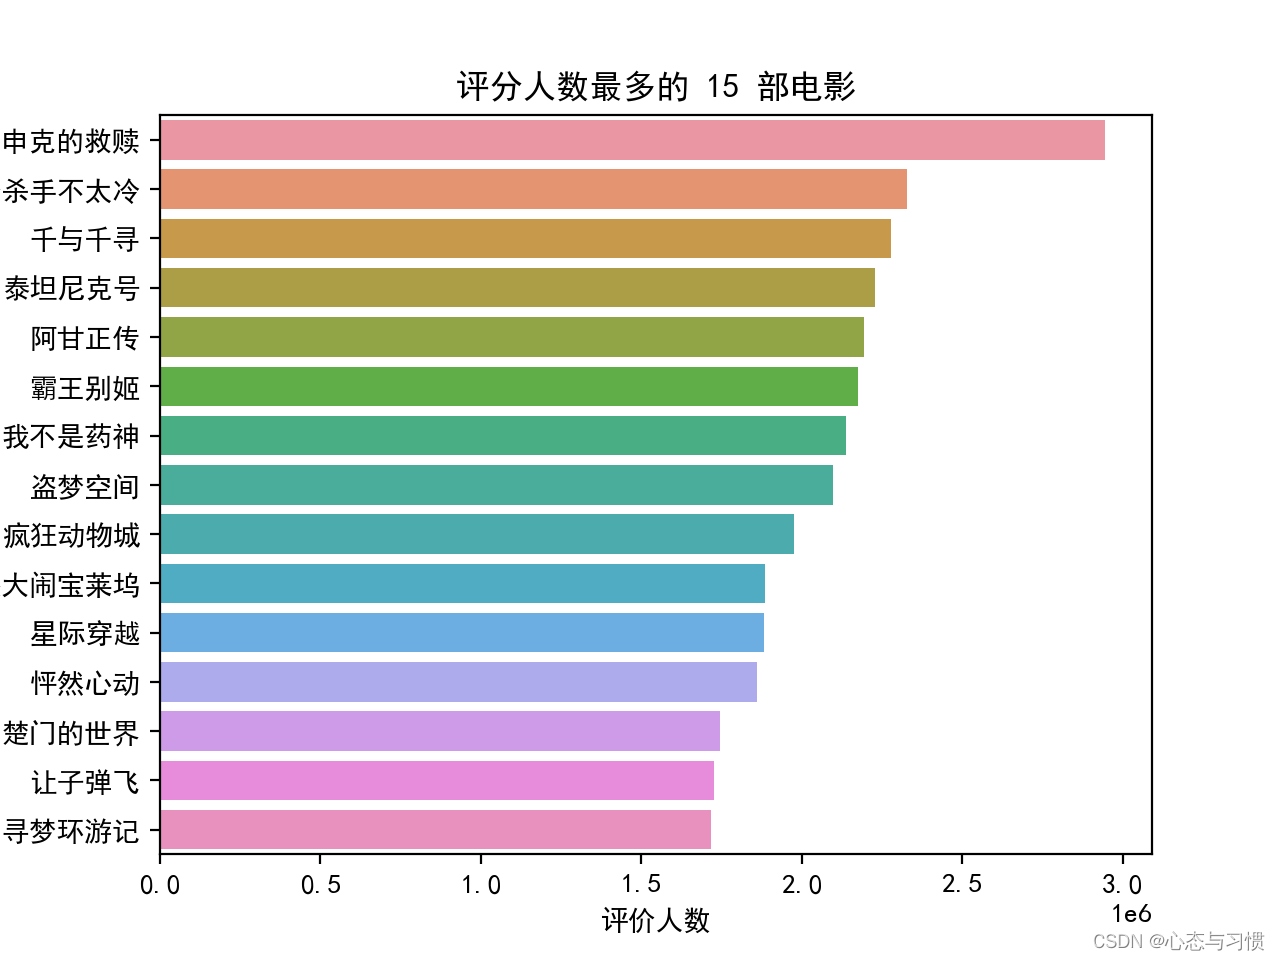

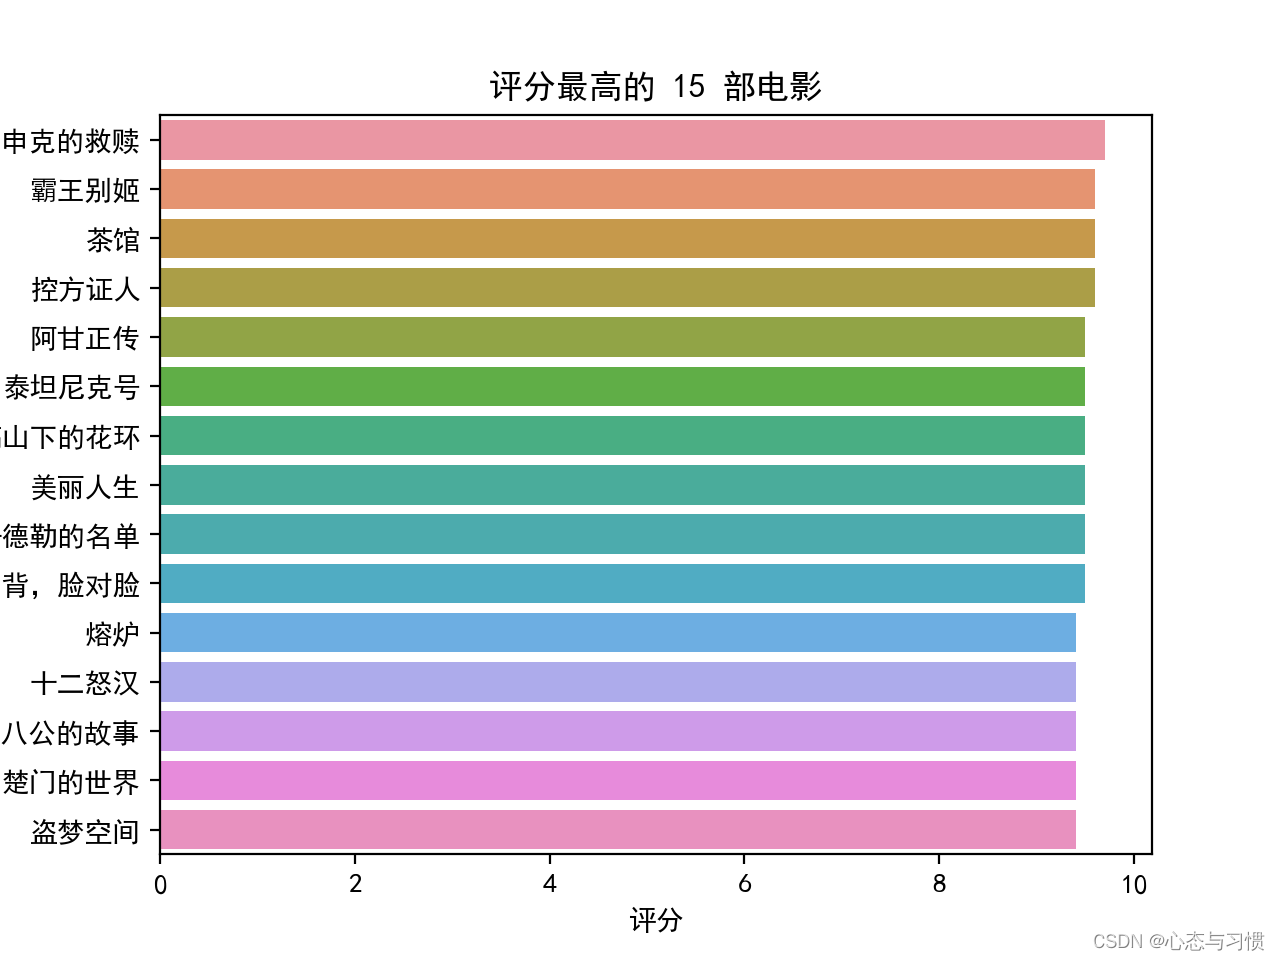
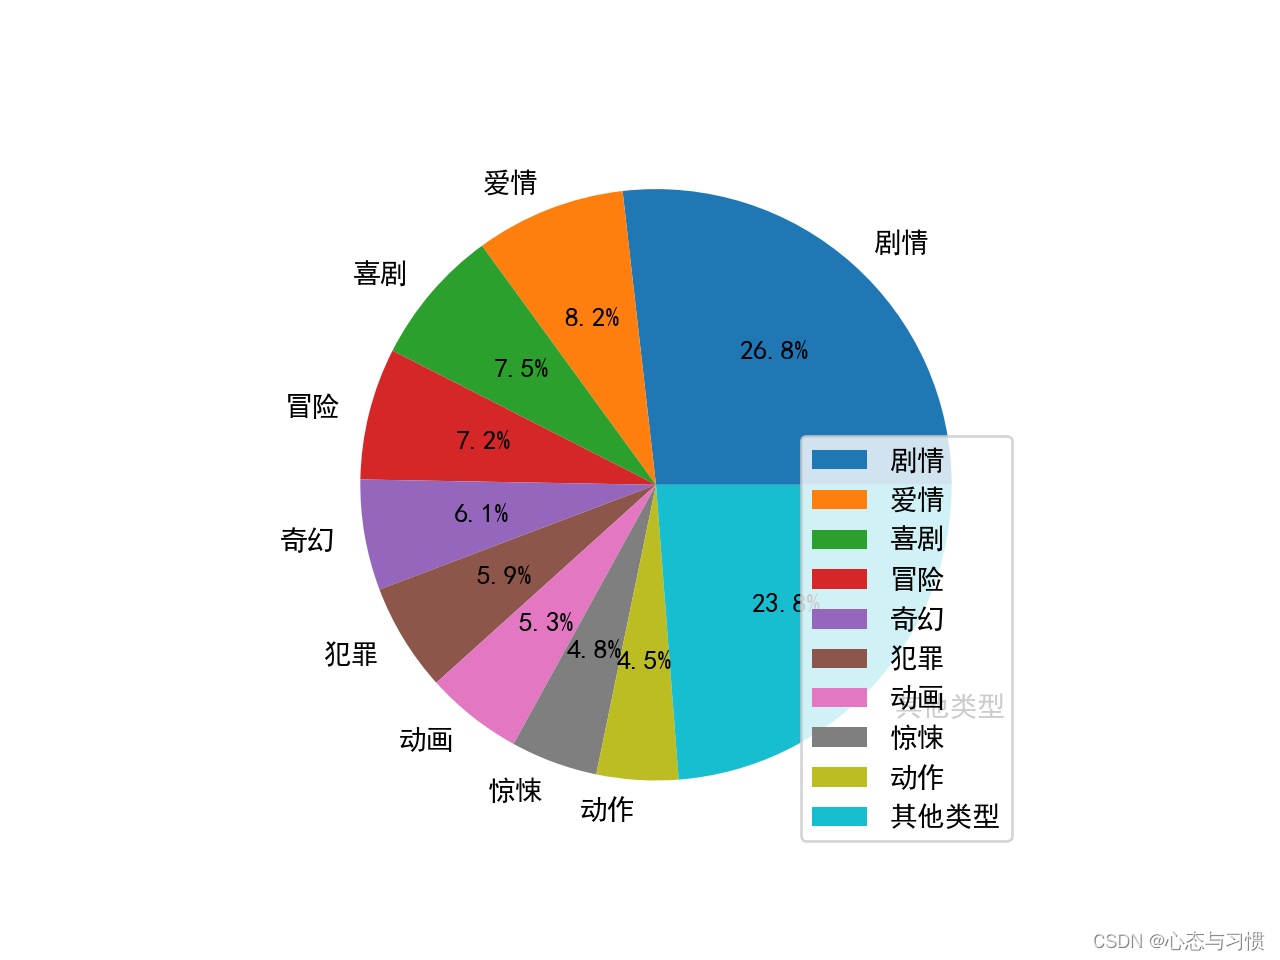
后记
- 不同的网站的爬虫技巧经常不一样,要具体网站具体分析。
- 由于一些网站经常更新数据的存储地址或源代码,某段时间的爬虫代码可能在下一个时间段就不能用了,爬虫代码也要更新。
- 有的网页信息并不在网站直接打开的网页源代码里(例如弹幕、电商评论等),还要结合按键
F12找到网页信息的真实地址。 - 提取网页信息时,经常要用到正则表达式处理字符串。
近年来,许多网站都提高了反爬手段防止网站的数据被无端获取。因此,提醒读者避免过度使用爬虫,给一些网站造成不必要的访问负担。