UEFI 基础教程 (一) - 基于QEMU搭建UEFI开发环境(win/linux)
一、EDKII windows 环境搭建
1. 下载UEFI开源代码
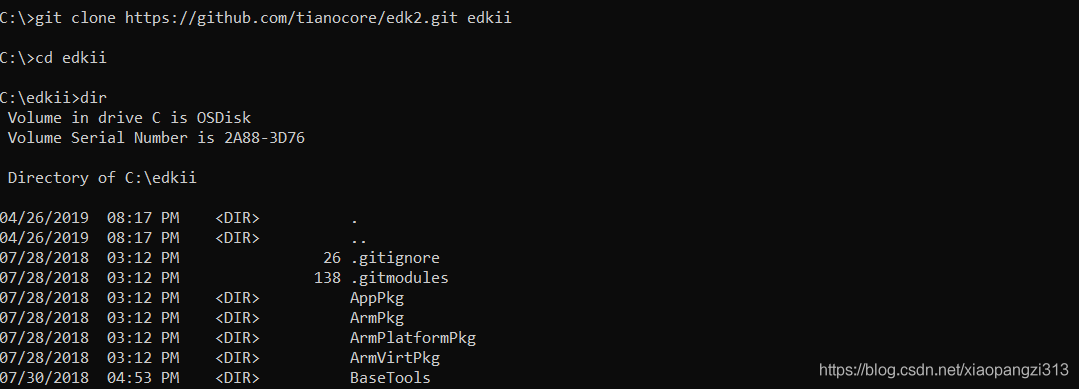
cmd进入C盘根目录,git clone https://github.com/tianocore/edk2.git edkii && cd edkii && git submodule update --init
(太慢的话,使用gitee, git clone https://gitee.com/xiaopangzi313/edk2.git)
2. 安装ASL编译器
下载 iasl-win-20190405.zip,然后解压至C:\asl。
3. 安装NASM编译器
下载 nasm-2.14.02-win64.zip,解压nasm-2.14.02-win64.zip到C:\nasm
4. 安装VS2013或者VS2015(过程略)
5. 修改启动脚本edksetup.bat
进入edk2目录,在edksetup.bat最后一行添加
build -a X64 -p OvmfPkg\OvmfPkgX64.dsc -D DEBUG_ON_SERIAL_PORT
6. 编译 OVMF.FD 固件文件
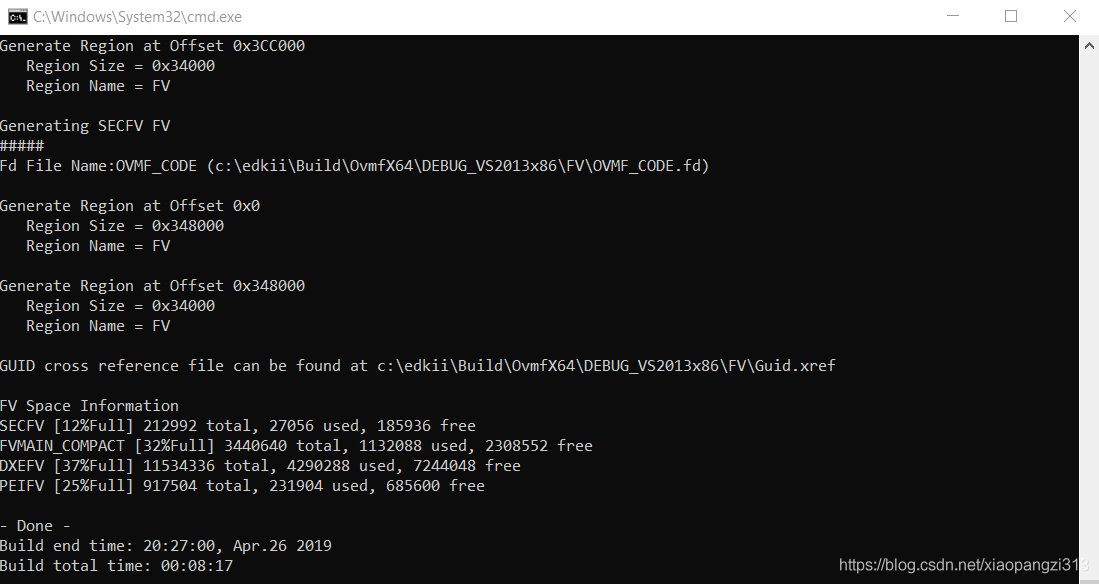
在edk2目录执行edksetup.bat,

运行结果如下,
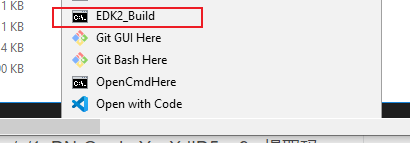
为了运行方便,可以将edksetup.bat放入右键菜单,编写以下文本保存为EDK2_Build.reg 并双击运行,
Windows Registry Editor Version 5.00

[HKEY_CLASSES_ROOT\Directory\shell\EDK2_Build]
@="EDK2_Build"
"Icon"="cmd.exe"

[HKEY_CLASSES_ROOT\Directory\shell\EDK2_Build\command]
@="cmd.exe /s /k pushd \"%V\" && edksetup.bat"

[HKEY_CLASSES_ROOT\Directory\Background\shell\EDK2_Build]
@="EDK2_Build"
"Icon"="cmd.exe"

[HKEY_CLASSES_ROOT\Directory\Background\shell\EDK2_Build\command]
@="cmd.exe /s /k pushd \"%V\"  && edksetup.bat"
即可以使用右键菜单运行编译脚本,
查看生成的固件文件,dir C:\edkii\Build\OvmfX64\DEBUG_VS2013x86\FV\*.fd

7. 安装QEMU(X64)虚拟机
下载QEMU并安装,链接:https://pan.baidu.com/s/1aQ7wmQ6bUOInUs94PmAFHA 提取码:csdn
–来自百度网盘超级会员V1的分享
在C盘创建QEMU并进入,拷贝OVMF.FD到当前目录,创建启动脚本setup-qemu-x64.bat
C:\qemu>echo "C:\Program Files\qemu\qemu-system-x86_64.exe" -bios "OVMF.fd" -M "pc" -m 256 -cpu "qemu64" -boot order=dc -serial stdio >> setup-qemu-x64.bat
运行脚本 setup-qemu-x64.bat,

效果如下,
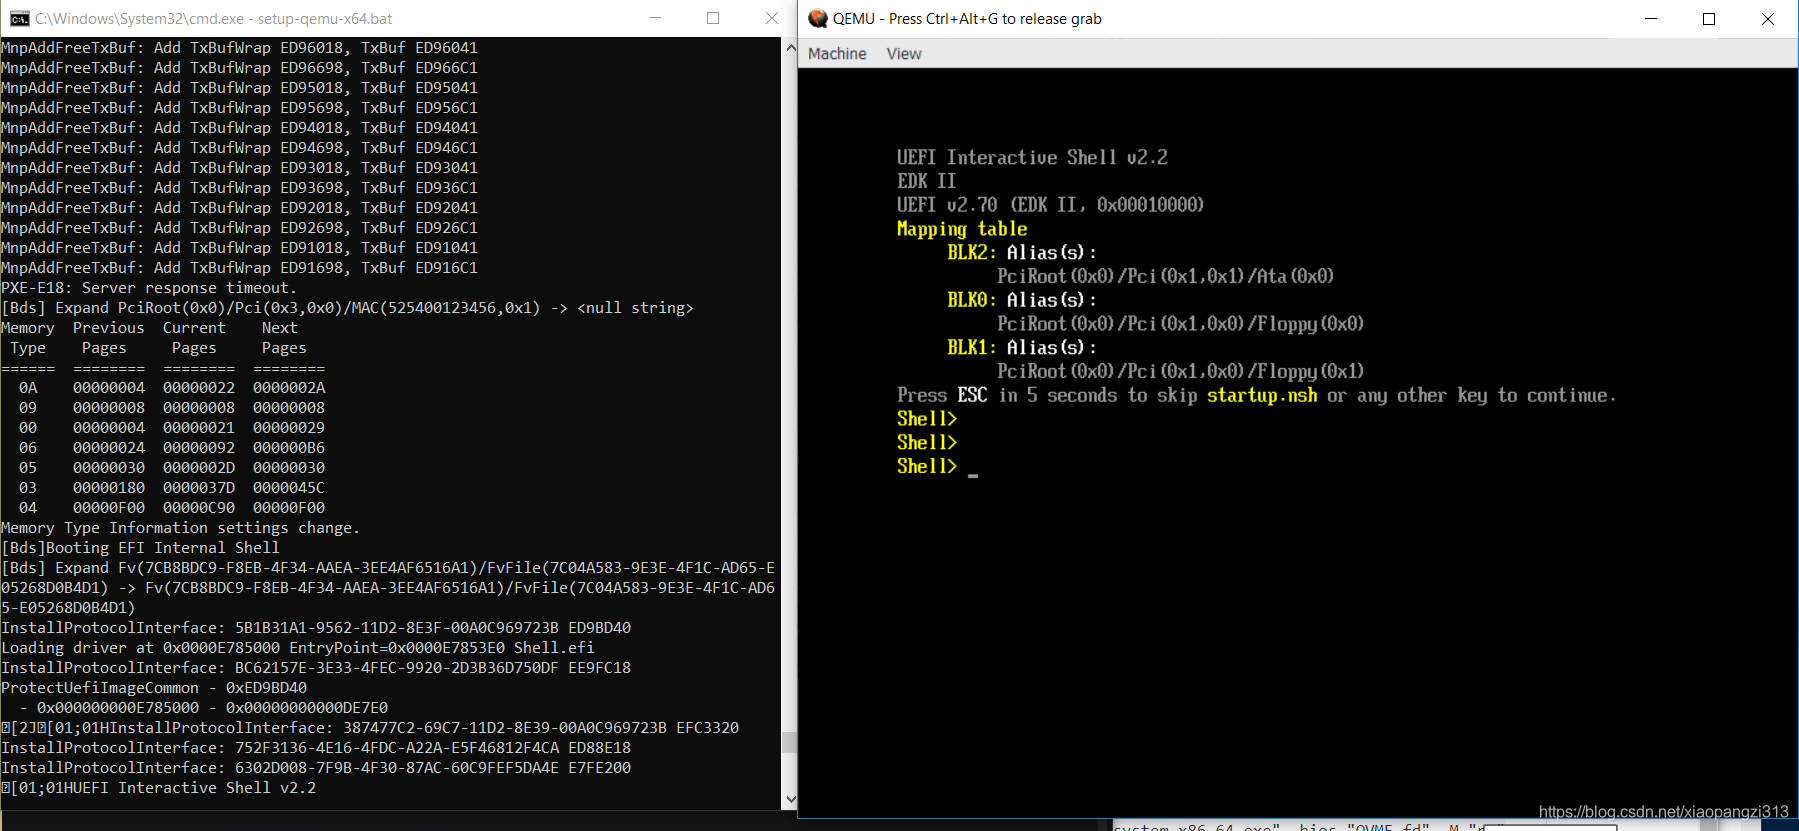
图中,左侧为Console串口输出,右侧为QEMU的shell界面。
二、EDKII Linux(Centos7) 环境搭建
1. 设置软件源
# 备份当前repo文件
cp  /etc/yum.repos.d/CentOS-Base.repo  /etc/yum.repos.d/CentOS-Base.repo.back
# 下载ali cloud centos 源
wget -O /etc/yum.repos.d/CentOS-Base.repo http://mirrors.aliyun.com/repo/Centos-7.repo
# 安装扩展仓库
wget -O /etc/yum.repos.d/epel-7.repo wget http://mirrors.aliyun.com/repo/epel-7.repo
yum clean all
yum makecache
2. 安装编译器、模拟器环境
·yum -y install gcc gcc-c++ git python3 nasm iasl libuuid-devel qemu
#安装GUI
yum groupinstall "GNOME Desktop" "Graphical Administration Tools"
ln -sf /lib/systemd/system/runlevel5.target /etc/systemd/system/default.target
3. 下载UEFI开源代码
git clone https://github.com/tianocore/edk2.git edkii(如果太慢可以sync到自己的gitee账户,如我的gitee, git clone https://gitee.com/xiaopangzi313/edk2.git)
4. 编译UEFI开源代码
# 编译basetools
  make -C /root/edk2/BaseTools/Source/C
# 编译 Ovmf.fd
 ./OvmfPkg/build.sh -D DEBUG_ON_SERIAL_PORT
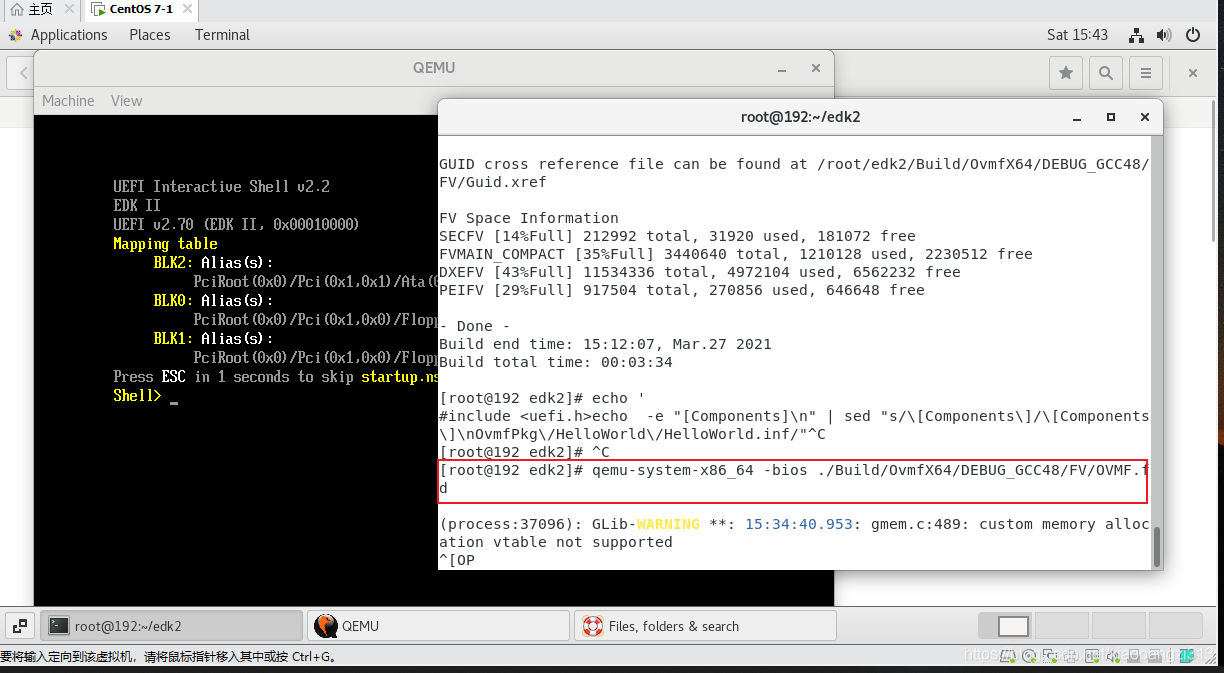
5. 使用QEMU加载Ovmf.fd
qemu-system-x86_64 -bios ./Build/OvmfX64/DEBUG_GCC48/FV/OVMF.fd
PS:
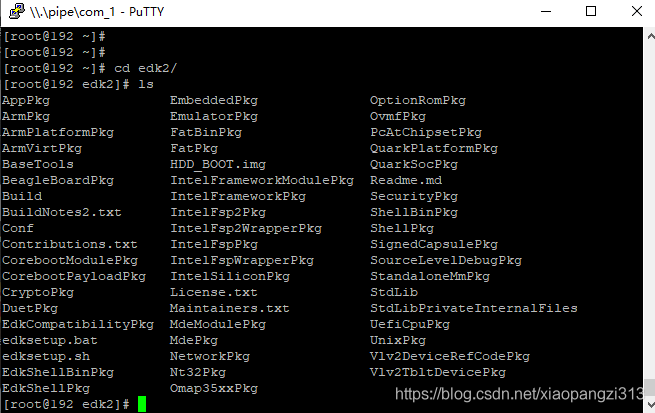
VMware/Vbox console操作不方便,可以尝试使用虚拟串口方式。- 虚拟机设置->硬件>添加->串行端口->使用命名管道->输入
\\.\pipe\com_1 - Centos 下配置grub:
sed 's/quiet/console=ttyS1,9600 loglevel=8/' -i /etc/default/grubgrub2-mkconfig -o /boot/grub2/grub.cfggrub2-mkconfig -o /boot/efi/EFI/centos/grub.cfgreboot
- Putty 配置,serial line设置为
\\.\pipe\com_1,speed设置为9600
效果如下:
- 虚拟机设置->硬件>添加->串行端口->使用命名管道->输入
三、UEFI OVMF 固件 boot Linux
1. 编译Busybox
#安装相关依赖库以及tool
yum -y  install gcc  gcc-c++
yum install -y ncurses ncurses-devel
yum install -y elfutils-libelf-devel openssl-devel dwarves make flex bison
yum install -y glibc-static

#创建工作目录
CSDN=/root/csdn
TOP_BUILD=$CSDN/build
mkdidr -p $TOP_BUILD
cd $CSDN

#下载解压busybox源码
wget  https://busybox.net/downloads/busybox-1.26.2.tar.bz2  --no-check-certificate
tar xjf busybox-1.26.2.tar.bz2

#生成.config
cd $CSDN/busybox-1.26.2
mkdir -pv $TOP_BUILD/obj/busybox-x86
make O=$TOP_BUILD/obj/busybox-x86 defconfig

make O=$TOP_BUILD/obj/busybox-x86 menuconfig
sed -i "s/.*CONFIG_STATIC.*/CONFIG_STATIC=y/" .config
(或者Busybox Settings  ---> Build BusyBox as a static binary (no shared libs).)

cd $TOP_BUILD/obj/busybox-x86
make -j2
make install
编译完成如下:

测试下busybox:

2. 制作initramfs
#创建假的文件系统目录
mkdir -pv $TOP_BUILD/initramfs/x86-busybox
cd $TOP_BUILD/initramfs/x86-busybox
mkdir -pv {bin,dev/tty0,sbin,etc,proc,sys/kernel/debug,usr/{bin,sbin},lib,lib64,mnt/root,root}

#copy 编译生成的busybox
cp -av $TOP_BUILD/obj/busybox-x86/_install/*  $TOP_BUILD/initramfs/x86-busybox
cp -av /dev/{null,console,tty,sda1} $TOP_BUILD/initramfs/x86-busybox/dev/

#创建init文件
cat > $TOP_BUILD/initramfs/x86-busybox/init < EOF
#!/bin/sh
mount -t proc none /proc
mount -t sysfs none /sys
#mount -t debugfs none /sys/kernel/debug
mdev -s
echo -e "\nBoot took $(cut -d' ' -f1 /proc/uptime) seconds\n"
#exec /bin/sh
exec /sbin/init
EOF
chmod +x $TOP_BUILD/initramfs/x86-busybox/init


#创建 ./etc/passwd与 ./etc/group
echo "root::0:0:root:/:/bin/sh" > ./etc/passwd
touch  ./etc/group

#创建 ./etc/inittab
cat > ./etc/inittab << EOF
::sysinit:/etc/rc.d/rcS
::respawn:/sbin/getty -n -l /bin/sh ttyS0 115200
::respawn:/bin/cttyhack /bin/sh
::shutdown:/bin/umount -a -r
::shutdown:/sbin/swapoff -a
::restart:/sbin/init
EOF

#创建 . ./etc/fstab
cat > ./etc/fstab << EOF
proc     /proc    proc     defaults 0 0
sys      /sys     sysfs    defaults 0 0
none     /dev     devtmpfs defaults 0 0
tmpfs    /dev/shm tmpfs    defaults 0 0
none     /dev/pts devpts   defaults 0 0
EOF

#创建 . ./etc/hostname
echo "busybox_csdn" >  ./etc/hostname

#创建  ./etc/rc.d/rcS
mkdir -p ./etc/rc.d/ && touch ./etc/rc.d/rcS

echo '#!/bin/sh
/bin/hostname -F /etc/hostname
/bin/mount /proc               # We need to do this before remounting root
/bin/mount /sys
/bin/mount -o remount,rw /     # Remount read-write
/bin/mount /dev
/bin/mkdir /dev/shm
/bin/mkdir /dev/pts
/bin/mount -a                  # Mount all filesystems in fstab, except those marked with 'noauto'
/sbin/ifconfig lo 127.0.0.1    # Setup loopback interface for network (if you have networking in your kernel)
#/sbin/inetd                    # If you want inetd to run
#/sbin/telnetd                  # If you want standalone telnetd to run -- incompatible with inetd it seems
' > ./etc/rc.d/rcS
chmod +x ./etc/rc.d/rcS

#创建 tty设备文件
mknod ./dev/tty1 c 4 1
mknod ./dev/tty2 c 4 2
mknod ./dev/tty3 c 4 3
mknod ./dev/tty4 c 4 4
ls -l ./dev/tty[0-9]

#打包initramfs
cd $TOP_BUILD/initramfs/x86-busybox
find . -print0 | cpio --null -ov --format=newc 	| gzip -9 > $TOP_BUILD/obj/initramfs-busybox-x86.cpio.gz

3. 制作支持EFI的 Linux 硬盘镜像
# 安装相关的tool
 yum install -y dosfstools
 yum install -y  grub2-efi-x64-modules.noarch
 yum install -y  efibootmgr
# 插入 USB 到PC同时保证被Vmware能识别(或者直接宿主linux)

#对U盘前500MB清零
 dd if=/dev/zero of=/dev/sdb  bs=1M count=512;

#对U盘(/dev/sdb)进行分区
gdisk /dev/sdb
GPT fdisk (gdisk) version 0.8.10

Partition table scan:
  MBR: protective
  BSD: not present
  APM: not present
  GPT: present

Found valid GPT with protective MBR; using GPT.

Command (? for help): p
Disk /dev/sdb: 60062500 sectors, 28.6 GiB
Logical sector size: 512 bytes
Disk identifier (GUID): 2280F128-40B9-44EF-8972-59E8AA2C1DD3
Partition table holds up to 128 entries
First usable sector is 34, last usable sector is 60062466
Partitions will be aligned on 2048-sector boundaries
Total free space is 60062433 sectors (28.6 GiB)

Number  Start (sector)    End (sector)  Size       Code  Name

Command (? for help): n
Partition number (1-128, default 1):
First sector (34-60062466, default = 2048) or {+-}size{KMGTP}:
Last sector (2048-60062466, default = 60062466) or {+-}size{KMGTP}: 110MiB
Current type is 'Linux filesystem'
Hex code or GUID (L to show codes, Enter = 8300): EF00
Changed type of partition to 'EFI System'

Command (? for help): p
Disk /dev/sdb: 60062500 sectors, 28.6 GiB
Logical sector size: 512 bytes
Disk identifier (GUID): 2280F128-40B9-44EF-8972-59E8AA2C1DD3
Partition table holds up to 128 entries
First usable sector is 34, last usable sector is 60062466
Partitions will be aligned on 2048-sector boundaries
Total free space is 59839200 sectors (28.5 GiB)

Number  Start (sector)    End (sector)  Size       Code  Name
   1            2048          225280   109.0 MiB   EF00  EFI System

Command (? for help): n
Partition number (2-128, default 2):
First sector (34-60062466, default = 227328) or {+-}size{KMGTP}:
Last sector (227328-60062466, default = 60062466) or {+-}size{KMGTP}: 400MiB
Current type is 'Linux filesystem'
Hex code or GUID (L to show codes, Enter = 8300): 8300
Changed type of partition to 'Linux filesystem'

Command (? for help): p
Disk /dev/sdb: 60062500 sectors, 28.6 GiB
Logical sector size: 512 bytes
Disk identifier (GUID): 2280F128-40B9-44EF-8972-59E8AA2C1DD3
Partition table holds up to 128 entries
First usable sector is 34, last usable sector is 60062466
Partitions will be aligned on 2048-sector boundaries
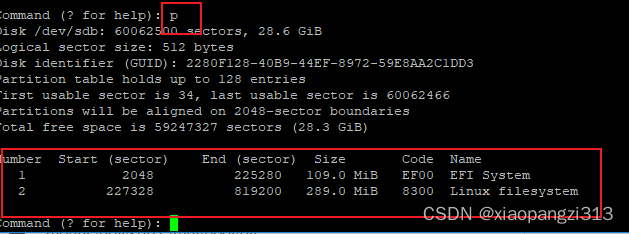
Total free space is 59247327 sectors (28.3 GiB)

Number  Start (sector)    End (sector)  Size       Code  Name
   1            2048          225280   109.0 MiB   EF00  EFI System
   2          227328          819200   289.0 MiB   8300  Linux filesystem

Command (? for help): w

Final checks complete. About to write GPT data. THIS WILL OVERWRITE EXISTING
PARTITIONS!!

Do you want to proceed? (Y/N): y
OK; writing new GUID partition table (GPT) to /dev/sdb.
Warning: The kernel is still using the old partition table.
The new table will be used at the next reboot.
The operation has completed successfully.
[root@localhost ~]#
#对U盘(/dev/sdb)进行格式化
fdisk -l  /dev/sdb
mkfs.vfat  -F 32 -s 2 /dev/sdb1
mkfs.ext3 /dev/sdb2
#对U盘安装bootloader这里用grub tool,也可以使用LILO
mount /dev/sdb2 /mnt/
mkdir -p /mnt/boot/efi
mkdir -p /mnt/boot/grub
mount /dev/sdb1  /mnt/boot/efi
grub2-install --root-directory=/mnt/   --target=x86_64-efi   /dev/sdb

#创建EFI/BOOT/bootx64.efi,确保UEFI可以boot
mkdir -p  /mnt/boot/efi/EFI/BOOT
cp  /mnt/boot/efi/EFI/centos/grubx64.efi  /mnt/boot/efi/EFI/BOOT/bootx64.efi

# copy 本机的kernel 镜像(也可以自己编译)
cp  /boot/vmlinuz-3.10.0-514.el7.x86_64  /mnt/

#copy上面编译的busybox initramfs
cp   /root/csdn/build/obj/initramfs-busybox-x86.cpio.gz  /mnt/

# 获取主分区的UUID用来填充grub.cfg
lsblk -f

# 制作启动菜单
echo 'menuentry 'csdn-kernel-3.10.0-514.el7.x86_64' --class gnu-linux --class gnu --class os {
		insmod gzio
		insmod part_gpt
		search --no-floppy --fs-uuid --set e619cba7-494d-4e0a-976d-e5d6ca196dbc
		echo 'Loading csdn kernel 3.10.0 ...'
		linux  /vmlinuz-3.10.0-514.el7.x86_64  rw init=/bin/sh console=ttyS0,9600n8 console=tty0 consoleblank=0 earlyprintk=ttyS0,9600 kgdboc=kbd,ttyS0 loglevel=7
		echo   'Loading initial ramdisk busybox  ...'
		initrd /initramfs-busybox-x86.cpio.gz
}'  > /mnt/boot/efi/EFI/centos/grub.cfg
#卸载U盘
umount /dev/sdb1
umount /dev/sdb2

# 导出U盘为HardDisk image
dd if=/dev/sdb bs=512 count=819200 of=./csdn_busybox.img
4. 使用OVMF 固件启动 Linux 硬盘镜像
1.`Windows 端启动
chcp 65001 && "C:\Program Files\qemu\qemu-system-x86_64.exe" -bios "OVMF.fd" -M "pc" -m 256 -cpu "qemu64" -boot order=dc -serial stdio -hda "csdn_busybox.img"
press F2 -> uefi shell
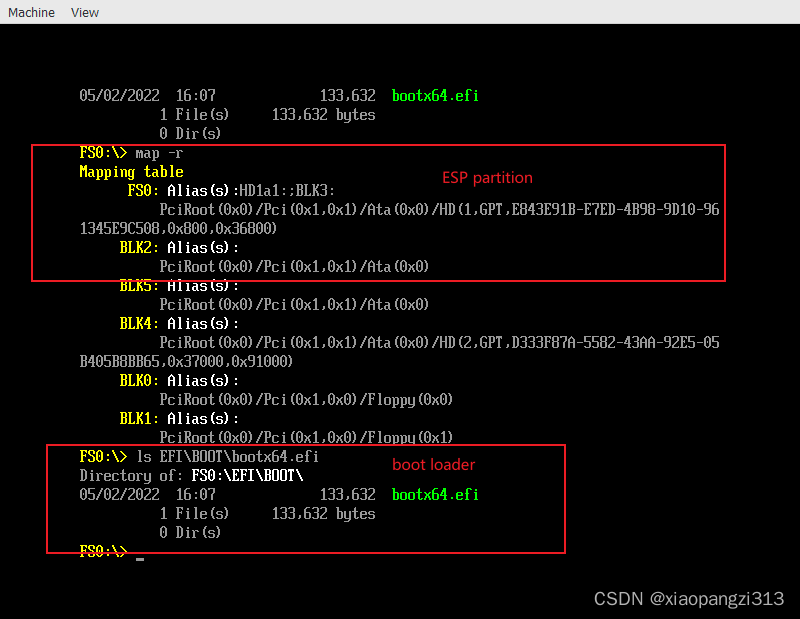
退出shell,进入setup, 再进入boot entry
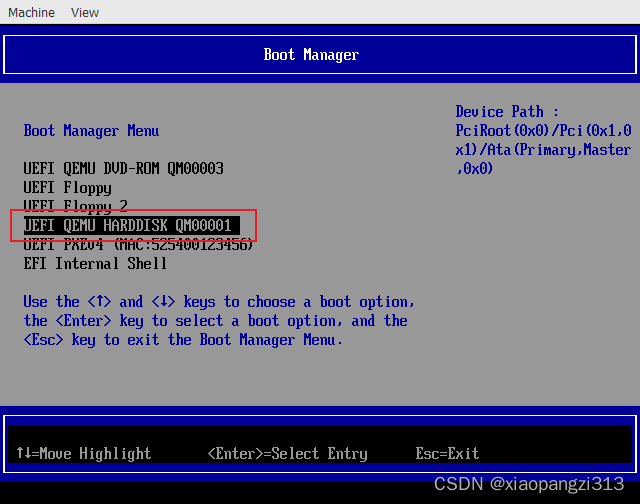
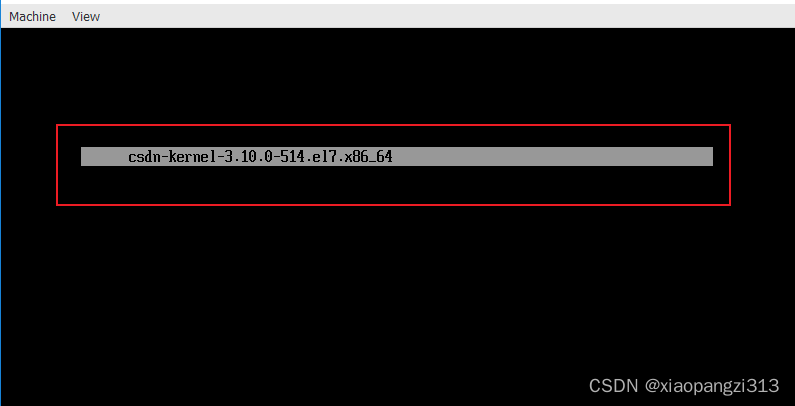
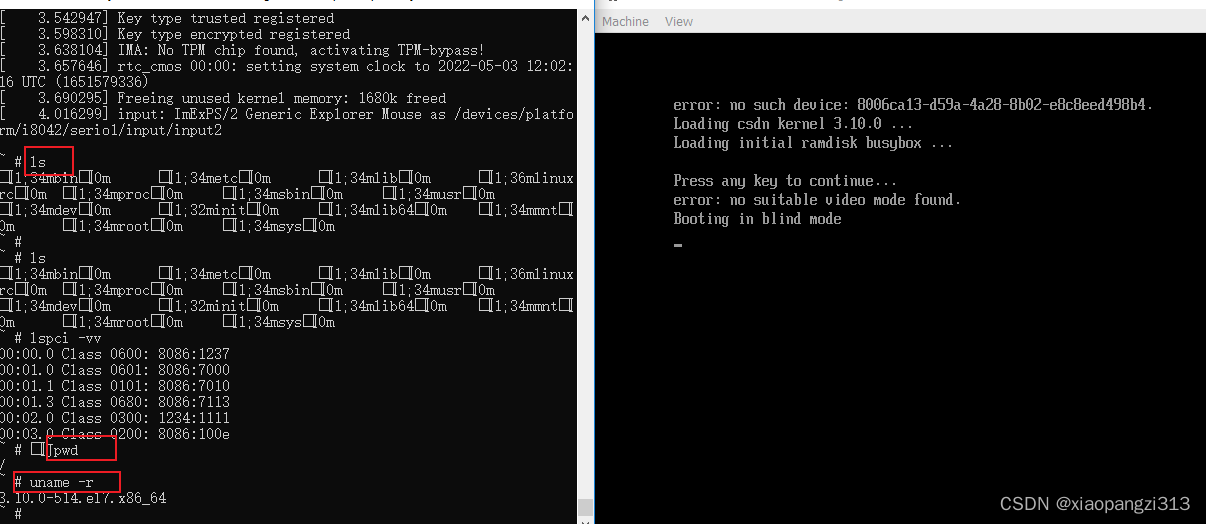
`
2.`Linux端启动
qemu-system-x86_64 -bios ./Build/OvmfX64/DEBUG_GCC48/FV/OVMF.fd -serial stdio -hda /root/csdn_busybox.img
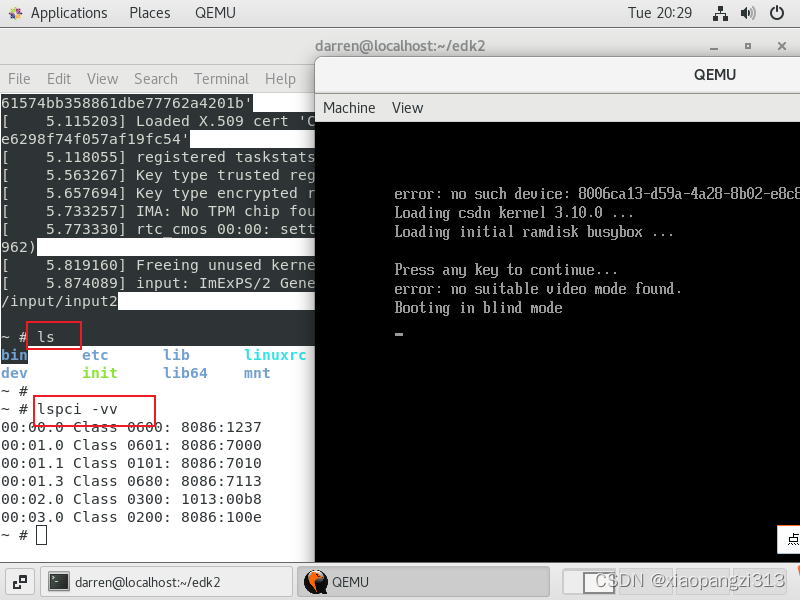
5. 使用OVMF 固件启动 win10硬盘镜像
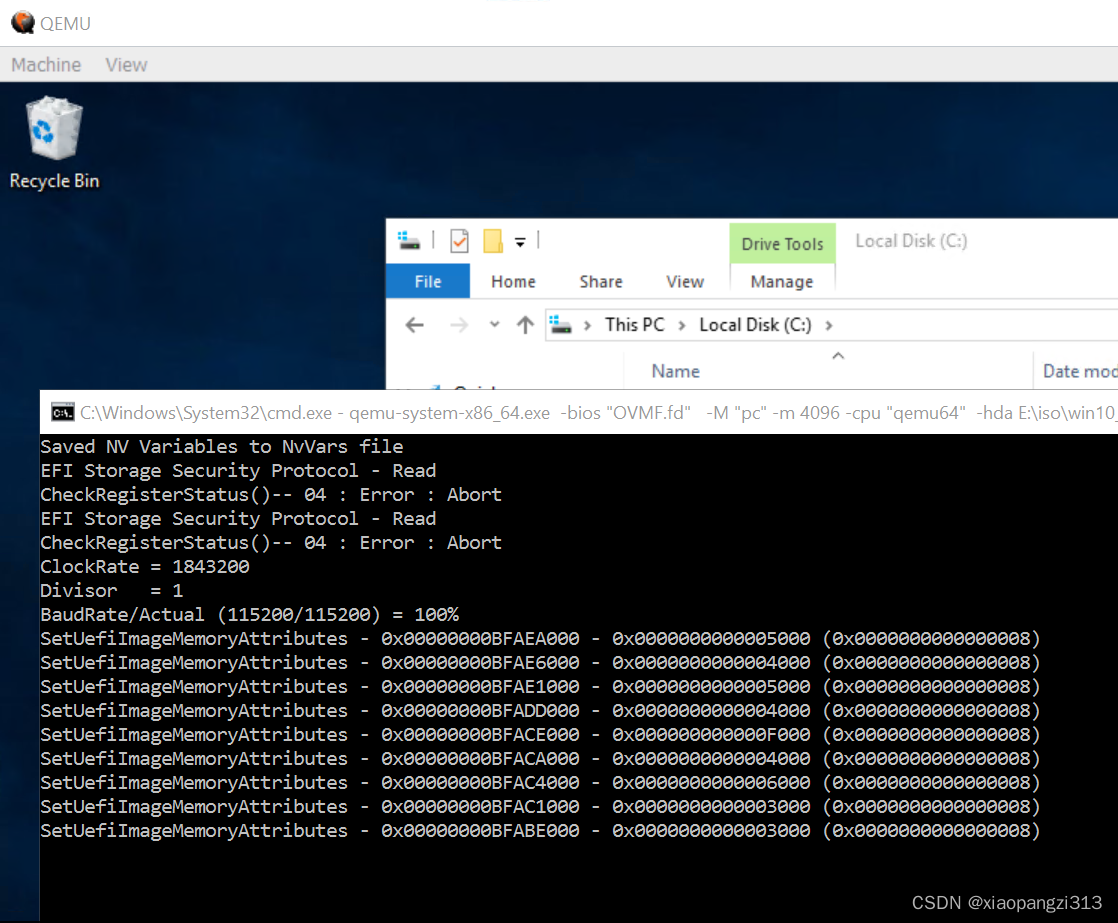
cmd 中执行如下命令qemu-system-x86_64.exe -bios "OVMF.fd" -M "pc" -m 4096 -cpu "qemu64" -hda E:\iso\win10_xxx.raw -serial stdio (注意:win10 镜像可以通过vmware以及vbox制作)
6. 使用OVMF 固件启动 FWTS硬盘镜像
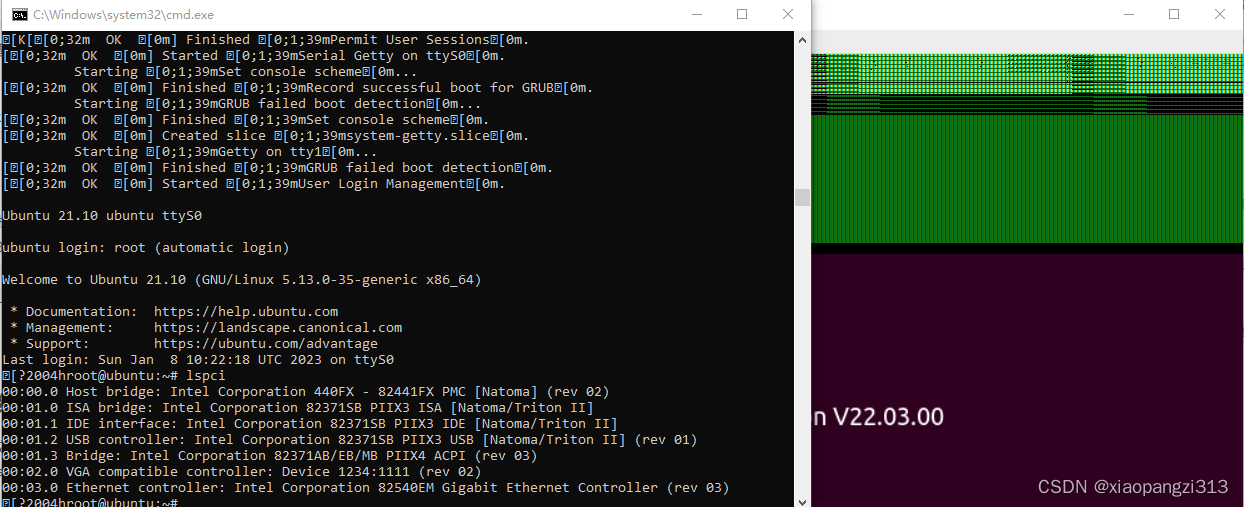
cmd 中执行如下命令chcp 65001 && "C:\Program Files\qemu\qemu-system-x86_64.exe" -bios "OVMF.fd" -M "pc" -m 4096 -cpu "qemu64" -boot order=dc -serial stdio -hda fwts-live-22.03.00-x86_64.img -usbdevice disk:HDD_BOOT.img (注意:fwts镜像可以从 https://fwts.ubuntu.com/fwts-live/ 下载)
小结:
本章完成了UEFI 开源固件OVMF的编译环境搭建以及使用OVMF 启动UEFI shell / Linux OS (busybox + fwts)/ windows . 后续再会添加OVMF启动ReactOS.
PS:
本文使用的Qemu安装包,OVMF固件以及busybox可以从以下链接下载
qemu+ovmf+busybox