shopping高级篇-1
Elastisearch-介绍及安装
简介
mysql用作持久化存储,ES用作检索
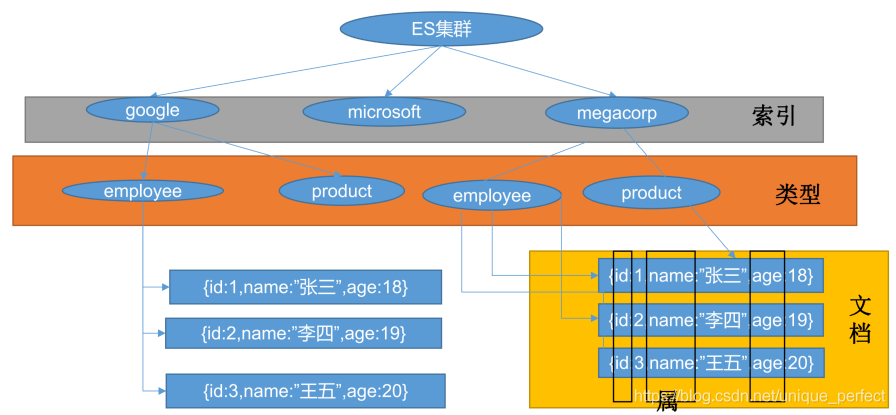
基本概念:
index索引
名词:相当于mysql的db,数据库
Type类型
在index中,可以定义一个或多个类型
类似于mysql的table,每一种类型的数据放在一起
index库>type表>document文档
Document文档
保存在某个index下,某种type的一个数据document,文档是json格式的,
document就像是mysql中的某个table里面的内容。每一行对应的列叫属性
检索机制
102、全文检索-ElasticSearch-简介_哔哩哔哩_bilibili
安装elastic search
dokcer中安装elastic search
下载ealastic search(存储和检索)和kibana(可视化检索)
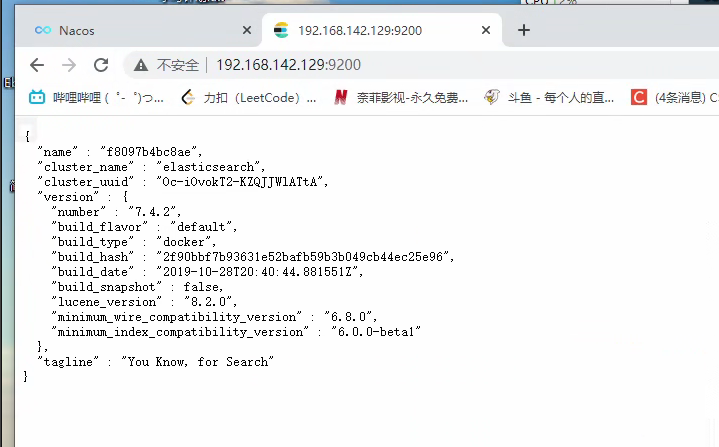
docker pull elasticsearch:7.4.2
docker pull kibana:7.4.2
注意版本要统一配置
mkdir -p /usr/local/elasticsearch/plugins
mkdir -p /usr/local/elasticsearch/config
mkdir -p /usr/local/elasticsearch/data# es可以被远程任何机器访问
echo "http.host: 0.0.0.0" >/usr/local/elasticsearch/config/elasticsearch.yml# 递归更改权限,es需要访问
chmod -R 777 /usr/local/elasticsearch启动Elastic search
# 9200是用户交互端口 9300是集群心跳端口
# -e指定是单阶段运行
# -e指定占用的内存大小,生产时可以设置32G
sudo docker run --name elasticsearch -p 9200:9200 -p 9300:9300 \
-e "discovery.type=single-node" \
-e ES_JAVA_OPTS="-Xms64m -Xmx512m" \
-v /usr/local/elasticsearch/config/elasticsearch.yml:/usr/share/elasticsearch/config/elasticsearch.yml \
-v /usr/local/elasticsearch/data:/usr/share/elasticsearch/data \
-v /usr/local/elasticsearch/plugins:/usr/share/elasticsearch/plugins \
-d elasticsearch:7.4.2
docker ps 查看
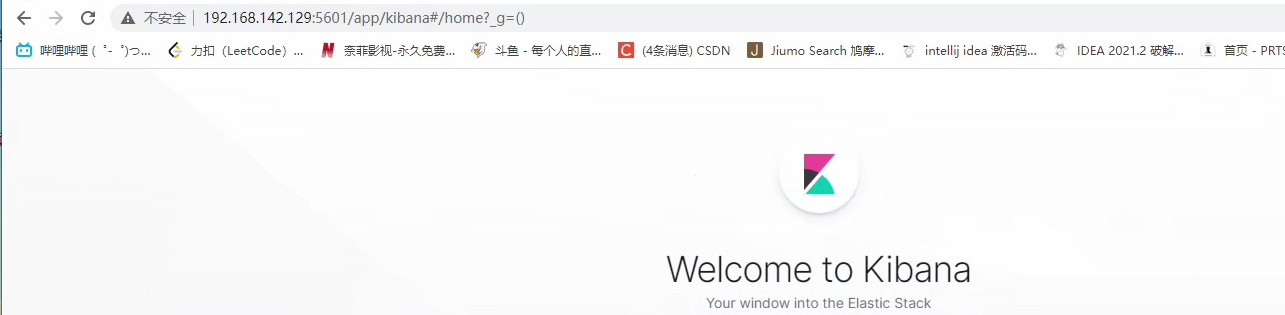
安装kibana
docker pull kibana:7.4.2
启动kibana:
sudo docker run --name kibana -e ELASTICSEARCH_HOSTS=http://192.168.142.129:9200 -p 5601:5601 -d kibana:7.4.2
Elasticsearch-使用入门
前面介绍说,Elasticsearch 都是通过 REST API 接口来操作数据的,那么下面接通过几个接口的请求来演示它的使用。(当前虚拟机IP为192.168.163.131)
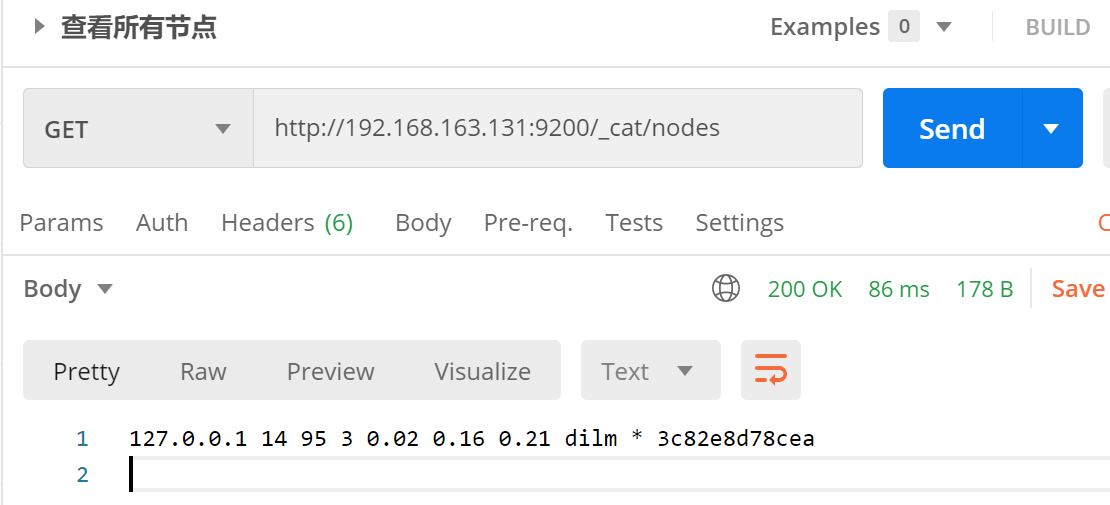
_cat
1. /_cat/nodes:查看所有节点
接口:GET http://192.168.163.131:9200/_cat/nodes
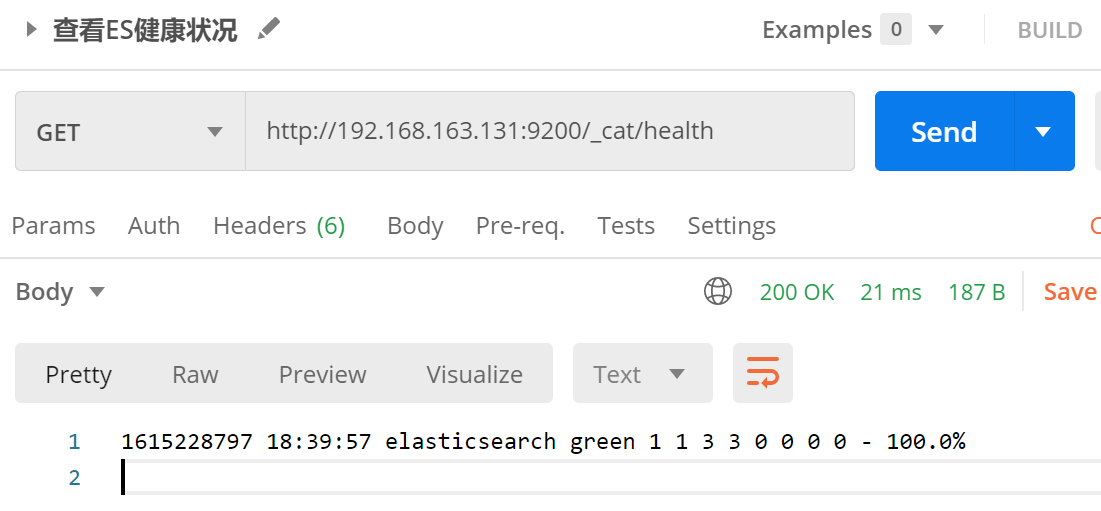
2. /_cat/health:查看ES健康状况
接口:GET http://192.168.163.131:9200/_cat/health
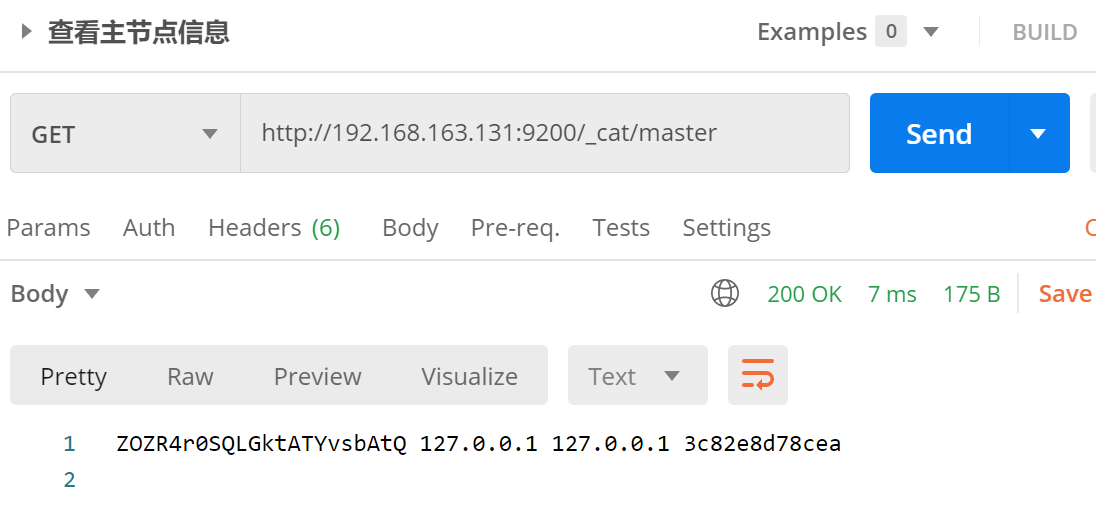
3. /_cat/master:查看主节点信息
接口:GET http://192.168.163.131:9200/_cat/master
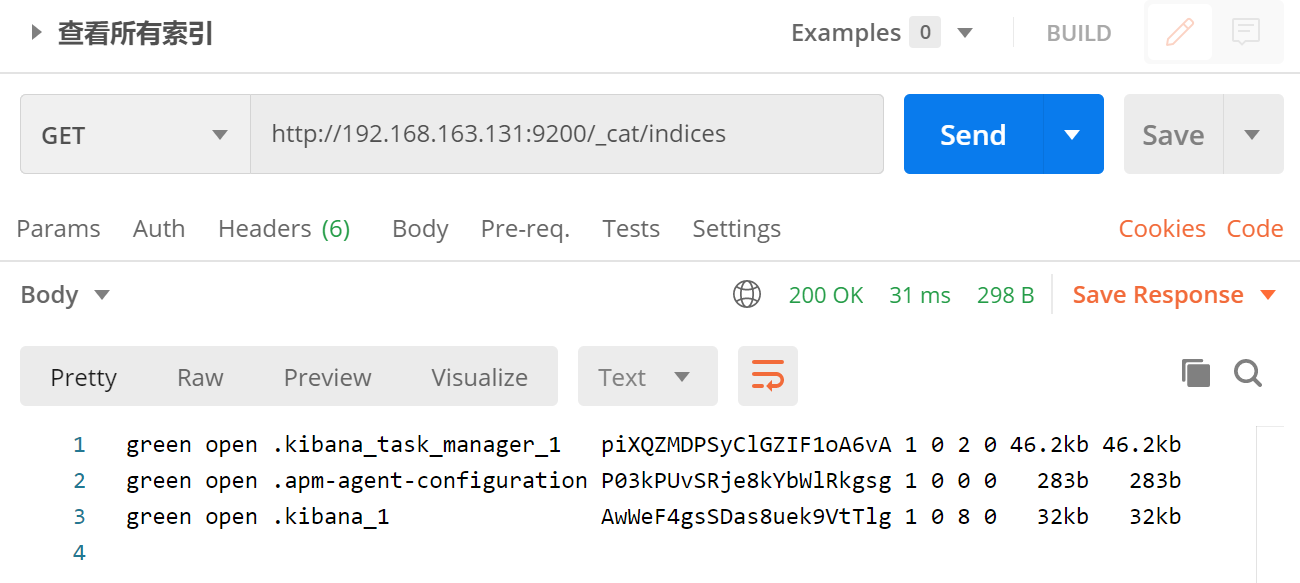
4. /_cat/indicies:查看所有索引
等价于 mysql 数据库的 show databases;
接口:GET http://192.168.163.131:9200/_cat/indices
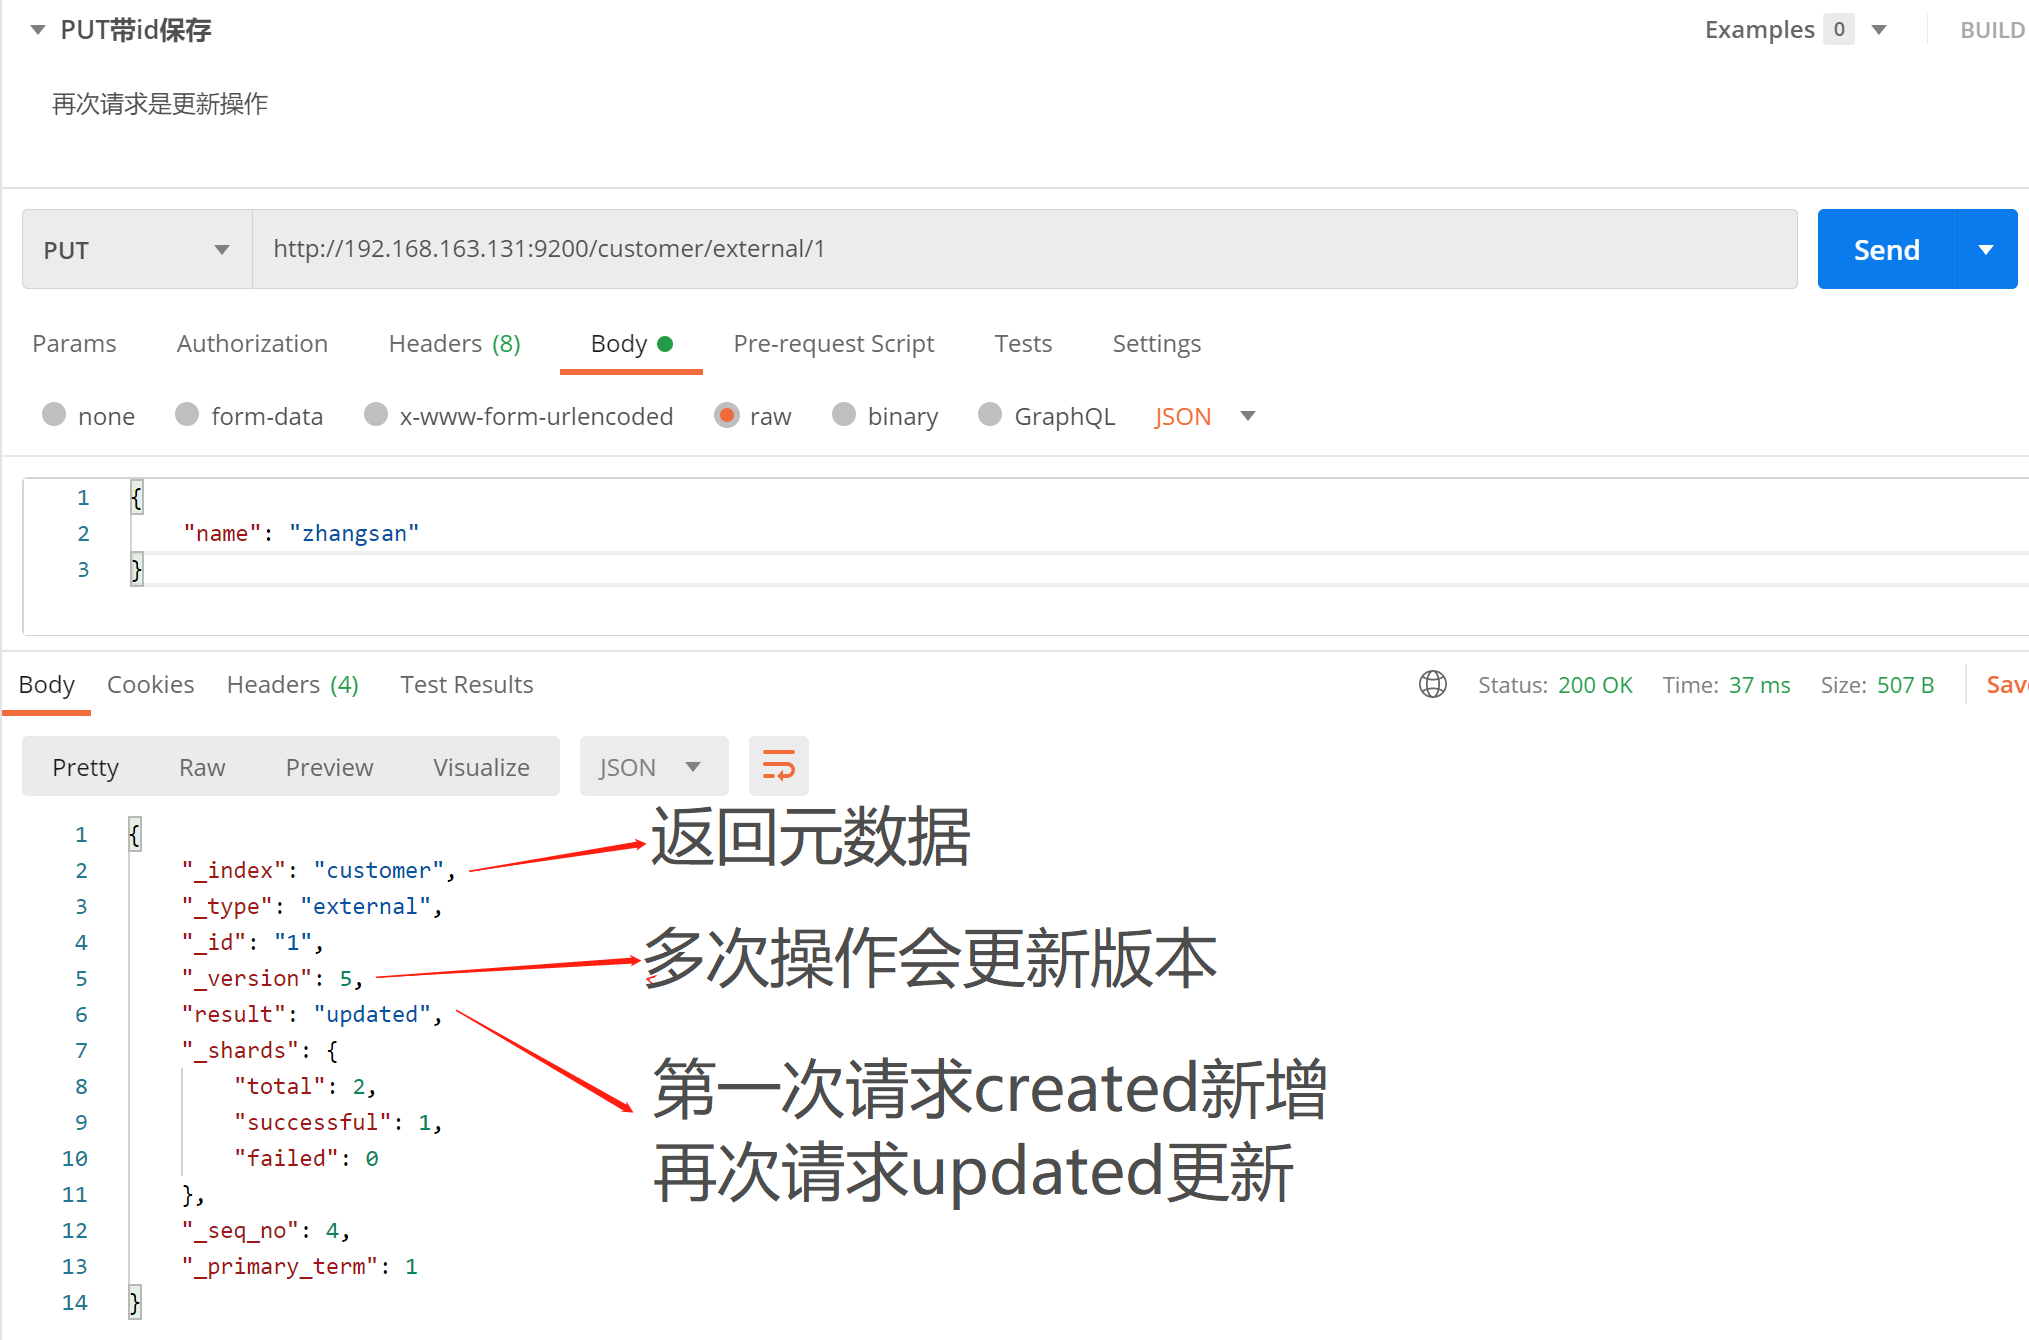
索引一个文档
即保存一条数据,保存在哪个索引的哪个类型下,指定用哪个唯一标识。
1. PUT 请求
接口:PUT http://192.168.163.131:9200/customer/external/1
2. POST 请求
接口:POST http://192.168.163.131:9200/customer/external/
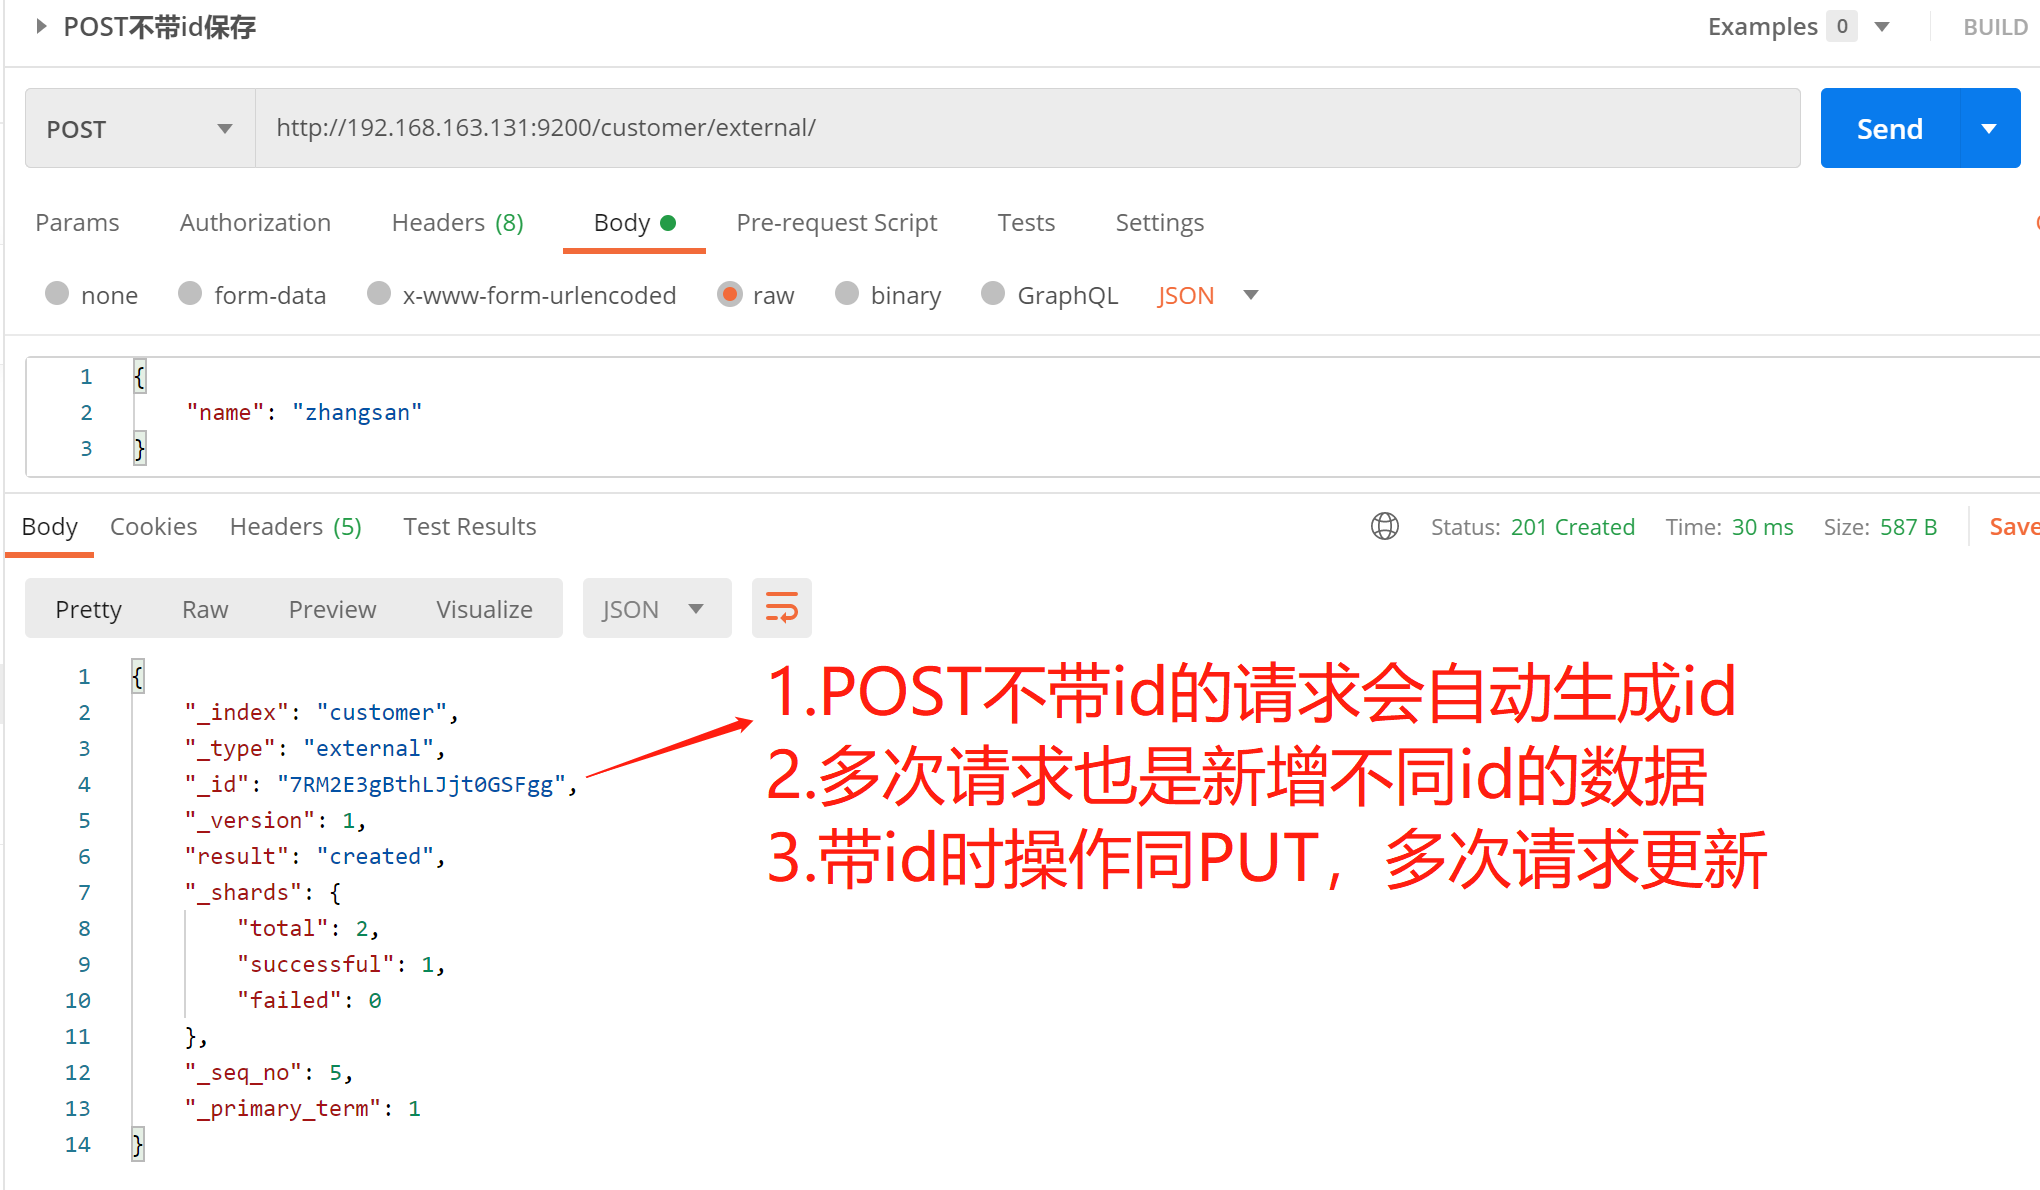
PUT和POST都可以
- POST新增,如果不指定id,会自动生成id。指定id就会修改这个数据,并新增版本号;
- PUT可以新增也可以修改。PUT必须指定id;由于PUT需要指定id,我们一般用来做修改操作,不指定id会报错。
Nginx
正向代理和反向代理
配置反向代理
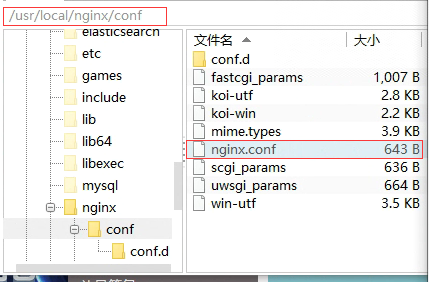
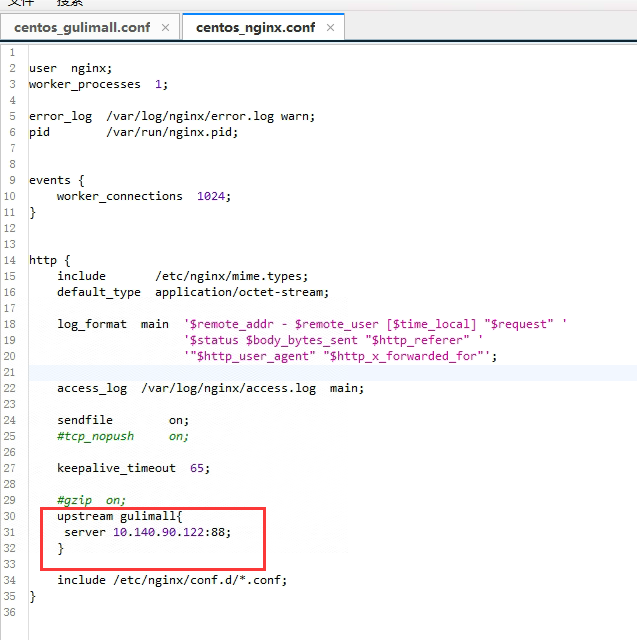
因为我们之前配置docker的时候将nginx挂载到了 usr/local/nginx 下
所以我们找到总的配置文件
user nginx;
worker_processes 1;error_log /var/log/nginx/error.log warn;
pid /var/run/nginx.pid;
events {
worker_connections 1024;
}
http {
include /etc/nginx/mime.types;
default_type application/octet-stream;log_format main '$remote_addr - $remote_user [$time_local] "$request" '
'$status $body_bytes_sent "$http_referer" '
'"$http_user_agent" "$http_x_forwarded_for"';access_log /var/log/nginx/access.log main;
sendfile on;
#tcp_nopush on;keepalive_timeout 65;
#gzip on;
include /etc/nginx/conf.d/*.conf;
}
注意include /etc/nginx/conf.d/*.conf,说明也包括这个路径下所有 .conf的配置文件
所以以后我们自定义的配置文件就可以写在/etc/nginx/conf.d/下,但是这是docker内部的地址,挂载到外面对应的地址应该是 /usr/local/nginx/conf.d/*.conf
所以我们可以看到一个配置文件default.conf
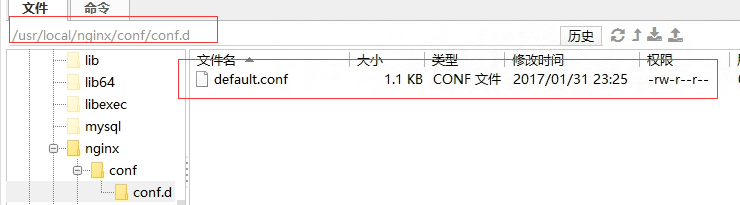
我们复制一份,作为本项目的配置文件
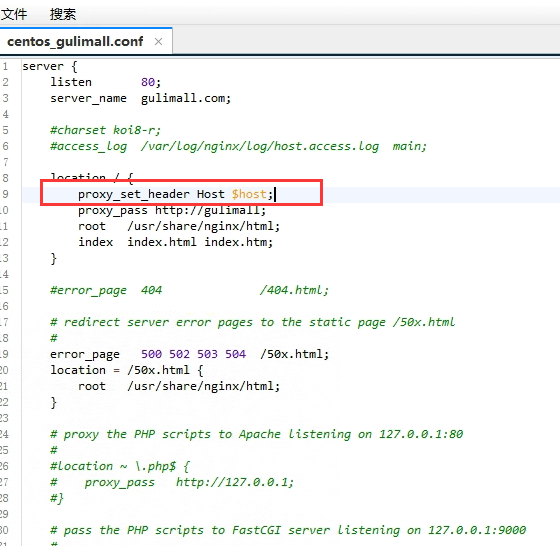
cp default.conf gulimall.conf修改一下

niginx+网关 -使用网关进行负载均衡
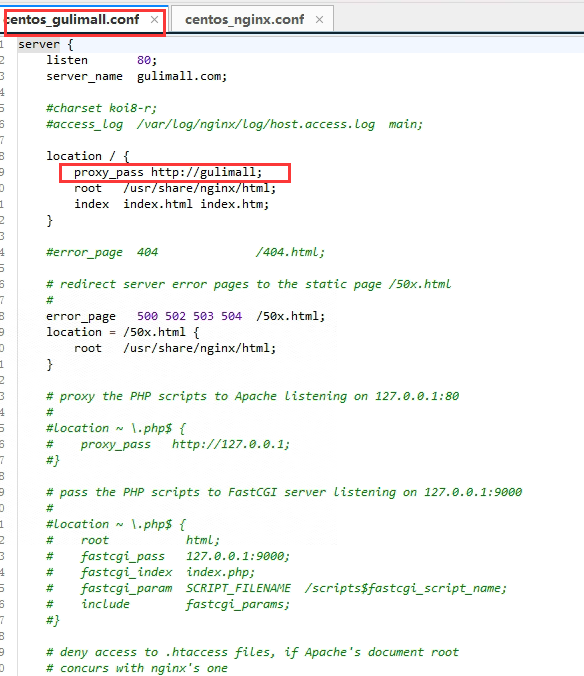
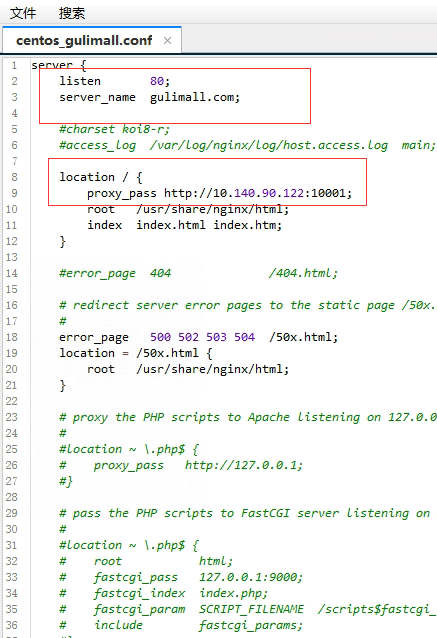
网关修改,因为nginx反向代理是根据请求地址的host来的,所以这里的断言是host断言
        - id: gulimall_nginx_route
          uri: lb://gulimall-product
          predicates:
            - Host=**.gulimall.com
但是nginx代理给网关的时候,会丢失host信息,需要在nginx中配置一下
压力测试
压力测试考察当前软硬件环境下系统所能承受的最大负荷并帮助找出系统瓶颈所在。压测都 是为了系统在线上的处理能力和稳定性维持在一个标准范围内,做到心中有数。 使用压力测试,我们有希望找到很多种用其他测试方法更难发现的错误。有两种错误类型是: 内存泄漏,并发与同步。 有效的压力测试系统将应用以下这些关键条件:重复,并发,量级,随机变化
内存泄漏:就是高并发情况下,如果不优化复用对象,那么会疯狂创建对象,使得内存饱满
142、性能压测-压力测试-Apache JMeter安装使用_哔哩哔哩_bilibili
修改端口占用问题
143、性能压测-压力测试-JMeter在windows下地址占用bug解决_哔哩哔哩_bilibili
首先简单优化
1.mysql优化,增加索引
2.关闭thymeleaf缓存
3.关闭日志
4.业务优化
①因为我的主页的静态资源和动态请求都放在一个模块中,无论是我查数据库的动态请求,还是静态资源的请求,都是要发给tomcat的=为了解决首页全量数据的获取,采取动静分离
②因为有很多查询方法重复使用,提取方法,提高方法的复用性
    @Override
    public Map<String, List<Catelog2Vo>> getCatelogJson() {
        List<CategoryEntity> entityList = baseMapper.selectList(null);
        // 查询所有一级分类
        List<CategoryEntity> level1 = getLevel1Categorys();
        Map<String, List<Catelog2Vo>> parent_cid = level1.stream().collect(Collectors.toMap(k -> k.getCatId().toString(), v -> {
            // 拿到每一个一级分类 然后查询他们的二级分类
            List<CategoryEntity> entities = this.list(new LambdaQueryWrapper<CategoryEntity>().eq(CategoryEntity::getParentCid, v.getCatId()));
            List<Catelog2Vo> catelog2Vos=null;
            if (entities != null) {
                catelog2Vos = entities.stream().map(l2 -> {
                    Catelog2Vo catelog2Vo = new Catelog2Vo(v.getCatId().toString(), null, l2.getCatId().toString(), null);
                    // 找当前二级分类的三级分类
                    List<CategoryEntity> level3Catelog = this.list(new LambdaQueryWrapper<CategoryEntity>().eq(CategoryEntity::getParentCid, l2.getCatId()));

                    // 三级分类有数据的情况下
                    if (level3Catelog != null) {
                        List<Catelog2Vo.Category3Vo> catalog3Vos = level3Catelog.stream().map(l3 -> new Catelog2Vo.Category3Vo(l2.getCatId().toString(),l3.getCatId().toString(),l3.getName())).collect(Collectors.toList());
                        catelog2Vo.setCatalog3List(catalog3Vos);
                    }
                    return catelog2Vo;
                }).collect(Collectors.toList());
            }
            return catelog2Vos;
        }));
        return parent_cid;
    }
我们发现this.list方法调用多次:即查询符合id的数据
不如我们先查出所有的数据,然后用stream的filter(item->item.id=条件id)
@Override
    public Map<String, List<Catelog2Vo>> getCatelogJson() {
        List<CategoryEntity> selectList = baseMapper.selectList(null);
        // 查询所有一级分类
        List<CategoryEntity> level1 = getLevel1Categorys();
        Map<String, List<Catelog2Vo>> parent_cid = level1.stream().collect(Collectors.toMap(k -> k.getCatId().toString(), v -> {
            // 拿到每一个一级分类 然后查询他们的二级分类
//            List<CategoryEntity> entities = this.list(new LambdaQueryWrapper<CategoryEntity>().eq(CategoryEntity::getParentCid, v.getCatId()));
            List<CategoryEntity> entities = getParent_cid(selectList, v.getCatId());
            List<Catelog2Vo> catelog2Vos=null;
            if (entities != null) {
                catelog2Vos = entities.stream().map(l2 -> {
                    Catelog2Vo catelog2Vo = new Catelog2Vo(v.getCatId().toString(), null, l2.getCatId().toString(), l2.getName);
                    // 找当前二级分类的三级分类
//                    List<CategoryEntity> level3Catelog = this.list(new LambdaQueryWrapper<CategoryEntity>().eq(CategoryEntity::getParentCid, l2.getCatId()));
                    List<CategoryEntity> level3Catelog = getParent_cid(selectList, l2.getCatId());

                    // 三级分类有数据的情况下
                    if (level3Catelog != null) {
                        List<Catelog2Vo.Category3Vo> catalog3Vos = level3Catelog.stream().map(l3 -> new Catelog2Vo.Category3Vo(l2.getCatId().toString(),l3.getCatId().toString(),l3.getName())).collect(Collectors.toList());
                        catelog2Vo.setCatalog3List(catalog3Vos);
                    }
                    return catelog2Vo;
                }).collect(Collectors.toList());
            }
            return catelog2Vos;
        }));
        return parent_cid;
    }
    private List<CategoryEntity> getParent_cid(List<CategoryEntity> selectList,Long parentCid) {
        List<CategoryEntity> categoryEntities = selectList.stream().filter(item -> item.getParentCid().equals(parentCid)).collect(Collectors.toList());
        return categoryEntities;
        // return this.baseMapper.selectList(
        //         new QueryWrapper<CategoryEntity>().eq("parent_cid", parentCid));
    }
但是这样并不能提供多少吞吐量,这里我们就需要缓存
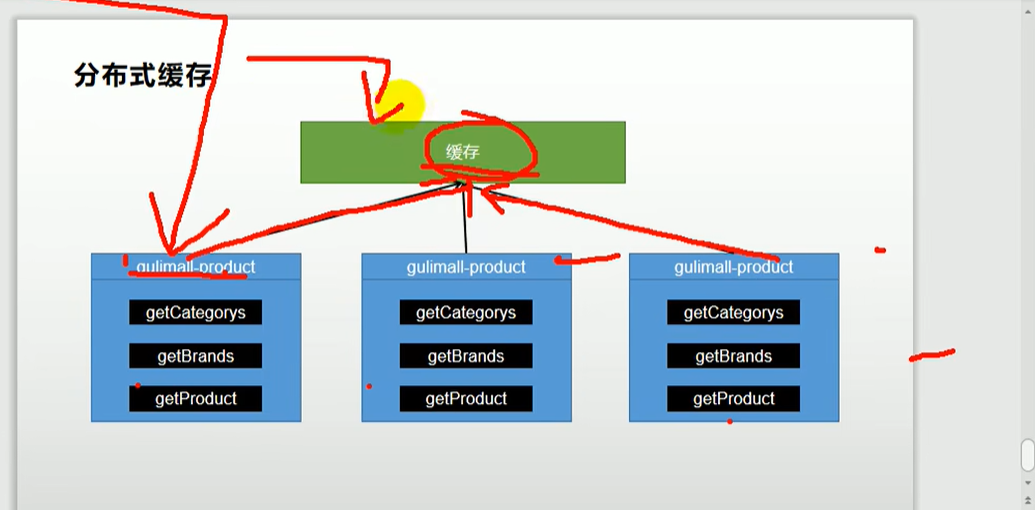
缓存
哪些数据适合放入缓存?
即时性、数据一致性要求不高的
访问量大且更新频率不高的数据(读多,写少)
缓存的方式一:在当前机器上使用map来保存,下次取就直接拿
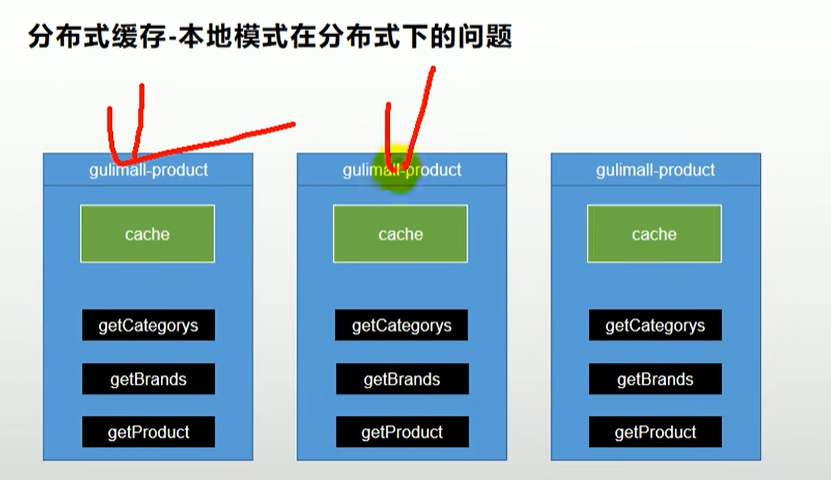
缺点①就是分布式中,一个微服务可能会部署很多服务器,第一次负载均衡到a机器,缓存到本地,但第二次负载均衡到b机器就找不到该缓存了
②最大的缺点就是,如果修改a机器中的缓存,但是其他机器没有修改,那么后面再次读取缓存会错误
所以再分布式情况下,应该使用redis
缓存方法二:redis
public Map<String, List<Catelog2Vo>> getCatalogJson2() {
//给缓存中放json字符串,拿出的json字符串,反序列为能用的对象
/**
* 1、空结果缓存:解决缓存穿透问题
* 2、设置过期时间(加随机值):解决缓存雪崩
* 3、加锁:解决缓存击穿问题
*/
//1、加入缓存逻辑,缓存中存的数据是json字符串
//JSON跨语言。跨平台兼容。
ValueOperations<String, String> ops = stringRedisTemplate.opsForValue();
String catalogJson = ops.get("catalogJson");
if (StringUtils.isEmpty(catalogJson)) {
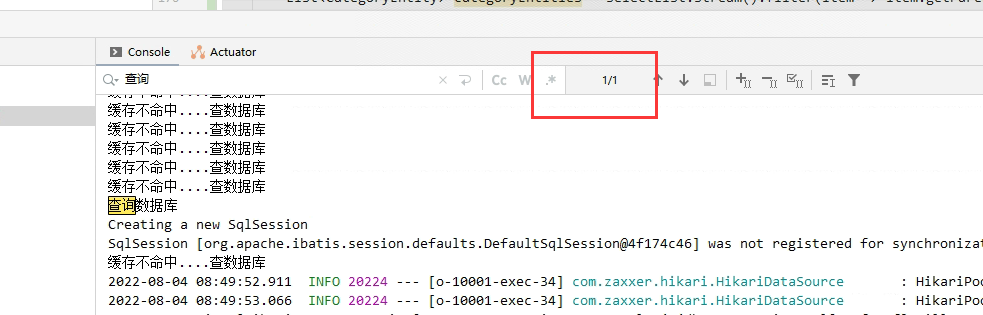
System.out.println("缓存不命中...查询数据库...");
//2、缓存中没有数据,查询数据库
Map<String, List<Catelog2Vo>> catalogJsonFromDb = getCatalogJsonFromDbWithRedissonLock();
return catalogJsonFromDb;
}
System.out.println("缓存命中...直接返回...");
//转为指定的对象
Map<String, List<Catelog2Vo>> result = JSON.parseObject(catalogJson,new TypeReference<Map<String, List<Catelog2Vo>>>(){});
return result;
}注意
import com.alibaba.fastjson.JSON;
import com.alibaba.fastjson.TypeReference;
缓存穿透
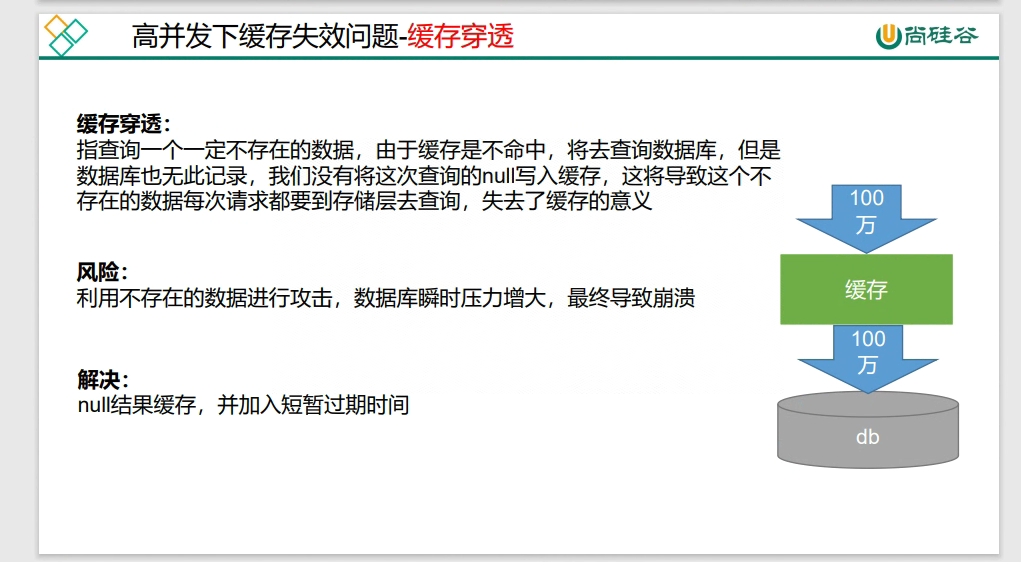
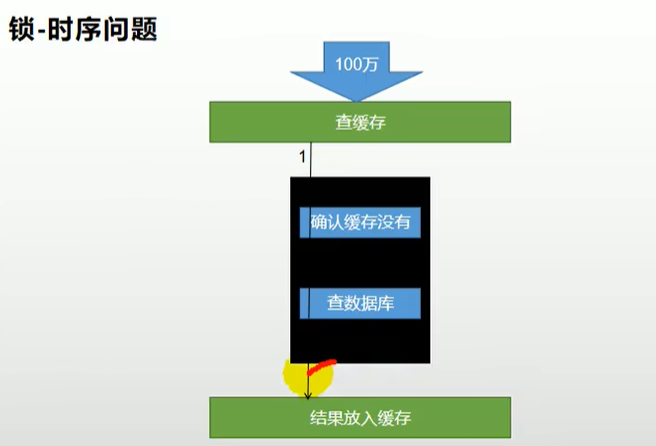
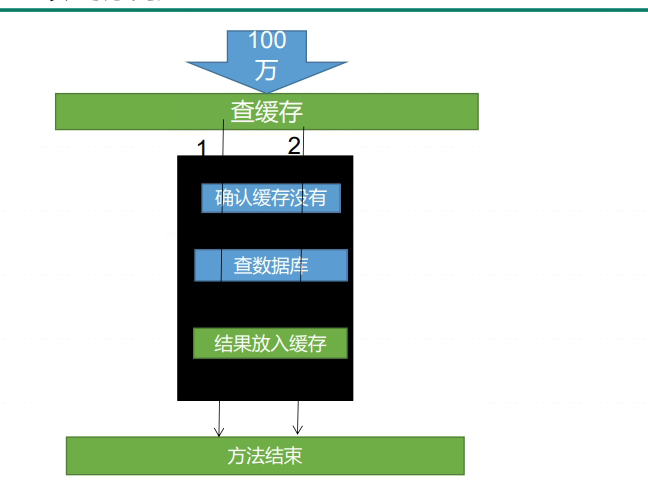
以上面的缓存为例,本来都是查询缓存中的catalogJson,一切正常,但是突然100w的并发量查不存在的数据catalogJson2,就会操作缓存穿透
解决缓存穿透的两种常用解决方案:1. 缓存空值,优点:简单粗暴,缺点:占用额外内存,数据不一致 2. 布隆过滤器,好处:额外内存占用较少,没有多余的key 缺点:实现较复杂,不能百分百过滤
缓存雪崩
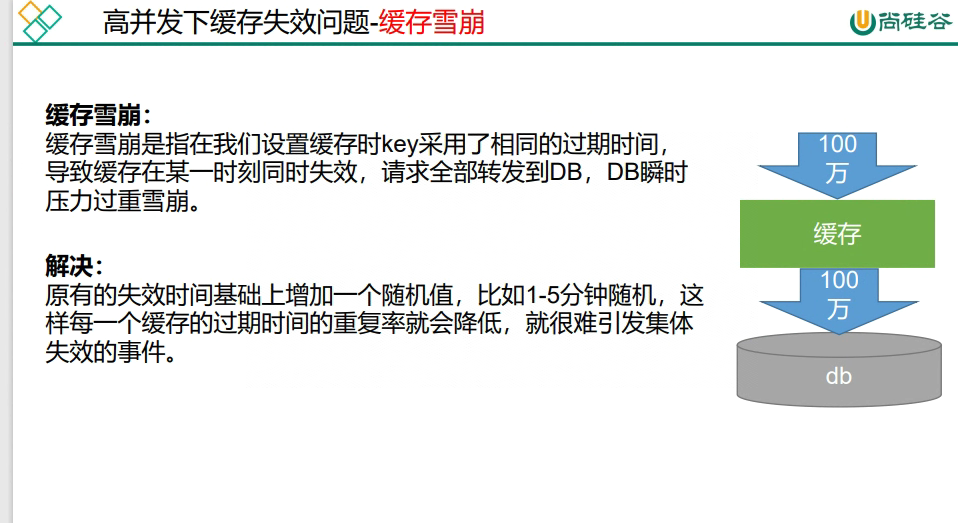
缓存雪崩:缓存数据大面积过期
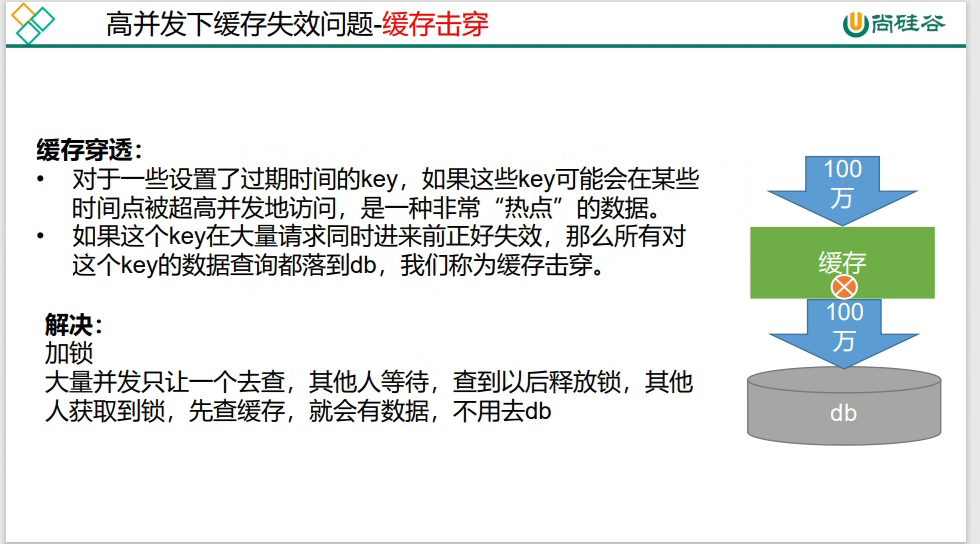
缓存击穿:某一个数据过期之后,大量请求查询这个数据
解决问题
1.空结果缓存:解决缓存击穿
2.设置过期时间(加随机值):解决缓存雪崩
3.加锁(本地锁),解决缓存击穿
    @Override
    public Map<String, List<Catelog2Vo>> getCatelogJson() {
        /**
         * 1.空结果缓存:解决缓存击穿
         *
         * 2.设置过期时间(加随机值):解决缓存雪崩
         *
         * 3.加锁,解决缓存击穿
         */
        ValueOperations<String, String> ops = redisTemplate.opsForValue();
        String catelogJson = ops.get("catelogJson");
        if(StringUtils.isBlank(catelogJson)){
            System.out.println("缓存不命中....查数据库");
            Map<String, List<Catelog2Vo>> catelogJsonFromDb = getCatelogJsonFromDb();
            String s = JSON.toJSONString(catelogJsonFromDb);
            ops.set("catelogJson",s,1, TimeUnit.HOURS);//设置过期时间
            return catelogJsonFromDb;

        }
        System.out.println("缓存命中....直接返回");
        Map<String, List<Catelog2Vo>> result = JSON.parseObject(catelogJson, new TypeReference<Map<String, List<Catelog2Vo>>>() {});
        return result;
    }

//    @Override
    public Map<String, List<Catelog2Vo>> getCatelogJsonFromDb() {
        //加锁解决缓存击穿的问题   springboot中所有容器中的组件都是单例的,这里的this指的是CategoryService
        synchronized (this){
            String catelogJson=redisTemplate.opsForValue().get("catelogJson");
            if(StringUtils.isNotBlank(catelogJson)){
                Map<String, List<Catelog2Vo>> result = JSON.parseObject(catelogJson, new TypeReference<Map<String, List<Catelog2Vo>>>() {});
                return result;
            }
            System.out.println("查询数据库");
            List<CategoryEntity> selectList = baseMapper.selectList(null);
            // 查询所有一级分类
            List<CategoryEntity> level1 = getLevel1Categorys();
            Map<String, List<Catelog2Vo>> parent_cid = level1.stream().collect(Collectors.toMap(k -> k.getCatId().toString(), v -> {
                // 拿到每一个一级分类 然后查询他们的二级分类
//            List<CategoryEntity> entities = this.list(new LambdaQueryWrapper<CategoryEntity>().eq(CategoryEntity::getParentCid, v.getCatId()));
                List<CategoryEntity> entities = getParent_cid(selectList, v.getCatId());
                List<Catelog2Vo> catelog2Vos=null;
                if (entities != null) {
                    catelog2Vos = entities.stream().map(l2 -> {
                        Catelog2Vo catelog2Vo = new Catelog2Vo(v.getCatId().toString(), null, l2.getCatId().toString(), l2.getName());
                        // 找当前二级分类的三级分类
//                    List<CategoryEntity> level3Catelog = this.list(new LambdaQueryWrapper<CategoryEntity>().eq(CategoryEntity::getParentCid, l2.getCatId()));
                        List<CategoryEntity> level3Catelog = getParent_cid(selectList, l2.getCatId());

                        // 三级分类有数据的情况下
                        if (level3Catelog != null) {
                            List<Catelog2Vo.Category3Vo> catalog3Vos = level3Catelog.stream().map(l3 -> new Catelog2Vo.Category3Vo(l2.getCatId().toString(),l3.getCatId().toString(),l3.getName())).collect(Collectors.toList());
                            catelog2Vo.setCatalog3List(catalog3Vos);
                        }
                        return catelog2Vo;
                    }).collect(Collectors.toList());
                }
                return catelog2Vos;
            }));
            return parent_cid;
        }


    }
上面这段代码的模型
压测。。。。
如果查询数据库会在控制台打印 "查询数据库"
我们发现一共查询了3次,这是为什么呢?
所以我们把我们的逻辑改成这样
添加代码
public Map<String, List<Catelog2Vo>> getCatelogJsonFromDb() {
        //加锁解决缓存击穿的问题   springboot中所有容器中的组件都是单例的,这里的this指的是CategoryService
        synchronized (this){
            String catelogJson=redisTemplate.opsForValue().get("catelogJson");
            if(StringUtils.isNotBlank(catelogJson)){
                Map<String, List<Catelog2Vo>> result = JSON.parseObject(catelogJson, new TypeReference<Map<String, List<Catelog2Vo>>>() {});
                return result;
            }
            System.out.println("查询数据库");
            List<CategoryEntity> selectList = baseMapper.selectList(null);
            // 查询所有一级分类
            List<CategoryEntity> level1 = getLevel1Categorys();
            Map<String, List<Catelog2Vo>> result = level1.stream().collect(Collectors.toMap(k -> k.getCatId().toString(), v -> {
                // 拿到每一个一级分类 然后查询他们的二级分类
//            List<CategoryEntity> entities = this.list(new LambdaQueryWrapper<CategoryEntity>().eq(CategoryEntity::getParentCid, v.getCatId()));
                List<CategoryEntity> entities = getParent_cid(selectList, v.getCatId());
                List<Catelog2Vo> catelog2Vos = null;
                if (entities != null) {
                    catelog2Vos = entities.stream().map(l2 -> {
                        Catelog2Vo catelog2Vo = new Catelog2Vo(v.getCatId().toString(), null, l2.getCatId().toString(), l2.getName());
                        // 找当前二级分类的三级分类
//                    List<CategoryEntity> level3Catelog = this.list(new LambdaQueryWrapper<CategoryEntity>().eq(CategoryEntity::getParentCid, l2.getCatId()));
                        List<CategoryEntity> level3Catelog = getParent_cid(selectList, l2.getCatId());

                        // 三级分类有数据的情况下
                        if (level3Catelog != null) {
                            List<Catelog2Vo.Category3Vo> catalog3Vos = level3Catelog.stream().map(l3 -> new Catelog2Vo.Category3Vo(l2.getCatId().toString(), l3.getCatId().toString(), l3.getName())).collect(Collectors.toList());
                            catelog2Vo.setCatalog3List(catalog3Vos);
                        }
                        return catelog2Vo;
                    }).collect(Collectors.toList());
                }
                return catelog2Vos;
            }));
            String s = JSON.toJSONString(result);
            redisTemplate.opsForValue().set("catelogJson",s,1, TimeUnit.HOURS);

            return result;
        }


    }
结果
本地锁缺点
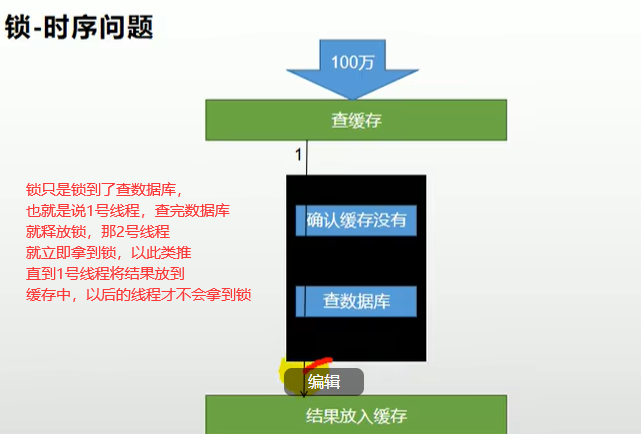
我们假设有8台服务器,那么就有8哥容器,那就会有8个锁(this),就会同时有8个线程去查数据库
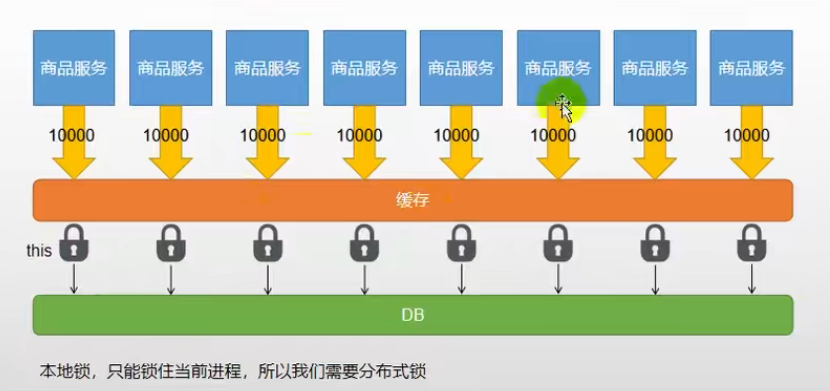
所以我们需要分布式锁
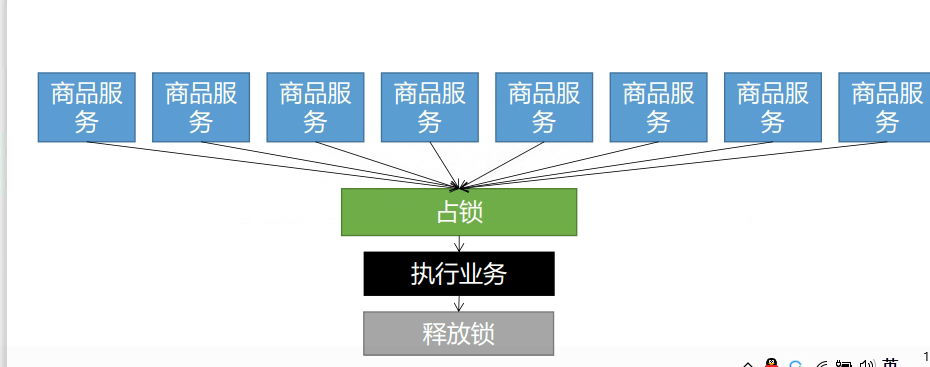
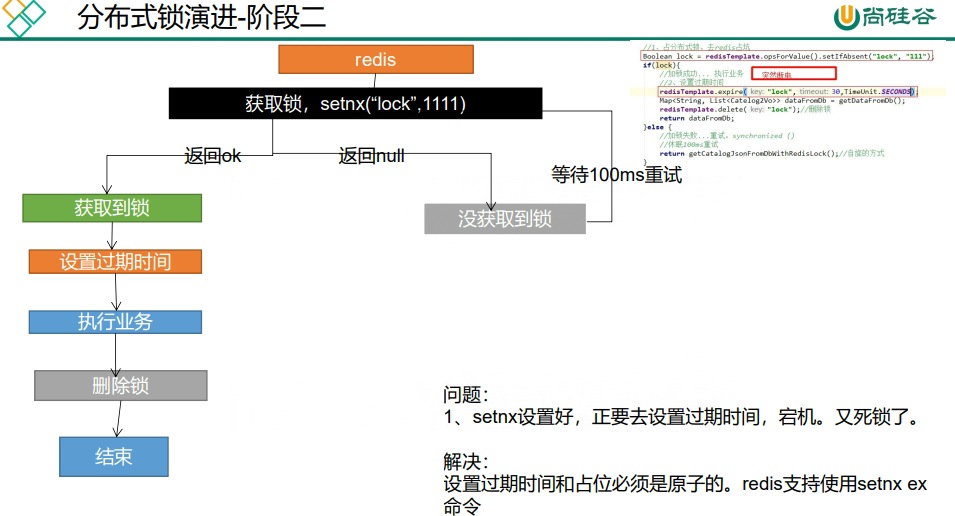
基本思想就是:所有线程来查询缓存,如果缓存没有命中,那么就去查询数据库,当第一个线程去查数据库时,在redis存一个数据(Lock-这个随意是什么),这就是锁。以后要来数据库查询时,线程都先去redis中查看有没有lock这个数据,有的话就等待释放锁(拿到锁的线程将Lock删除)
    public Map<String, List<Catelog2Vo>> getCatelogJsonFromDbWithRedisLock() throws InterruptedException {
        Boolean ifAbsent = redisTemplate.opsForValue().setIfAbsent("lock", "111");

        if(ifAbsent){
            Map<String, List<Catelog2Vo>> result = getCatelogJsonFromDb();
            redisTemplate.delete("lock");
            return result;
        }else{
            Thread.sleep(100);
            return getCatelogJsonFromDbWithRedisLock();

        }
    }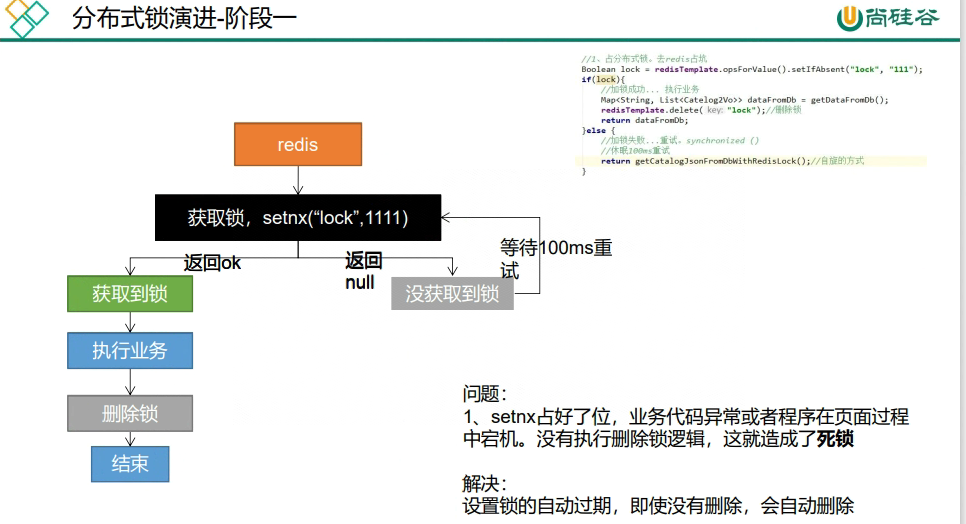
但也存在一个问题,如果getCatelogJsonFromDb()这个方法出现异常,那么就不会执行redisTemplate.delete("lock");就会出现死锁-
解决方法就是将这个锁设置自动过期时间
    public Map<String, List<Catelog2Vo>> getCatelogJsonFromDbWithRedisLock() throws InterruptedException {
        Boolean ifAbsent = redisTemplate.opsForValue().setIfAbsent("lock", "111");
        if(ifAbsent){
            redisTemplate.expire( 3, TimeUnit.SECONDS);
            Map<String, List<Catelog2Vo>> result = getCatelogJsonFromDb();
            redisTemplate.delete("lock");
            return result;
        }else{
            Thread.sleep(100);
            return getCatelogJsonFromDbWithRedisLock();

        }


    }
这种写法也会有问题,if(ifAbsent)之后突然宕机,还没来得及设置过期时间,没有保证redis的原子性
public Map<String, List<Catelog2Vo>> getCatelogJsonFromDbWithRedisLock() throws InterruptedException {
        Boolean ifAbsent = redisTemplate.opsForValue().setIfAbsent("lock", "111", 3, TimeUnit.SECONDS);
        if(ifAbsent){
//            redisTemplate.expire("lock",3,TimeUnit.SECONDS);
            Map<String, List<Catelog2Vo>> result = getCatelogJsonFromDb();
            redisTemplate.delete("lock");
            return result;
        }else{
            Thread.sleep(100);
            return getCatelogJsonFromDbWithRedisLock();

        }

    }
但是依旧存在问题,假如我们设置过期时间为20s,但是查询数据库用了30s.线程A开始查询数据库,20s过去了,锁自动释放,线程B拿到锁开始查询数据库,过了10s后线程A的查询结束,redisTemplate.delete("lock");这样就会删除线程B的锁,然后线程C就会拿到锁
修改:
public Map<String, List<Catelog2Vo>> getCatelogJsonFromDbWithRedisLock() throws InterruptedException {
        String UUID= java.util.UUID.randomUUID().toString();
        Boolean ifAbsent = redisTemplate.opsForValue().setIfAbsent("lock", UUID, 3, TimeUnit.SECONDS);
        if(ifAbsent){
//            redisTemplate.expire("lock",3,TimeUnit.SECONDS);
            Map<String, List<Catelog2Vo>> result = getCatelogJsonFromDb();
            String s = redisTemplate.opsForValue().get("lock");
            if(s.equals(UUID)){

                redisTemplate.delete("lock");
            }
            return result;
        }else{
            Thread.sleep(100);
            return getCatelogJsonFromDbWithRedisLock();

        }


    }
当然又出现问题了,那就是String s = redisTemplate.opsForValue().get("lock");之后lock过期,另一个线程进来拿锁,设置lock,前一个线程执行redisTemplate.delete("lock");又会误删
所以 获取值对比+对比成功册除 一定要是 原子操作 ,要用lua脚本
    public Map<String, List<Catelog2Vo>> getCatelogJsonFromDbWithRedisLock()  {
        String UUID= java.util.UUID.randomUUID().toString();
        Boolean ifAbsent = redisTemplate.opsForValue().setIfAbsent("lock", UUID, 300, TimeUnit.SECONDS);
        if(ifAbsent){
            System.out.println("获取分布式锁成功");
//            redisTemplate.expire("lock",3,TimeUnit.SECONDS);
            Map<String, List<Catelog2Vo>> result=null;

            try {

                result = getCatelogJsonFromDb();
            }finally {

                String script="if redis.call('get',KEYS[1]) == ARGV[1] then return redis.call('get',KEYS[1]) else return 0 end";
                redisTemplate.execute(new DefaultRedisScript<Long>(script,Long.class),Arrays.asList("lock"),UUID);
            }

            return result;
        }else{
            System.out.println("获取分布式锁失败");
            try {
                Thread.sleep(100);
            } catch (InterruptedException e) {
                e.printStackTrace();
            }
            return getCatelogJsonFromDbWithRedisLock();

        }


    }
总结 获取锁时-保证原子性,释放锁的时候保证原子性
Redisson
https://github.com/redisson/redisson
Redisson是一个在Redis的基础上实现的Java驻内存数据网格(In-Memory Data
Grid)。它不仅提供了一系列的分布式的Java常用对象,还提供了许多分布式服
务。其中包括(BitSet, Set, Multimap, SortedSet, Map, List, Queue,
BlockingQueue, Deque, BlockingDeque, Semaphore, Lock, AtomicLong,
CountDownLatch, Publish / Subscribe, Bloom filter, Remote service, Spring
cache, Executor service, Live Object service, Scheduler service) Redisson提供
了使用Redis的最简单和最便捷的方法。Redisson的宗旨是促进使用者对Redis的
关注分离(Separation of Concern),从而让使用者能够将精力更集中地放在处
理业务逻辑上。
(1) 环境搭建
导入依赖
<dependency>
<groupId>org.redisson</groupId>
<artifactId>redisson</artifactId>
<version>3.13.4</version>
</dependency>
这个用作连续,后面可以使用redisson-spring-boot-starter
开启配置https://github.com/redisson/redisson/wiki/2.-%E9%85%8D%E7%BD%AE%E6%96%B9%E6%B3%95
@Configuration
public class MyRedisConfig {@Value("${ipAddr}")
private String ipAddr;// redission通过redissonClient对象使用 // 如果是多个redis集群,可以配置
@Bean(destroyMethod = "shutdown")
public RedissonClient redisson() {
Config config = new Config();
// 创建单例模式的配置
config.useSingleServer().setAddress("redis://" + ipAddr + ":6379");
return Redisson.create(config);
}
}测试
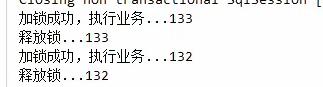
@Autowired
RedissonClient redisson;@ResponseBody @GetMapping(value = "/hello") public String hello() { //1、获取一把锁,只要锁的名字一样,就是同一把锁 RLock myLock = redisson.getLock("my-lock"); //2、加锁 myLock.lock(); //阻塞式等待。默认加的锁都是30s,如果没有拿到锁就在这里一直等待 try { System.out.println("加锁成功,执行业务..." + Thread.currentThread().getId()); try { TimeUnit.SECONDS.sleep(20); } catch (InterruptedException e) { e.printStackTrace(); } } catch (Exception ex) { ex.printStackTrace(); } finally { //3、解锁 假设解锁代码没有运行,Redisson会不会出现死锁 System.out.println("释放锁..." + Thread.currentThread().getId()); myLock.unlock(); } return "hello"; } }然后执行两次http://localhost:10001/hello
myLock.lock();的三点好处
①阻塞式等待。如果没有拿到锁就在这里一直等待
②自动设置了锁的过期时间,默认加的锁都是30s。如果业务处理过程中宕机,过了过期时间自动释放锁
③如果业务时长超过了锁的过期时间,redisson也会自动续费/自动续期
综上所述 不会出现死锁
我总结一波。就是本来锁自动设置了30秒过期,但是我们业务处理超过了30s,不用担心,redis会自动延长过期时间,直到你业务处理完后,30s内给你自动删除锁。
看门狗机制
//2、加锁
myLock.lock(); //阻塞式等待。默认加的锁都是30s
//1)、锁的自动续期,如果业务超长,运行期间自动锁上新的30s。不用担心业务时间长,锁自动过期被删掉
//2)、加锁的业务只要运行完成,就不会给当前锁续期,即使不手动解锁,锁默认会在30s内自动过期,不会产生死锁问题
// myLock.lock(10,TimeUnit.SECONDS); //10秒钟自动解锁,自动解锁时间一定要大于业务执行时间 问题:在锁时间到了以后,不会自动续期
//
//1、如果我们传递了锁的超时时间,就发送给redis执行脚本,进行占锁,默认超时就是 我们制定的时间
//2、如果我们未指定锁的超时时间,就使用 lockWatchdogTimeout = 30 * 1000 【看门狗默认时间】
//只要占锁成功,就会启动一个定时任务【重新给锁设置过期时间,新的过期时间就是看门狗的默认时间】,每隔10秒都会自动的再次续期,续成30秒
// 默认10s是怎么来的:internalLockLeaseTime 【看门狗时间】 / 3, 10s但是还是推荐使用myLock.lock(10,TimeUnit.SECONDS); 这样就不会有自动续期的操作了
-------------------------------------------------------------------------------------
(1)公平锁
12345线程进入
1线程拿到锁,释放锁,接下来就是2拿锁,3,4,5 依次类推 比较公平
redisson.getFairLock("my-lock");
其他都一样
(2) 可重入锁(Reentrant Lock)
分布式锁:github.com/redisson/redisson/wiki/8.-分布式锁和同步器A调用B。AB都需要同一锁,此时可重入锁就可以重入,A就可以调用B。不可重入锁时,A调用B将死锁
// 参数为锁名字
RLock lock = redissonClient.getLock("CatalogJson-Lock");//该锁实现了JUC.locks.lock接口
lock.lock();//阻塞等待
// 解锁放到finally // 如果这里宕机:有看门狗,不用担心
lock.unlock();基于Redis的Redisson分布式可重入锁RLock Java对象实现了java.util.concurrent.locks.Lock接口。同时还提供了异步(Async)、反射式(Reactive)和RxJava2标准的接口。
锁的续期:大家都知道,如果负责储存这个分布式锁的Redisson节点宕机以后,
而且这个锁正好处于锁住的状态时,这个锁会出现锁死的状态。为了避免这种情
况的发生,Redisson内部提供了一个监控锁的看门狗,它的作用是在Redisson实
例被关闭前,不断的延长锁的有效期。默认情况下,看门狗的检查锁的超时时间
是30秒钟(每到20s就会自动续借成30s,是1/3的关系),也可以通过修改
Config.lockWatchdogTimeout来另行指定。
// 加锁以后10秒钟自动解锁,看门狗不续命
// 无需调用unlock方法手动解锁
lock.lock(10, TimeUnit.SECONDS);// 尝试加锁,最多等待100秒,上锁以后10秒自动解锁
boolean res = lock.tryLock(100, 10, TimeUnit.SECONDS);
if (res) {
try {
...
} finally {
lock.unlock();
}
}
如果传递了锁的超时时间,就执行脚本,进行占锁;
如果没传递锁时间,使用看门狗的时间,占锁。如果返回占锁成功future,调用future.onComplete();
没异常的话调用scheduleExpirationRenewal(threadId);
重新设置过期时间,定时任务;
看门狗的原理是定时任务:重新给锁设置过期时间,新的过期时间就是看门狗的默认时间;
锁时间/3是定时任务周期;
Redisson同时还为分布式锁提供了异步执行的相关方法:
RLock lock = redisson.getLock("anyLock");
lock.lockAsync();
lock.lockAsync(10, TimeUnit.SECONDS);
Future<Boolean> res = lock.tryLockAsync(100, 10, TimeUnit.SECONDS);
RLock对象完全符合Java的Lock规范。也就是说只有拥有锁的进程才能解锁,其他进程解锁则会抛出IllegalMonitorStateException错误。但是如果遇到需要其他进程也能解锁的情况,请使用分布式信号量Semaphore 对象.
public Map<String, List<Catalog2Vo>> getCatalogJsonDbWithRedisson() {
Map<String, List<Catalog2Vo>> categoryMap=null;
RLock lock = redissonClient.getLock("CatalogJson-Lock");
lock.lock();
try {
Thread.sleep(30000);
categoryMap = getCategoryMap();
} catch (InterruptedException e) {
e.printStackTrace();
}finally {
lock.unlock();
return categoryMap;
}
}
(3) 读写锁(ReadWriteLock)
基于Redis的Redisson分布式可重入读写锁RReadWriteLock Java对象实现了
java.util.concurrent.locks.ReadWriteLock接口。其中读锁和写锁都继承了RLock
接口。分布式可重入读写锁允许同时有多个读锁和一个写锁处于加锁状态。
RReadWriteLock rwlock = redisson.getReadWriteLock("anyRWLock");
// 最常见的使用方法
rwlock.readLock().lock();
// 或
rwlock.writeLock().lock();// 10秒钟以后自动解锁
// 无需调用unlock方法手动解锁
rwlock.readLock().lock(10, TimeUnit.SECONDS);
// 或
rwlock.writeLock().lock(10, TimeUnit.SECONDS);// 尝试加锁,最多等待100秒,上锁以后10秒自动解锁
boolean res = rwlock.readLock().tryLock(100, 10, TimeUnit.SECONDS);
// 或
boolean res = rwlock.writeLock().tryLock(100, 10, TimeUnit.SECONDS);
...
lock.unlock();
上锁时在redis的状态
HashWrite-Lock
key:mode value:read
key:sasdsdffsdfsdf... value:1
(4) 信号量(Semaphore)-可以用于限流
信号量为存储在redis中的一个数字,当这个数字大于0时,即可以调用acquire()方法增加数量,也可以调用release()方法减少数量,但是当调用release()之后小于0的话方法就会阻塞,直到数字大于0
@GetMapping("/park")
@ResponseBody
public String park() {
RSemaphore park = redissonClient.getSemaphore("park");
try {
park.acquire(2);//当且仅当redis中park的value大于等于2的时候可以执行
} catch (InterruptedException e) {
e.printStackTrace();
}
return "停进2";
}@GetMapping("/go")
@ResponseBody
public String go() {
RSemaphore park = redissonClient.getSemaphore("park");
park.release(2);
return "开走2";
}
除了acquire()阻塞性,也可以是用tryacquire(),不会阻塞,如果无法执行就返回false
(5) 闭锁(CountDownLatch)164、缓存-分布式锁-Redisson-闭锁测试_哔哩哔哩_bilibili
缓存和数据库一致性
双写模式:写数据库后,写缓存
问题:并发时,2写进入,写完DB后都写缓存。有暂时的脏数据
失效模式:写完数据库后,删缓存
问题:还没存入数据库呢,线程2又读到旧的DB了
解决:缓存设置过期时间,定期更新
解决:写数据写时,加分布式的读写锁。
解决方案:如果是用户纬度数据(订单数据、用户数据),这种并发几率非常小,不用考虑这个问题,缓存数据加上过期时间,每隔一段时间触发读的主动更新即可
如果是菜单,商品介绍等基础数据,也可以去使用canal订阅binlog的方式
缓存数据+过期时间也足够解决大部分业务对于缓存的要求。
通过加锁保证并发读写,写写的时候按顺序排好队。读读无所谓。所以适合使用读写锁。(业务不关心脏数据,允许临时脏数据可忽略);
总结:我们能放入缓存的数据本就不应该是实时性、一致性要求超高的。所以缓存数据的时候加上过期时间,保证每天拿到当前最新数据即可。
我们不应该过度设计,增加系统的复杂性
遇到实时性、一致性要求高的数据,就应该查数据库,即使慢点。
SpringCache
引入依赖
<dependency>
  <groupId>org.springframework.boot</groupId>
  <artifactId>spring-boot-starter-cache</artifactId>
</dependency>
添加配置
自动配置了:
- CacheAutoConfiguration 会导入 RedisCacheConfiguration;
- 会自动装配缓存管理器 RedisCacheManager;
手动配置:
spring.cache.type=redis

#spring.cache.cache-names=qq,毫秒为单位
spring.cache.redis.time-to-live=3600000

#如果指定了前缀就用我们指定的前缀,如果没有就默认使用缓存的名字作为前缀
#spring.cache.redis.key-prefix=CACHE_
spring.cache.redis.use-key-prefix=true

#是否缓存空值,防止缓存穿透
spring.cache.redis.cache-null-values=true
@EnableConfigurationProperties(CacheProperties.class)
@Configuration
@EnableCaching
public class MyCacheConfig {
/**
* 配置文件的配置没有用上
* 1. 原来和配置文件绑定的配置类为:@ConfigurationProperties(prefix = "spring.cache")
* public class CacheProperties
* <p>
* 2. 要让他生效,要加上 @EnableConfigurationProperties(CacheProperties.class)
*/
@Bean
public RedisCacheConfiguration redisCacheConfiguration(CacheProperties cacheProperties) {
RedisCacheConfiguration config = RedisCacheConfiguration.defaultCacheConfig();
// config = config.entryTtl();
config = config.serializeKeysWith(RedisSerializationContext.SerializationPair.fromSerializer(new StringRedisSerializer()));
config = config.serializeValuesWith(RedisSerializationContext.SerializationPair.fromSerializer(new GenericJackson2JsonRedisSerializer()));
CacheProperties.Redis redisProperties = cacheProperties.getRedis();
//将配置文件中所有的配置都生效
if (redisProperties.getTimeToLive() != null) {
config = config.entryTtl(redisProperties.getTimeToLive());
}
if (redisProperties.getKeyPrefix() != null) {
config = config.prefixKeysWith(redisProperties.getKeyPrefix());
}
if (!redisProperties.isCacheNullValues()) {
config = config.disableCachingNullValues();
}
if (!redisProperties.isUseKeyPrefix()) {
config = config.disableKeyPrefix();
}
return config;
}
}常用注解
- @Cacheable :触发将数据保存到缓存的操作;
- @CacheEvict : 触发将数据从缓存删除的操作;
- @CachePut :不影响方法执行更新缓存;
- @Cacheing:组合以上多个操作;
- @CacheConfig:在类级别共享缓存的相同配置;
使用:
    //如果缓存有数据,就不再调用这个方法,value指的是放在哪个缓存区域,可以有多个缓存区
    //key就是自定义的存放在redis中的名字
    //sync = true 开启同步
    @Cacheable(value = {"category"},key = "#root.method.name",sync = true)
    @Override
    public List<CategoryEntity> getLevel1Categorys() {
        System.out.println("getLevel1Categorys");
        LambdaQueryWrapper<CategoryEntity> wrapper = new LambdaQueryWrapper<>();
        wrapper.eq(CategoryEntity::getCatLevel,1);
         return this.list(wrapper);
    }
/**
* 级联更新所有关联的数据
*
* @CacheEvict:失效模式
* @CachePut:双写模式,需要有返回值
* 1、同时进行多种缓存操作:@Caching
* 2、指定删除某个分区下的所有数据 @CacheEvict(value = "category",allEntries = true)
* 3、存储同一类型的数据,都可以指定为同一分区
* @param category
*/
// @Caching(evict = {
// @CacheEvict(value = "category",key = "'getLevel1Categorys'"), //注意这里的 ' '
// @CacheEvict(value = "category",key = "'getCatalogJson'")
// })
@CacheEvict(value = "category",allEntries = true) //删除某个分区下的所有数据
@Transactional(rollbackFor = Exception.class)
@Override
public void updateCascade(CategoryEntity category) {
RReadWriteLock readWriteLock = redissonClient.getReadWriteLock("catalogJson-lock");
//创建写锁
RLock rLock = readWriteLock.writeLock();
try {
rLock.lock();
this.baseMapper.updateById(category);
categoryBrandRelationService.updateCategory(category.getCatId(), category.getName());
} catch (Exception e) {
e.printStackTrace();
} finally {
rLock.unlock();
}
//同时修改缓存中的数据
//删除缓存,等待下一次主动查询进行更新
}/**
* 每一个需要缓存的数据我们都来指定要放到那个名字的缓存。【缓存的分区(按照业务类型分)】
* 代表当前方法的结果需要缓存,如果缓存中有,方法都不用调用,如果缓存中没有,会调用方法。最后将方法的结果放入缓存
* 默认行为
* 如果缓存中有,方法不再调用
* key是默认生成的:缓存的名字::SimpleKey::[](自动生成key值)
* 缓存的value值,默认使用jdk序列化机制,将序列化的数据存到redis中
* 默认时间是 -1:
*
* 自定义操作:key的生成
* 指定生成缓存的key:key属性指定,接收一个Spel
* 指定缓存的数据的存活时间:配置文档中修改存活时间
* 将数据保存为json格式
*
*
* 4、Spring-Cache的不足之处:
* 1)、读模式-读取数据时,会出现的问题及其解决方法
* 缓存穿透:查询一个null数据。解决方案:缓存空数据
* 缓存击穿:大量并发进来同时查询一个正好过期的数据。解决方案:加锁 ? 默认是无加锁的;使用sync = true来解决击穿问题。 @Cacheable(value = {"category"},key = "#root.method.name",sync = true)加了sync = true,就会执行这个加了锁的方法
* 缓存雪崩:大量的key同时过期。解决:加随机时间。加上过期时间
* 2)、写模式:更新数据(缓存与数据库一致)
* 1)、读写加锁。
* 2)、引入Canal,感知到MySQL的更新去更新Redis
* 3)、读多写多,直接去数据库查询就行
*
* 总结:
* 常规数据(读多写少,即时性,一致性要求不高的数据,完全可以使用Spring-Cache):写模式(只要缓存的数据有过期时间就足够了)
* 特殊数据:特殊设计
*
* 原理:缓存所有功能都是AOP做的
大概: 加了cacheable之后,先查询缓存中有没有想要的数据,有的话就不执行写了注解的方法,没有就执行
具体:springcache中有一个缓存管理器CacheManager,帮我们造出很多的缓存组件cache,
cache负责缓存的读写。我的项目中使用的是redis作为缓存,所以管理器是redisCacheManager
组件是springcache
*
*
*/
异步
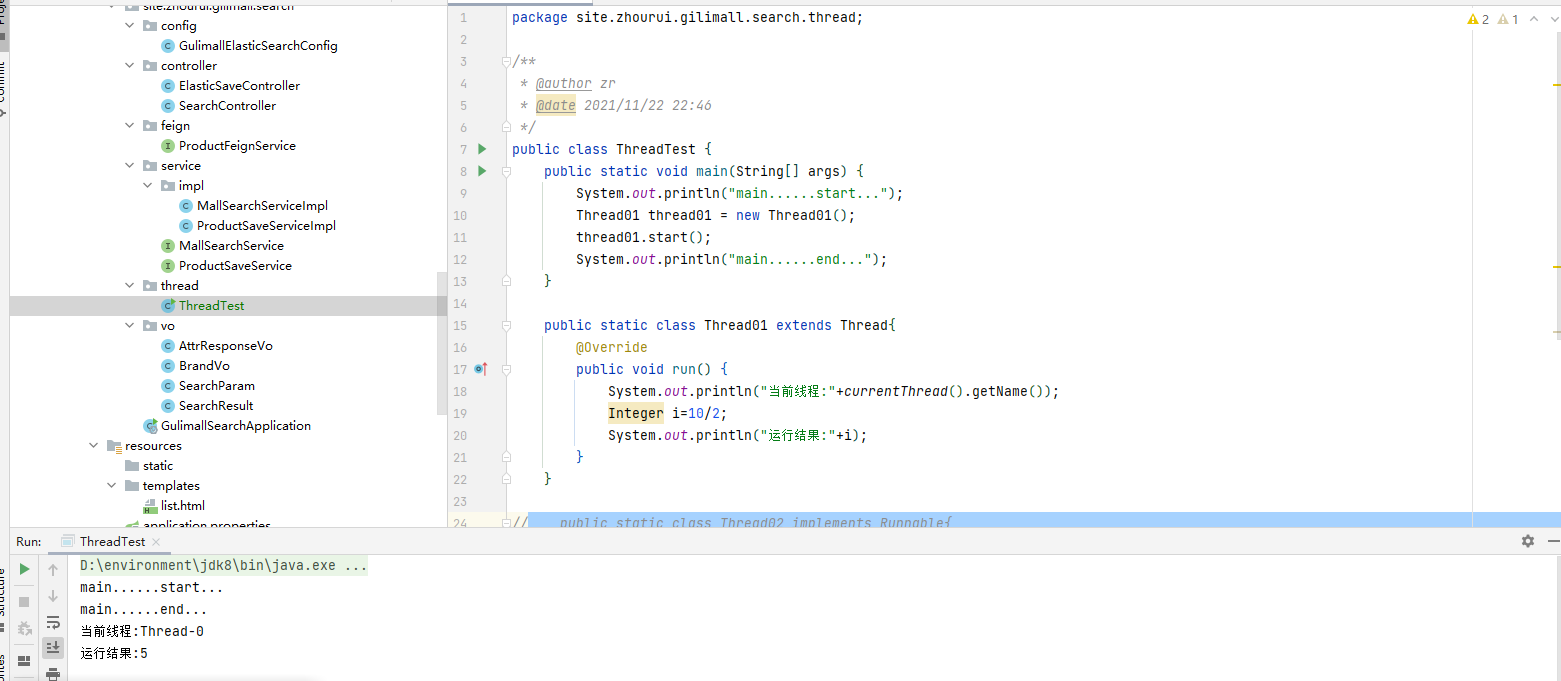
1. 初始化线程的4种方式
1.1 继承 Thread
public class ThreadTest {
    public static void main(String[] args) {
        System.out.println("main......start...");
        Thread01 thread01 = new Thread01();
        thread01.start();
        System.out.println("main......end...");
    }

    public static class Thread01 extends Thread{
        @Override
        public void run() {
            System.out.println("当前线程:"+Thread.currentThread().getName());
            Integer i=10/2;
            System.out.println("运行结果:"+i);
        }
    }
}
运行结果
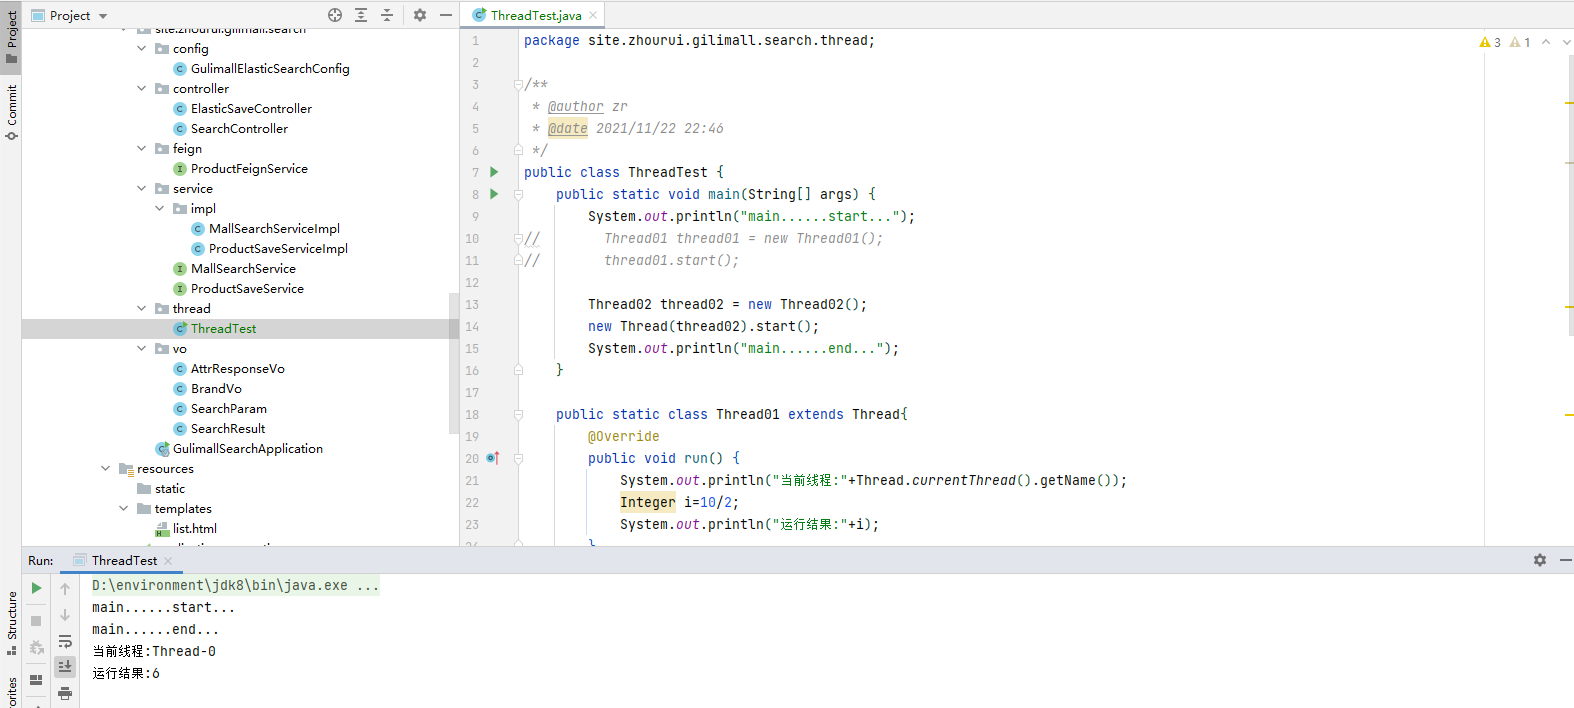
1.2 实现 Runnable 接口
public class ThreadTest {
    public static void main(String[] args) {
        System.out.println("main......start...");
//        Thread01 thread01 = new Thread01();
//        thread01.start();

        Thread02 thread02 = new Thread02();
        new Thread(thread02).start();
        System.out.println("main......end...");
    }

    public static class Thread01 extends Thread{
        @Override
        public void run() {
            System.out.println("当前线程:"+Thread.currentThread().getName());
            Integer i=10/2;
            System.out.println("运行结果:"+i);
        }
    }

    public static class Thread02 implements Runnable{
        @Override
        public void run() {
            System.out.println("当前线程:"+Thread.currentThread().getName());
            Integer i=12/2;
            System.out.println("运行结果:"+i);
        }
    }
}
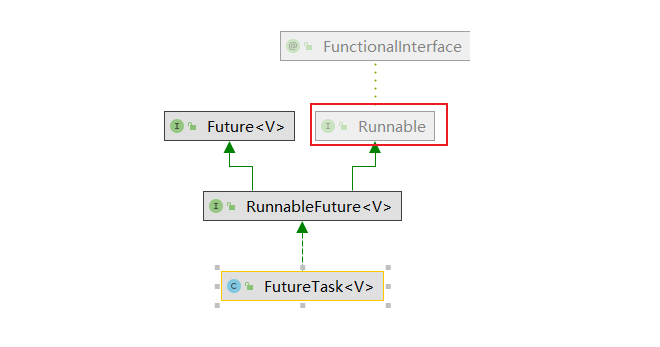
1.3 实现 Callable 接口 + FutureTask (可以拿到返回结果, 可以处理异常)
public class ThreadTest {
    public static void main(String[] args) throws ExecutionException, InterruptedException {
        System.out.println("main......start...");
//        Thread01 thread01 = new Thread01();
//        thread01.start();

//        Thread02 thread02 = new Thread02();
//        new Thread(thread02).start();

        FutureTask futureTask = new FutureTask<>(new Thread03());
        new Thread(futureTask).start();
        Integer i = (Integer) futureTask.get();
        System.out.println("main......end..."+i);
    }

    public static class Thread01 extends Thread{
        @Override
        public void run() {
            System.out.println("当前线程:"+Thread.currentThread().getName());
            Integer i=10/2;
            System.out.println("运行结果:"+i);
        }
    }

    public static class Thread02 implements Runnable{
        @Override
        public void run() {
            System.out.println("当前线程:"+Thread.currentThread().getName());
            Integer i=12/2;
            System.out.println("运行结果:"+i);
        }
    }

    public static class Thread03 implements Callable {

        @Override
        public Object call() throws Exception {
            System.out.println("当前线程:"+Thread.currentThread().getName());
            Integer i=14/2;
            System.out.println("运行结果:"+i);
            return i;
        }
    }
}
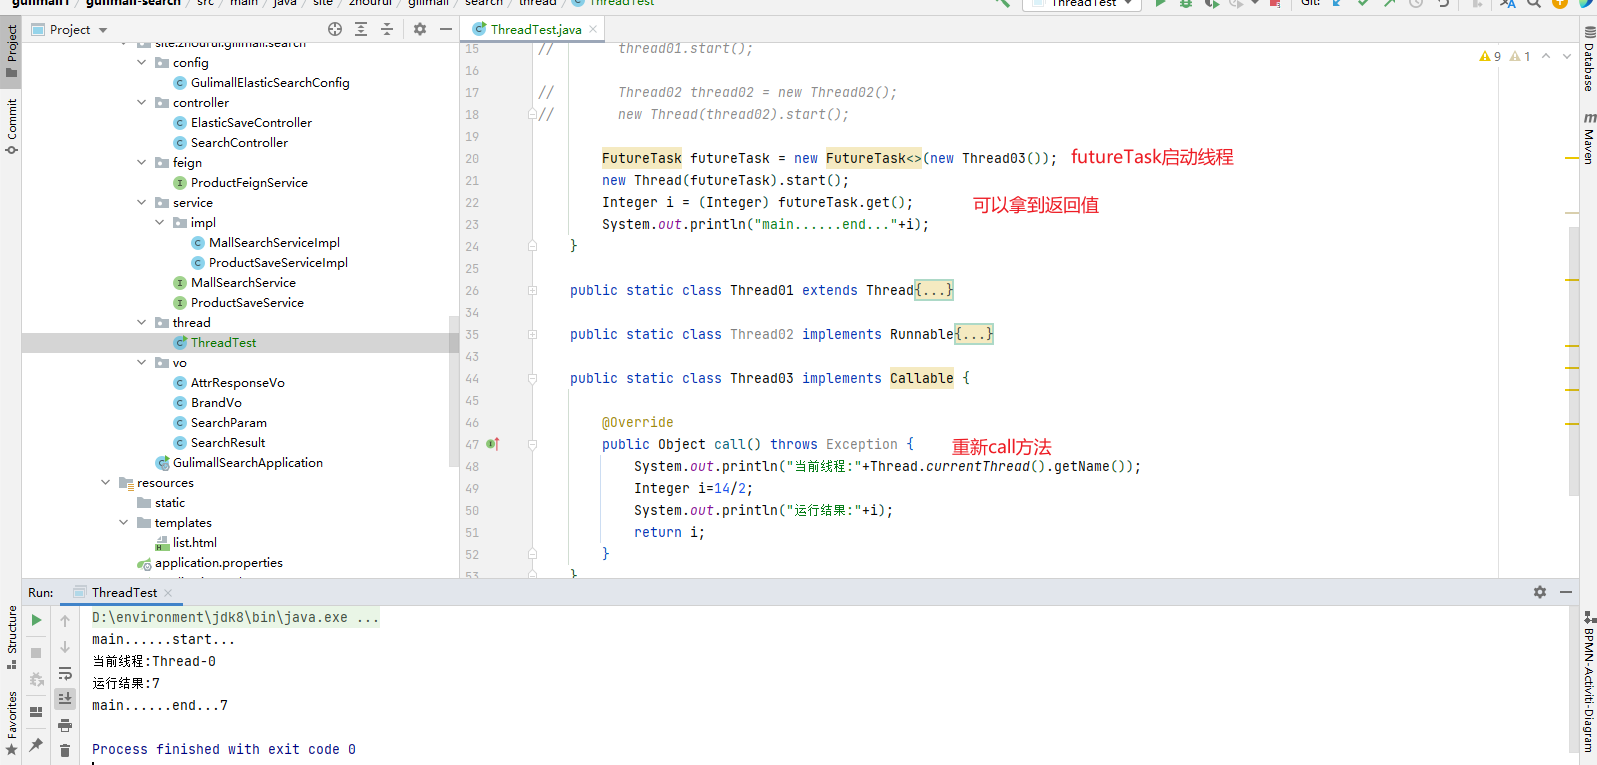
1.3.1 注意
实现callable的方法可以拿到返回值
FutureTask继承了Runnable
1.4 线程池
为什么要用线程池,不直接new Thread?
因为系统分配的内存是有限的。在高并发的环境下,如果有100w并发量,1个请求要开启10个异步任务,100w就需要1000w个线程,会导致系统崩溃
所以以后的业务都是用线程池
1.4.1 初始化线程池(方式一)
因为我们的一个系统必须只能有一个线程池(是这样吗?),所以要定义为静态
public static ExecutorService service = Executors.newFixedThreadPool(10);service有两个方法调用线程,一个是submit,一个是execute。submit有返回值,execute没有返回值
public static ExecutorService service = Executors.newFixedThreadPool(10);
    public static void main(String[] args) {
        service.execute(new Thread02());
    }
    public static class Thread01 extends Thread{
        @Override
        public void run() {
            System.out.println("当前线程:"+Thread.currentThread().getName());
            Integer i=10/2;
            System.out.println("运行结果:"+i);
        }
    }

    public static class Thread02 implements Runnable{
        @Override
        public void run() {
            System.out.println("当前线程:"+Thread.currentThread().getName());
            Integer i=12/2;
            System.out.println("运行结果:"+i);
        }
    }

    public static class Thread03 implements Callable {

        @Override
        public Object call() throws Exception {
            System.out.println("当前线程:"+Thread.currentThread().getName());
            Integer i=14/2;
            System.out.println("运行结果:"+i);
            return i;
        }
    }
}
总结:① 继承Thread 实现Runable 没有返回值,实现Callable接口 有返回值
②前三者都不能控制资源,只有线程池可以控制资源,性能稳定
1.4.2 初始化线程池(方式二)
三种方法,7大参数,4种拒绝策略
new ThreadPoolExecutor(corePoolSize, maximumPoolSize, keepAliveTime, TimeUnit unit,workQueue, threadFactory, handler);
1.4.2.1
七大参数
corePoolSize[5]:核心线程数,一直存在除非(alLowCoreThreadTimeOut我们给他设置过期时间) ];线程池,创建好以后就准备就绪
5个 Thread thread = new Thread(); thread.start( );
maximumPooLSize : [200]最大线程数量;控制资源
keepAliveTime:存活时间。如果当前的线程数量大于core数量且线程空闲大于指定的keepALiveTime就会释放空闲的线程(数量为:maximumPoolSize-corePoolSize)。
unit:时间单位
BLockingQueue<Runnable> workQueue:阻塞队列。如果任务有很多,就会将目前多的任务放在队列里面。只要有线程空闲,就会去队列里面取出新的任务继续执行。
threadFactory :线程的创建工厂。
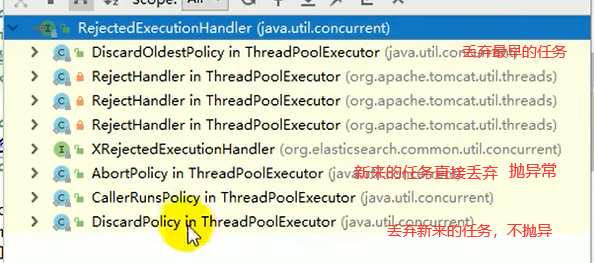
RejectedExecutionHandLer handLer:如果队列满了,按照我们指定的拒绝策略拒绝执行任务,下图是几种常见的拒绝策略,默认使用AbortPolicy
工作顺序:
1)、线程池创建,准备好core数量的核心线程,准备接受任务
1.1、core满了,就将再进来的任务放入阻塞队列中。空闲的core就会自己去阻塞队列获取 任 务执行;
1.2、阻塞队列满了,就直接开新线程执行,最大只能开到max指定的数量
1.3、max满了就用RejectedExecutionHandler拒绝任务
1.4、max都执行完成,有很多空闲.在指定的时间keepAliveTime以后,释放max-core这些线程
Q:—个线程池core 7;max 20 , queue: 50,100个并发进来怎么分配的;
core=7,所以7并发个会立即得到执行,阻塞队列长度是50,所以50个并发会进入队列,队列满了之后,再开13个线程,这时候达到了最大线程数。队列中13个并发就拿到这13个线程,队列空余13个位置,就是13个并发补上,最后剩下的30个就使用拒绝策略。如果不想丢弃可以使用CallRunsPolicy,直接同步调用方法
1.4.3 常见的4种线程池
1、newCachedThreadPool:核心线程数是0,如果空闲会回收所有线程【缓存线程池】
创建一个可缓存线程池, 如果线程池长度超过处理需要, 可灵活回收空闲线程, 若无可回收, 则新建线程。
2、newFixedThreadPool:核心线程数 = 最大线程数,【不回收】
创建一个定长线程池, 可控制线程最大并发数, 超出的线程会在队列中等待。
3、newScheduledThreadPool:定时任务线程池,多久之后执行【可提交核心线程数,最大线程数是Integer.Max】
创建一个定长线程池, 支持定时及周期性任务执行。
4、newSingleThreadPool:核心与最大都只有一个【不回收】,后台从队列中获取任务
创建一个单线程化的线程池, 它只会用唯一的工作线程来执行任务, 保证所有任务按照指定顺序(FIFO, LIFO, 优先级)执行。