Python第三方库 - Flask(python web框架)
1 Flask
1.1 认识Flask
Web Application Framework(Web应用程序框架)或简单的Web Framework(Web框架)表示一个库和模块的集合,使Web应用程序开发人员能够编写应用程序,而不必担心协议,线程管理等低级细节。
1.2 Pycharm安装与简单测试
1.2.1 安装
Pycharm安装Flask框架
File→Settings→Project: [project name]→Project Interpreter

1.2.2 简单测试
运行下面代码,打开http://127.0.0.1:5000的链接
from flask import Flask
# __name__:代表当前模块,app为类的实例
app = Flask(__name__)

# 创建一个路由和视图函数的映射
@app.route('/')
def hello_world():
   return 'Hello World'

if __name__ == '__main__':
   app.run()
   #app.run(host='0.0.0.0', port=5000)

1.2.3 Debug模式(热更新)
Debug 模式从控制台可以看见

Pycharm 专业版开启方法:
右上角的项目名称 →
Edit Configurations→ 勾选FLASK_DEBUG选项 → 重启项目
Pycharm 社区版开启方法:
# 开启Debug模式 运行时传递参数
app.run(debug=True)
1.2.4 社区版Pycharm建立Flask Project
| 文件夹 | 作用 |
|---|---|
static | 存放静态文件 |
templates | 存放模板文件 |

2 Flask模块的语法与使用
2.1 Flask路由与路由参数
2.1.1 路由
Flask 中的route() 装饰器用于将URL 绑定到函数,下面代码运行在http://127.0.0.1:5000/hello
@app.route('/hello')
def hello_world():
   return 'hello world'
application 对象的 a dd_url_rule() 函数也可用于将 URL 与函数绑定
from flask import Flask
app = Flask(__name__)

def hello_world():
   return 'hello world'

app.add_url_rule('/', 'hello', hello_world)
app.run()
2.1.2 路由参数(动态构建UrL)
通过向规则参数添加变量部分,可以动态构建
URL。
此变量部分标记为<variable-name>。
它作为关键字参数传递给与规则相关联的函数。
from flask import Flask
app = Flask(__name__)

@app.route('/hello/<name>')
def hello_name(name):
   return 'Hello %s!' % name

@app.route('/blog/<int:postID>')
def show_blog(postID):
   return 'Blog Number %d' % postID

@app.route('/rev/<float:revNo>')
def revision(revNo):
   return 'Revision Number %f' % revNo

if __name__ == '__main__':
   app.run(debug = True)

2.1.3 URL构建
url_for()函数用于动态构建特定函数的URL
语法
url_for(函数名,关键字参数)

举例:
from flask import Flask, redirect, url_for
app = Flask(__name__)
@app.route('/world')
def hello_world():
   return 'Hello  world!!!'


@app.route('/test/<str>')
def hello_test(str):
   return '%s !!!' % str


@app.route('/other/<oth>')
def hello_other(oth):
   if oth =='world':
      return redirect(url_for('hello_world'))
   else:
      return redirect(url_for('hello_test',  str= '随便拉'))


if __name__ == '__main__':
   app.run(debug = True)

代码解析:
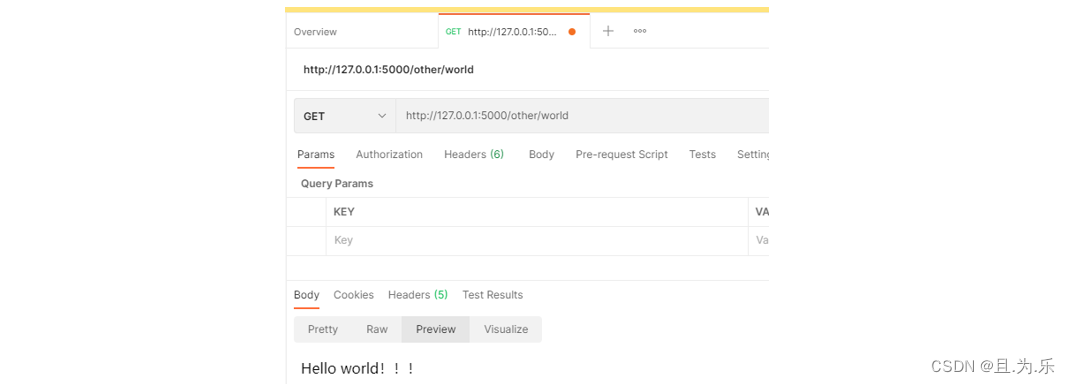
在postman输入http://127.0.0.1:5000/other/world网址,如果查接收的参数与world匹配,则重定向hello_world()函数
否则:
重定向到hello_test()函数

2.2 Flask与web交互
2.2.1 Flask和表单
html代码

<style>
    form{
        margin:300px auto;
        display:block;
    }
</style>
<body>
      <form action="http://localhost:5000/test" method="post" style="width:300px;height:30px">
        <div class="">
          <label for="exampleFormControlTextarea1" class="form-label">Example textarea</label>
          <textarea class="form-control" id="exampleFormControlTextarea1" rows="3" name="txt"></textarea>
        </div>
         <input class="btn btn-primary" type="submit" value="Submit">
      </form>
</body>

py代码

from flask import Flask, redirect, url_for, request, render_template

app = Flask(__name__)

@app.route('/page')
def index():
    return render_template("1.html")

@app.route('/success/<name>')
def success(name):
    return 'welcome %s' % name

@app.route('/test',methods = ['POST', 'GET'])
def test():
    if request.method == 'POST':
        txt = request.form['txt']
        print(txt)
        return redirect(url_for('success', name=txt))
    else:
        return redirect(url_for('index'))

if __name__ == '__main__':
    app.run(debug=True)

2.2.2 Flask模板
三种常用的定界符:
{{ ... }} 用来标记变量。
{% ... %} 用来标记语句,比如 if 语句,for 语句等。
{# ... #} 用来写注释。
render_template 方法渲染的模板需要在 templates 文件夹下
hello.html

<!DOCTYPE html>
<html lang="en">
<head>
    <meta charset="UTF-8">
    <title>Title</title>
</head>
<body>
我的模板html内容
  <br />{{ my_str }}
  <br />{{ my_int }}
  <br />{{ my_array }}
</body>
</html>

test.py

from flask import Flask, redirect, url_for, request, render_template

app = Flask(__name__)

@app.route('/')
def index():
    # 往模板中传入的数据
    my_str = 'Hello Word'
    my_int = 10
    my_array = [3, 4, 2, 1, 7, 9]
    return render_template('hello.html',
                           my_str = my_str,
                           my_int = my_int,
                           my_array = my_array
                           )

if __name__ == '__main__':
    app.run(debug=True)

2.2.3 静态文件
例如引入static 文件下的 1.css,在 html 中写入下面的代码:
<link rel="stylesheet" href="{{ url_for('static', filename='1.css') }}" type="text/css">
3 参考文档
[1] W3CSchool教程
[2] 社区版Pycharm自建Flask项目
[3] Flask Request对象
[4] 静态文件引用
[5] SQLAlchemy