JSP自定义标签
前言:已经有好久没有和大家分享知识,今天我要与大家分享的知识是继反射之后的JSP自定义标签知识。
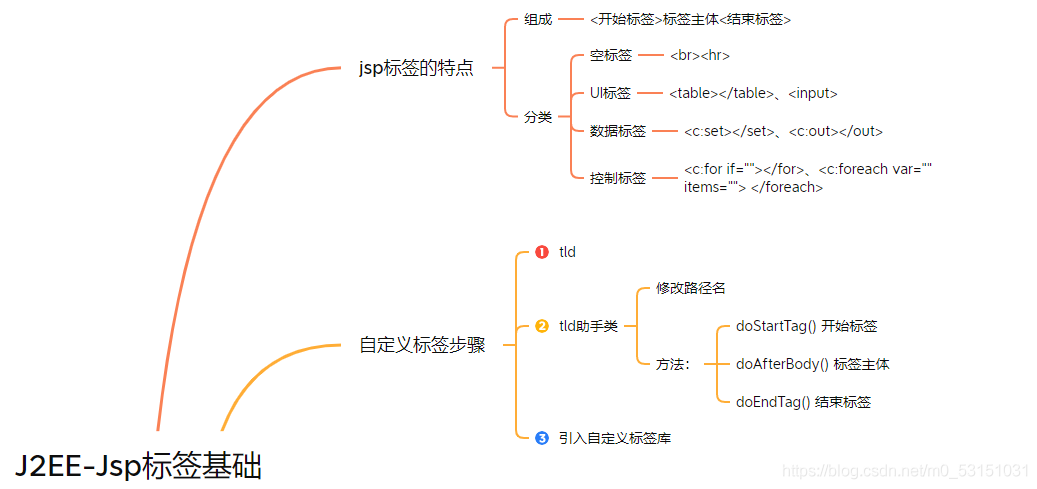


上面三张图是自己绘制的三张的思维导图。可以通过思维导图来进入我要跟大家分享的知识。
一、JSP的特点:
1、jsp的构成:开始标签、标签主体、结束标签 例如: <z:demo1>demo1</z:demo1>2
2、标签的分类:标签的分类主要是有四种
第一种:空标签 例如:<br>、<hr>
第二种:数据标签 例如:<c:set var="name" value="zs"></c:set>
<c:out value="${ name }"></c:out>
第三种:控制标签:<c:forEach items="" var=""></c:forEach>
<c:if test=""></c:if>
第四种:UI标签:<table><tr></tr></table>、<input>
二、自定义标签的步骤:
第一步:自己创建一个tld类,把跳转的域名改成自己想要跳转的路径。
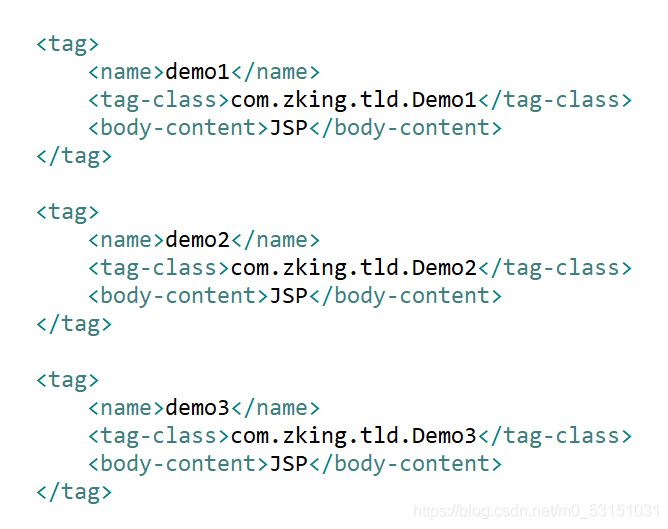
第二步:新建一个tld助手类,这里面要写标签对应的属性。

第三步:引用自己创建的JSP标签。

三:JSP生命周期:
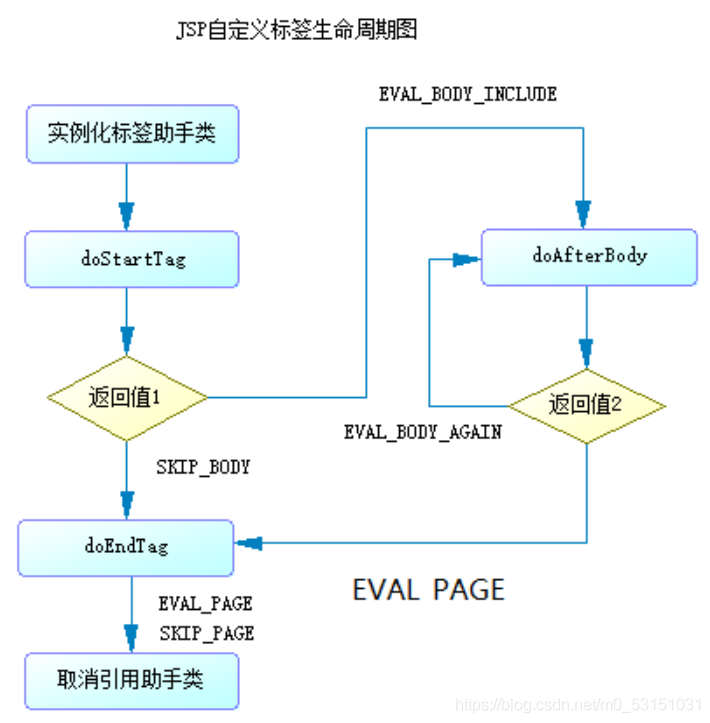
JSP标签生命周期一共有三条路线:
1、 路线一:doStartTag--->返回值是(SkipBody)--->doEndTag
2、 路线二:路线二:doStartTag--->返回值是(EAVL_BODY_INCLUDE)--- >doAfterBody--->返回值是(EAVL_PAGE)--->doEndTag
3、路线三:doStartTag--->返回值是(EAVL_BODY_INCLUDE)--->doAfterbody--->返回值(EAVL_Body_Again)--->doAfterBody(死循环,退出条件是案列五的foreach退出)--->doEndTag
证明路线一的正确性:只要在jsp界面上打出了Demo1_doStartTag进来了以及Demo1_doEndTag进来了,就可以说明路线一正确。

验证路线二:只要jsp界面上打印出了Demo2_doStartTag()进来了、Demo2_doAfterBody()进来了以及Demo2_doEndTag()进来了就可以验证路线二的正确性

验证路线三: 只要jsp界面上打印出了Demo3_doStartTag()进来了、Demo3_doAfterBody(),一直点循环按钮就一直是doafterbody()

结果在下面:

验证路线三的结果:因为EVAL_BODY_AGAIN, 所以一直输出Demo3_doAfterBody()进来了,只有当自己按红按钮时,才会停止。

接下来有六个案列,其中有五个是来验证三条路线的;
1、案例一与案例二:验证路线一和路线二,开发if标签。
下面是index界面中的代码:
<z:if test="true">输出</z:if>
	<z:if test="false">不输出</z:if>
新建一个IfTag类,里面写一个验证test属性。
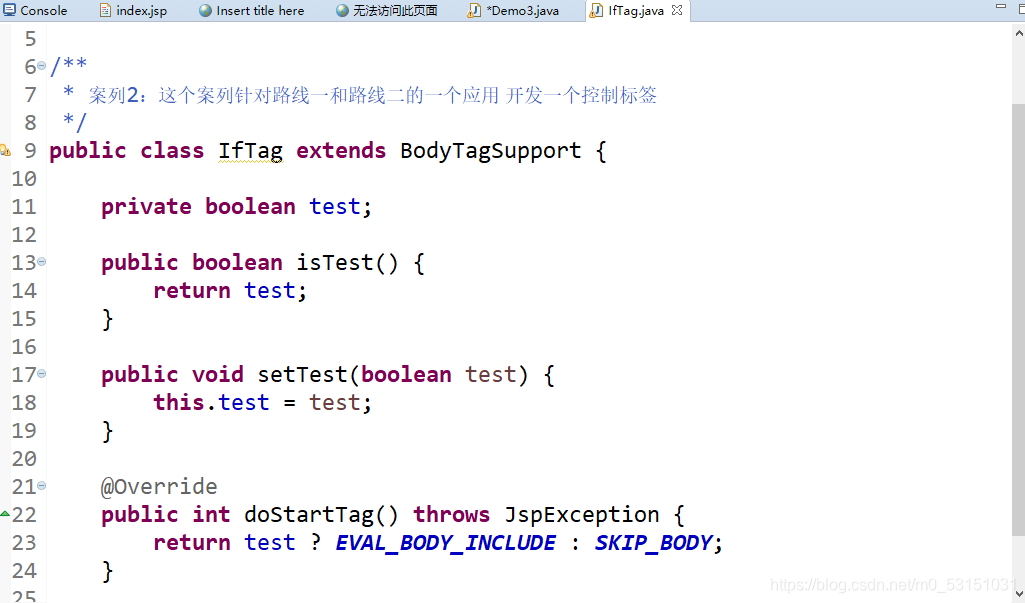
下面是在tld类中的写的if标签以及if标签的属性。

输出结果在上面,证明路线一正确。
2、 接下来是案例三和案例四:目的:验证路线一(开发数据标签set/out标签),需要借 助jspwrite来输出。
1、out类:
public class OutTag extends BodyTagSupport {

	private Object value;

	public Object getValue() {
		return value;
	}

	public void setValue(Object value) {
		this.value = value;
	}

	@Override
	public int doStartTag() throws JspException {
		JspWriter out = pageContext.getOut();
		try {
			out.print(value);
		} catch (IOException e) {
			e.printStackTrace();
		}

		return super.doStartTag();
	}

}
2、set类:
private String var;
	private String value;

	public String getVar() {
		return var;
	}

	public void setVar(String var) {
		this.var = var;
	}

	public String getValue() {
		return value;
	}

	public void setValue(String value) {
		this.value = value;
	}

	@Override
	public int doStartTag() throws JspException {
		// 将value值保存var变量中
		// jsp传递name给var,传递zs给value;
		// 需要将zs传递给name
		pageContext.setAttribute(var, value);
		return super.doStartTag();
	}
3、tld类:
<tag>
		<name>set</name>
		<tag-class>com.zking.tld.SetTag</tag-class>
		<body-content>JSP</body-content>
		<attribute>
			<!-- 自定义标签的成员变量名称。 -->
			<name>var</name>
			<!-- 该成员变量是否必传 -->
			<required>true</required>
			<!-- 是否支持EL表达式 -->
			<rtexprvalue>false</rtexprvalue>
		</attribute>
		<attribute>
			<!-- 自定义标签的成员变量名称。 -->
			<name>value</name>
			<!-- 该成员变量是否必传 -->
			<required>true</required>
			<!-- 是否支持EL表达式 -->
			<rtexprvalue>true</rtexprvalue>
		</attribute>
	</tag>

	<tag>
		<name>out</name>
		<tag-class>com.zking.tld.OutTag</tag-class>
		<body-content>JSP</body-content>
		<attribute>
			<!-- 自定义标签的成员变量名称。 -->
			<name>value</name>
			<!-- 该成员变量是否必传 -->
			<required>true</required>
			<!-- 是否支持EL表达式 -->
			<rtexprvalue>true</rtexprvalue>
		</attribute>
	</tag>
接下来看jsp界面的代码:
 <z:set value="zs" var="name"></z:set>
	<z:out value="${ name }"></z:out>
输出结果:

输出结果为zs,验证正确。
3、案例五:开发控制标签:foreach标签来验证路线三:
1、foreachtld助手类:
public class ForEachTag extends BodyTagSupport {

	private String var;
	private List<Object> items = new ArrayList<Object>();

	public String getVar() {
		return var;
	}

	public void setVar(String var) {
		this.var = var;
	}

	public List<Object> getItems() {
		return items;
	}

	public void setItems(List<Object> items) {
		this.items = items;
	}

	@Override

	public int doStartTag() throws JspException {
		// 在此处保存迭代器,供doafterbody中使用。
		Iterator<Object> it = items.iterator();
		pageContext.setAttribute("it", it);
		return EVAL_BODY_INCLUDE;
	}

	@Override
	public int doAfterBody() throws JspException {
         Iterator<Object> it = (Iterator<Object>) pageContext.getAttribute("it");
         if(it.hasNext()) {
        	 pageContext.setAttribute(var, it.next());
        	 pageContext.setAttribute("it", it);
        	 return EVAL_BODY_AGAIN;
         }else {
        	 return EVAL_PAGE;
         }
	}

	@Override
	public int doEndTag() throws JspException {
		// TODO Auto-generated method stub
		return super.doEndTag();
	}

}
大家可以想象foreach遍历,有一个指针在一个一个的往下找出东西,当第一次使用时,要先保存迭代器,指针每遍历一次时,要保存指针所在的位置。
2、tld类:
<tag>
		<name>forEach</name>
		<tag-class>com.zking.tld.ForEachTag</tag-class>
		<body-content>JSP</body-content>
		<attribute>
			<!-- 自定义标签的成员变量名称。 -->
			<name>var</name>
			<!-- 该成员变量是否必传 -->
			<required>true</required>
			<!-- 是否支持EL表达式 -->
			<rtexprvalue>false</rtexprvalue>
		</attribute>
		<attribute>
			<!-- 自定义标签的成员变量名称。 -->
			<name>items</name>
			<!-- 该成员变量是否必传 -->
			<required>true</required>
			<!-- 是否支持EL表达式 -->
			<rtexprvalue>true</rtexprvalue>
		</attribute>
	</tag>
3、jsp界面:
	<%
		List<User> users = new ArrayList<User>();
		users.add(new User("u001", "zs"));
		users.add(new User("u002", "ls"));
		users.add(new User("u003", "ww"));
		users.add(new User("u004", "ml"));
		request.setAttribute("users", users);
	%>
	<z:forEach items="${ users }" var="u">
          ${ u.id }:${ u.name }<br>
	</z:forEach>
输出结果:验证路线三正确,什么时候走出for循环,手动写代码,在doAfterBody()中判断条件中,如果还有下一个值,返回值就是:EVAL_BODY_AGAIN,如果没有下一个值,返回值就是:EVAL_PAGE。

4.案列六:select标签,用来减少之前增删改查中代码量。
1、tld类:
<tag>
		<name>select</name>
		<tag-class>com.zking.tld.SelectTag</tag-class>
		<body-content>JSP</body-content>
		<attribute>
			<!-- 自定义标签的成员变量名称。 -->
			<name>items</name>
			<!-- 该成员变量是否必传 -->
			<required>true</required>
			<!-- 是否支持EL表达式 -->
			<rtexprvalue>true</rtexprvalue>
		</attribute>


		<attribute>
			<!-- 自定义标签的成员变量名称。 -->
			<name>textKey</name>
			<!-- 该成员变量是否必传 -->
			<required>true</required>
			<!-- 是否支持EL表达式 -->
			<rtexprvalue>false</rtexprvalue>
		</attribute>


		<attribute>
			<!-- 自定义标签的成员变量名称。 -->
			<name>textVal</name>
			<!-- 该成员变量是否必传 -->
			<required>true</required>
			<!-- 是否支持EL表达式 -->
			<rtexprvalue>false</rtexprvalue>
		</attribute>


		<attribute>
			<!-- 自定义标签的成员变量名称。 -->
			<name>headerTextKey</name>
			<!-- 该成员变量是否必传 -->
			<required>false</required>
			<!-- 是否支持EL表达式 -->
			<rtexprvalue>false</rtexprvalue>
		</attribute>


		<attribute>
			<!-- 自定义标签的成员变量名称。 -->
			<name>headerTextVal</name>
			<!-- 该成员变量是否必传 -->
			<required>false</required>
			<!-- 是否支持EL表达式 -->
			<rtexprvalue>false</rtexprvalue>
		</attribute>


		<attribute>
			<!-- 自定义标签的成员变量名称。 -->
			<name>selectedVal</name>
			<!-- 该成员变量是否必传 -->
			<required>false</required>
			<!-- 是否支持EL表达式 -->
			<rtexprvalue>false</rtexprvalue>
		</attribute>


	</tag>
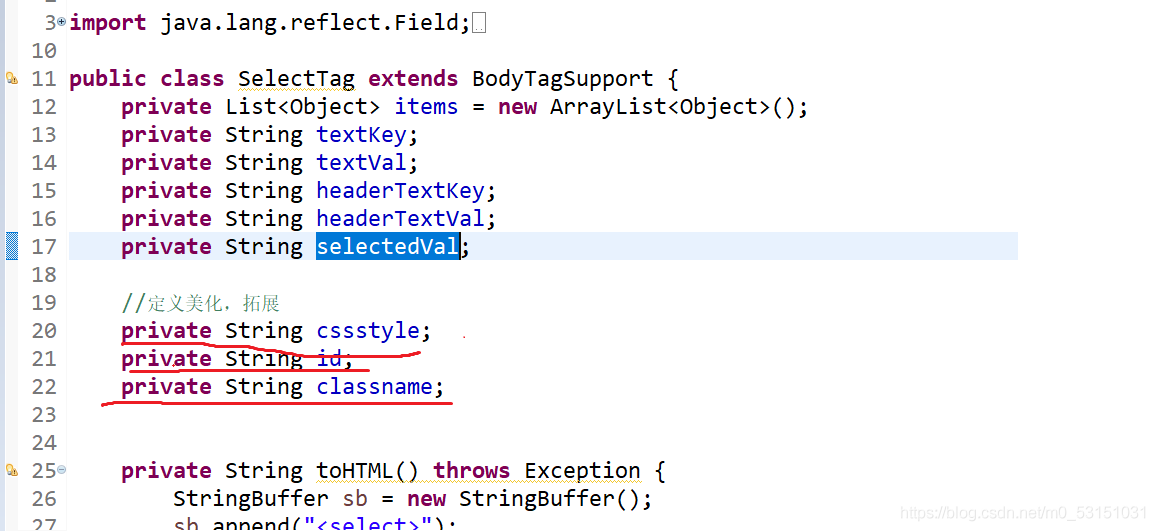
2、tld助手类:一个有五个属性:分别是:textKey、textVal、headerTextKey、headerTextVal、selectedVal,分别对应着:option中的value,option中的内容,开始没有选择时的属性value,开始没有选择时的内容,以及回县的值(用在修改时显示)
public class SelectTag extends BodyTagSupport {
	private List<Object> items = new ArrayList<Object>();
	private String textKey;
	private String textVal;
	private String headerTextKey;
	private String headerTextVal;
	private String selectedVal;

	//定义美化,拓展
	private String cssstyle;
	private String id;
	private String classname;


	private String toHTML() throws Exception {
		StringBuffer sb = new StringBuffer();
		sb.append("<select>");
		if (headerTextVal != null && !"".equals(headerTextVal)) {
			sb.append("<option value='" + headerTextKey + "'>" + headerTextVal + "</option>");
		}
		if (items.size() > 0) {
			for (Object obj : items) {
				Field textKeyfield = obj.getClass().getDeclaredField(textKey);
				textKeyfield.setAccessible(true);
				System.out.println("----------");
				sb.append("<option value='" + textKeyfield.get(obj) + "'>" + PropertyUtils.getProperty(obj, textVal)
						+ "</option>");
			}
		}
		sb.append("</select>");
		return sb.toString();
	}


	public String getCssstyle() {
		return cssstyle;
	}


	public void setCssstyle(String cssstyle) {
		this.cssstyle = cssstyle;
	}


	public String getId() {
		return id;
	}


	public void setId(String id) {
		this.id = id;
	}


	public String getClassname() {
		return classname;
	}


	public void setClassname(String classname) {
		this.classname = classname;
	}


	public List<Object> getItems() {
		return items;
	}

	public void setItems(List<Object> items) {
		this.items = items;
	}

	public String getTextKey() {
		return textKey;
	}

	public void setTextKey(String textKey) {
		this.textKey = textKey;
	}

	public String getTextVal() {
		return textVal;
	}

	public void setTextVal(String textVal) {
		this.textVal = textVal;
	}

	public String getHeaderTextKey() {
		return headerTextKey;
	}

	public void setHeaderTextKey(String headerTextKey) {
		this.headerTextKey = headerTextKey;
	}

	public String getHeaderTextVal() {
		return headerTextVal;
	}

	public void setHeaderTextVal(String headerTextVal) {
		this.headerTextVal = headerTextVal;
	}

	public String getSelectedVal() {
		return selectedVal;
	}

	public void setSelectedVal(String selectedVal) {
		this.selectedVal = selectedVal;
	}

}
3、JSP代码:
<z:select textVal="name" items="${ users }" textKey="id"></z:select>四:select样式优化类:
